Planning and Building Microsoft SQL Server on Amazon RDS

Planning and building SQL Server in RDS doesn’t have to scare you. It’s actually pretty easy and in this post will go over planning a SQL Server deployment in RDS, creating SQL Server in RDS, and last but not least configuring the new instance of SQL Server.

Let’s jump in…

Planning the deployment is important because if your SQL Server instance needs a feature that RDS doesn’t support, then RDS isn’t an option. Here are a few, but you can get the full list here: https://docs.aws.amazon.com/AmazonRDS/latest/UserGuide/CHAP_SQLServer.html

  • Log Shipping
  • SSRS, SSIS, SSAS, Data Quality Services, or Master Data Services
  • Database Mail
  • Maintenance Plans
  • SQL Server Audit
  • FILESTREAM support
  • Policy-Based Management
  • Replication

RDS also has some limitations that don’t exist with an on-premise SQL Server. Let’s look at a few:

  • As of this post, Amazon only supports SQL 2017 RTM, SQL Server 2016 SP2, SQL Server 2014 SP2, SQL Server 2012 SP4, and SQL Server 2008R2 SP3
  • You can only have a maximum of 30 databases per instance and 16TB of storage.
  • Linked Servers
  • Windows Authentication (must use AWS Managed Microsoft AD)

Again, the full list can be found here: https://docs.aws.amazon.com/AmazonRDS/latest/UserGuide/CHAP_SQLServer.html          

Pricing

Once you can verify that your environment will run properly in RDS you’ll need to look at the pricing model. When you setup RDS for SQL Server, the software license is included. AWS used to have a program called “Bring your own license” or “BYOL”, which allowed you to use a license that was already bought from Microsoft via an agreement or other. This has been rumored to expire on June 30, 2019. The software license that is included means that you don’t need to purchase SQL Server licenses separately. AWS holds the license for the SQL Server database software. Amazon RDS pricing includes the software license, underlying hardware resources, and Amazon RDS management capabilities. The pricing will depend on the selections such as size, edition, etc.

The following editions are supported in RDS:

  • Enterprise
  • Standard
  • Web
  • Express

Notice, Developer Edition is not included with RDS and Web Edition supports only public and internet-accessible webpages, websites, web applications, and web services.

Instance Type

You can also choose from On-demand or reserved instances. On-Demand DB Instances let you pay for compute capacity by the hour your DB Instance runs with no long-term commitments. This frees you from the costs and complexities of planning, purchasing, and maintaining hardware and transforms what are commonly large fixed costs into much smaller variable costs. This is good for development environments where you can power on and off the server as it’s being used.

Reserved Instances give you the option to reserve a DB instance for a one or three year term and in turn receive a significant discount compared to the On-Demand Instance pricing for the DB instance. Amazon RDS provides three RI payment options — No Upfront, Partial Upfront, All Upfront — that enable you to balance the amount you pay upfront with your effective hourly price.

You can see more about on-demand vs reserved instances and pricing here: https://aws.amazon.com/rds/sqlserver/pricing/   

RDS provides a selection of instance types optimized to fit different relational database use cases. Instance types comprise varying combinations of CPU, memory, storage, and networking capacity and give you the flexibility to choose the appropriate mix of resources for your database. Each instance type includes several instance sizes, allowing you to scale your database to the requirements of your target workload. View more details here: https://aws.amazon.com/rds/instance-types/       

Storage

Another item to look at when planning your deployment is storage. RDS uses Amazon Elastic Block Store (Amazon EBS) volumes for database and log storage. Depending on the amount of storage requested, Amazon RDS automatically stripes across multiple Amazon EBS volumes to enhance performance.

RDS offers three different storage types:

General Purpose SSD – also called gp2, this storage type offers cost-effective storage that can be used for a broad range of different workloads. These volumes deliver single-digit millisecond latencies and the ability to burst to 3,000 IOPS for extended periods of time. I would recommend putting small to medium sized databases on this type.

Provisioned IOPS – This storage type is designed for I/O intensive workloads, particularly database workloads that require low I/O latency and consistent throughput. This is also built on SSD and targeted for IO intensive, high performance databases. Cost wise, this is the highest of the three storage types.

Magnetic – This storage type is mostly used for backward compatibility. Amazon recommends using gp2 or Provisioned IOPS for any new builds. This is ideal for test and dev environments when performance isn’t a concern. This is the cheapest of the three storage types.

See more about storage here: https://docs.aws.amazon.com/AmazonRDS/latest/UserGuide/CHAP_Storage.html     

Network

One more item to consider when planning the deployment is network connectivity. Applications will more than likely need to connect to your RDS environment so there are a few import concepts to look at it.

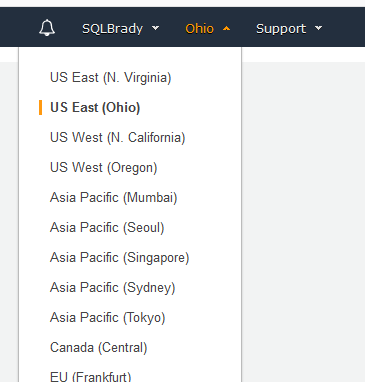
Availability Zones – this is simply a data center in an AWS region. The following AWS regions exist.
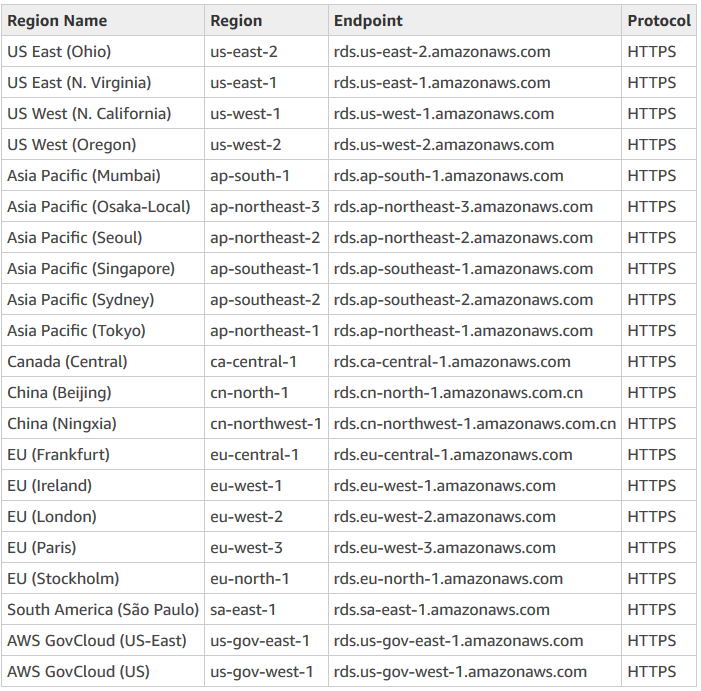
RDS Availability Zones

Virtual Private Cloud – also called VPC, this is an isolated virtual network that can span multiple Availability Zones. It’s used to group different types of resources to the network that need to talk to each other.

Virtual Private Cloud – also called VPC, this is an isolated virtual network that can span multiple Availability Zones. It’s used to group different types of resources to the network that need to talk to each other.

DB Subnet Group – this is a collection of subnets inside a VPC that contains the RDS instance addresses. See more about VPC and DB subnet groups here: https://docs.aws.amazon.com/AmazonRDS/latest/UserGuide/USER_VPC.WorkingWithRDSInstanceinaVPC.html

Create SQL Server RDS via AWS Console

Now that we’ve outlined some of the deployment planning tasks, let’s build an instance through the AWS console.

Once inside the console, we’ll click on RDS under the Database heading:
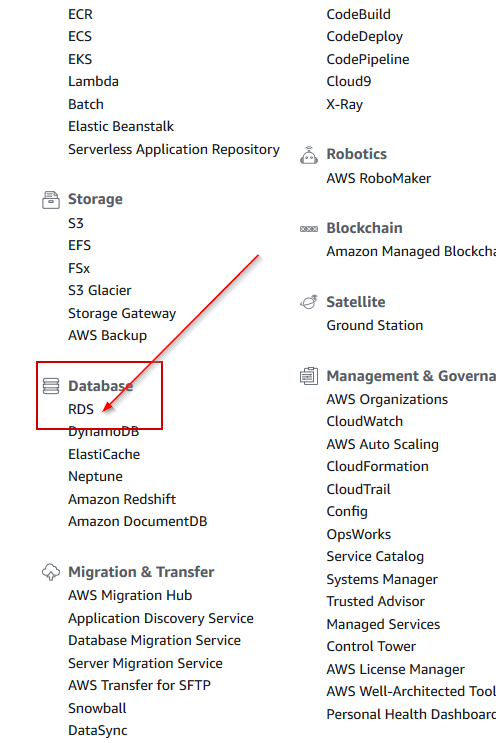
RDS

Once we are on the home page for RDS, we can click Create Database under Get Started. There’s also info for Pricing and costs and some documentation on getting started:
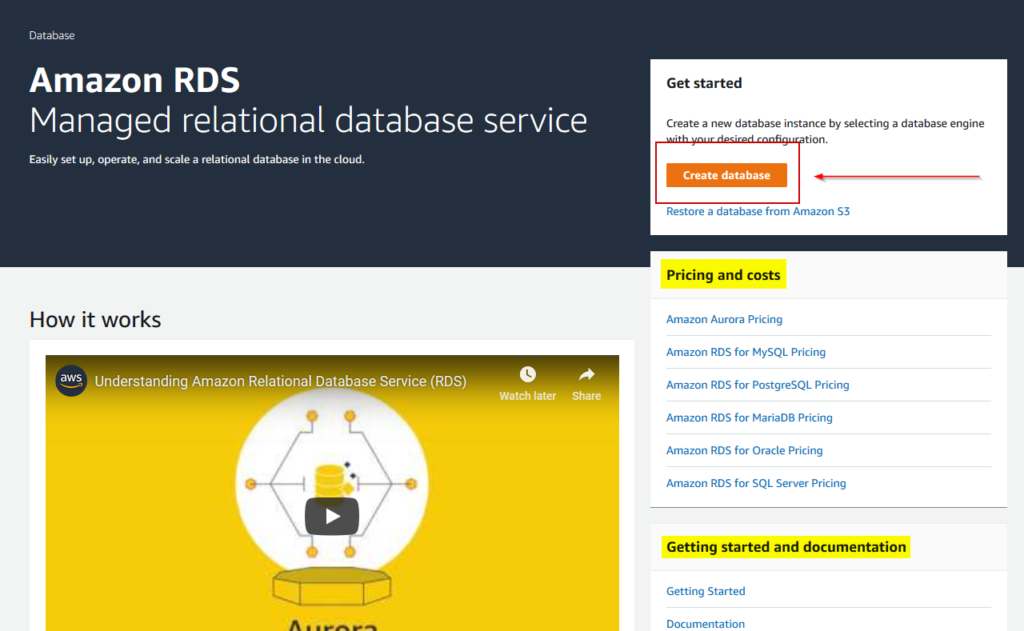
RDS Homepage

Notice in the top right corner is the Availability Zone in which you are logged into. In my case, I’m logged into US East (Ohio) since I’m on the Central Time Zone and Ohio is located closer to me than any other zone:

RDS Availability Zone (selected)

Back to the Select Engine page. For this post, I’m going to install Microsoft SQL Server Express, but you can see the other database engine platforms that are available and the associated editions:
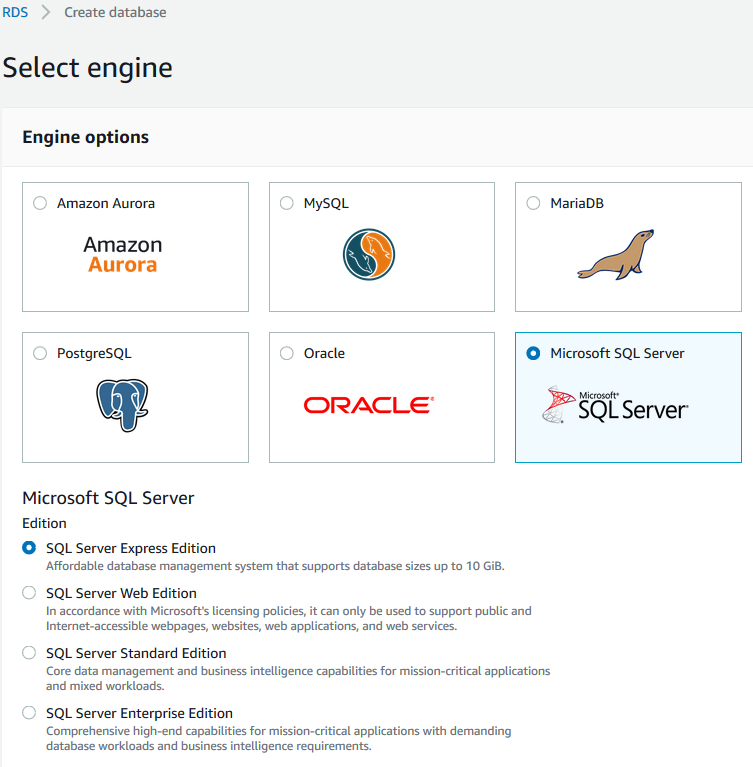
RDS Database Platforms

Next page we can see some of our database details. There are all items we discussed in the planning deployment section above. License model, DB engine version, DB instance class, Time Zone, Storage Type and allocated storage are all configurable on this page. Below are my selections:
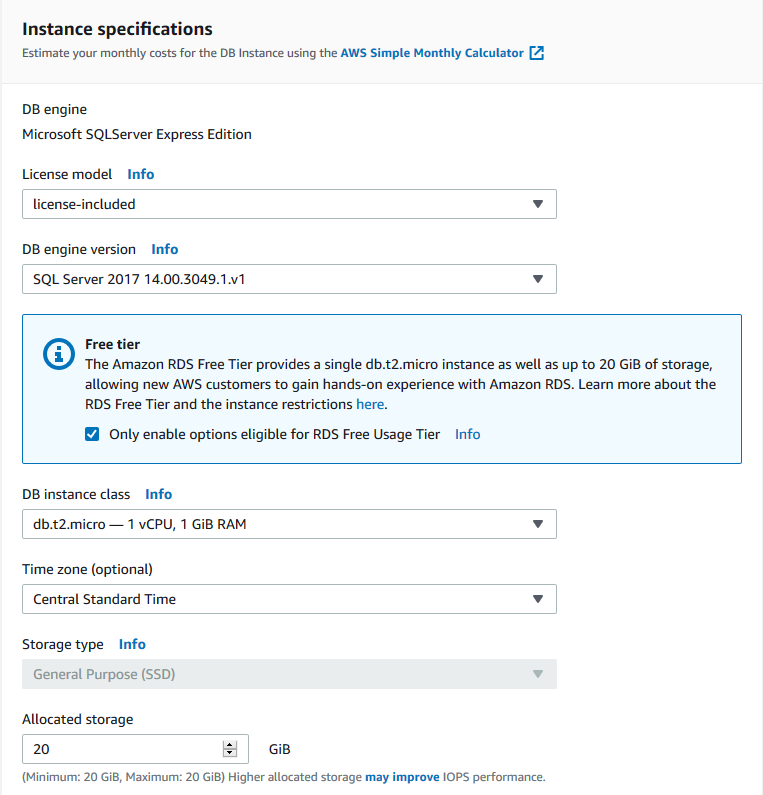
RDS SQL Instance Specifications

Scroll down to Settings header and configure the DB instance identifier, Master username and password. The DB instance identifier is a unique name for your DB instances across the current region. For this RDS instance I’ll name it SQLFreelancer:
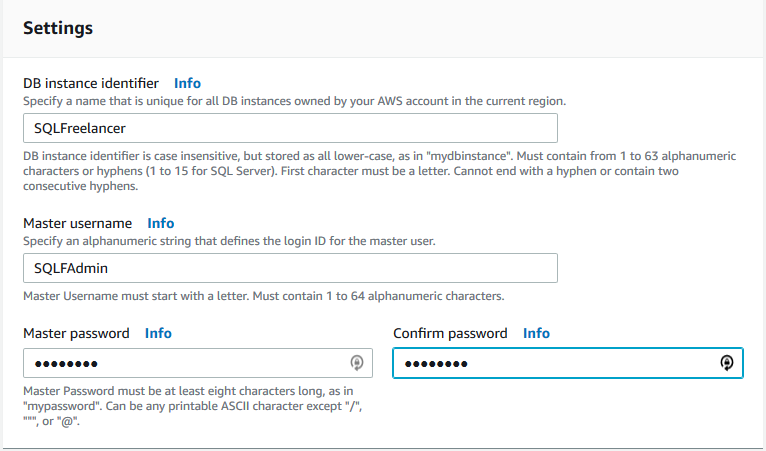
RDS Database Identifiers

On the Advanced Settings page we’ll configure Network and Security, Windows Authentication, Database Options such as port number, Encryption (where available), Backup retention, Monitoring, Performance Insights, Maintenance options, and Deletion protection. I’m going to choose all the defaults for this post, but this is a page where you want to make sure you choose what is best for your environment.
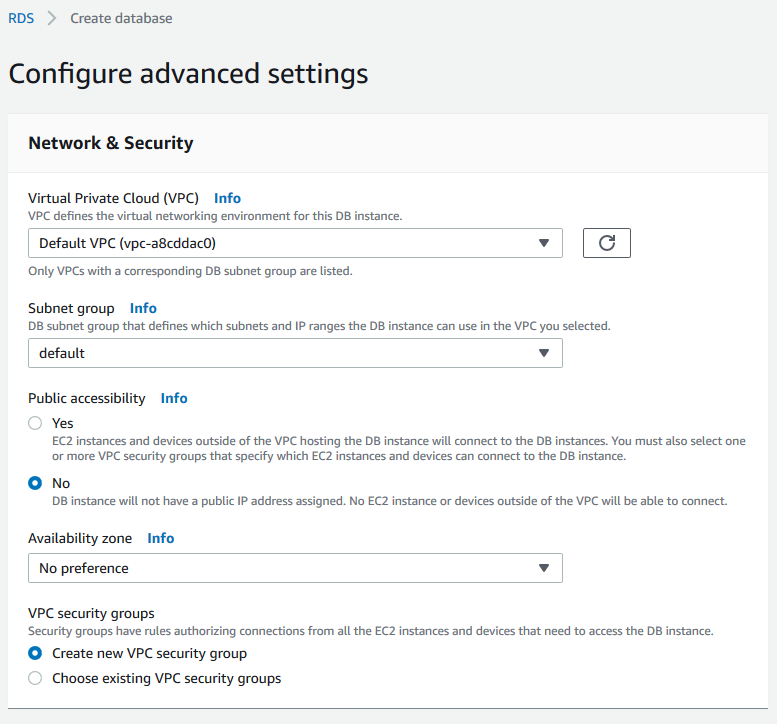
RDS Database Advanced Settings

Once you are finished on the Advanced Settings page, click Create Database.

Now how easy was that? Creating a new DB instance took about 2 minutes. Once your instance is created let’s click on View DB Instance details:
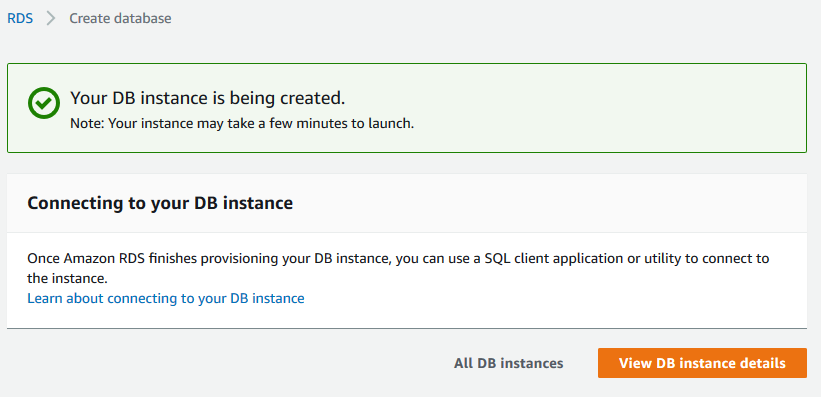
The details page gives you all sorts of info about your instance:
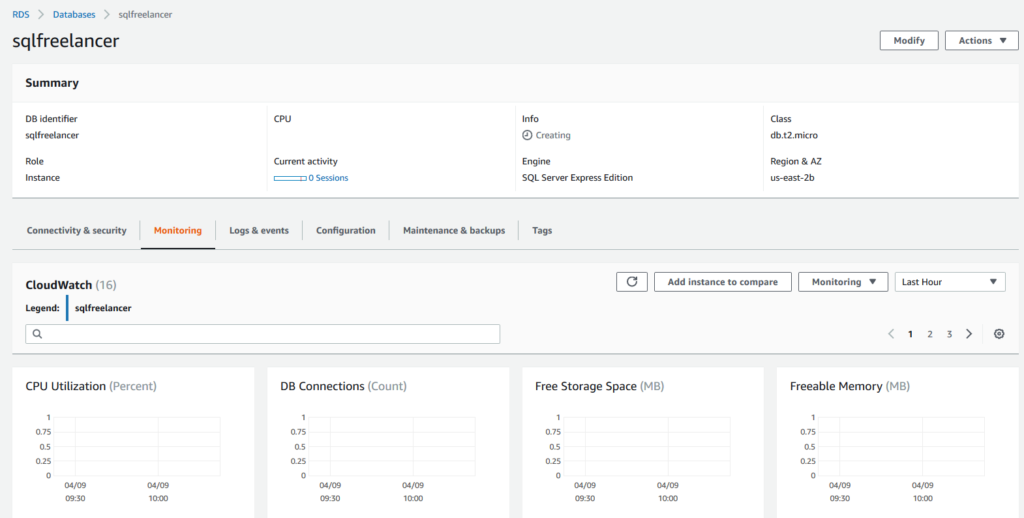
RDS Database Summary

Microsoft SQL Server on Amazon RDS in a Nutshell

As defined by Amazon, Amazon Relational Database Service (Amazon RDS) makes it easy to set up, operate, and scale a relational database in the cloud. It provides cost-efficient and resizable capacity while automating time-consuming administration tasks such as hardware provisioning, database setup, patching and backups. It frees you to focus on your applications so you can give them the fast performance, high availability, security and compatibility they need.

RDS is also referred to as a Database as a Service (DbaaS) or Platform as a Service (PaaS) not to be confused with Infrastructure as a Service (IaaS) which we’ll discuss in the next paragraph.

DbaaS vs. IaaS

DbaaS IaaS
You can choose any DB platform such as Oracle, MySQL, SQL Server, Amazon Aurora, PostgreSQL, and MariaDB You create a Virtual Machine and install OS and DB platform such as SQL Server
DbaaS takes care of backups, High Availability, Patching, OS, underlying hardware Iaas will only take care of the VM host layer and it’s hardware. You will need to manage patching, HA, security, etc. This is essentially like an on premise server.

Being an Operational DBA, there are a few tasks that RDS will take over freeing up time for the DBA to focus on other things. Some of those tasks include the following:

  • Backups: RDS will continuously take backups and allow point in time restore capabilities. We no longer have to worry about disk space or archiving backups to another location.
  • HA: RDS can automatically setup mirroring to another data center which allows for redundancy of databases.
  • Patching: RDS will automatically patch your SQL Server based on a maintenance window defined by you.
  • Add Resources such as CPU/Memory: RDS can increase CPU or Memory on demand as opposed to managing an on premise where the server might need downtime and you would have to orchestrate the change with Server Administrators.
  • Upgrade: With a push of a button you can automatically upgrade SQL Server and easily roll back if necessary.
  • Monitoring: Instead of buying a third party monitoring tool and running through the setup RDS provides a service called CloudWatch that can easily tap into SQL Server and alert when things go wrong.

Wow! All of these items make managing a SQL Server much easier for a DBA right? Do you even need a DBA if you’re running RDS? Of course you do! While it does make some tasks easier for a DBA, RDS will not do the following:

  • Write queries, tune queries, test queries: RDS has no knowledge about the data in each DB. Only a DBA knows the application and business processes to write and tune queries.
  • Manage DB security, change control, configuration settings: Only a DBA familiar with all of the procedures of his/her company can really make sure the environment is secure, that all changes are being documented, and that a specific configuration applies to what the databases are supposed to do.
  • Tune indexes or maintenance: Again, only the DBA knows what databases might need indexes or aren’t using specific indexes. You also know when to run maintenance procedures.

Now that we’ve discussed some of the pros and cons, why do businesses use DbaaS?

The speed of provisioning increases business value because instead of waiting weeks to bring a server online including purchasing software, servers, licenses, managing resources, etc. you can click a few buttons in the Amazon console and have a fresh SQL Server online in a matter of minutes.

The automation of regular tasks means there’s less possibility of human mistake and less hours spent by the admins patching and managing certain parts of the servers, which means no more late nights. Employees can now spend more time query tuning, deploying new functionality, and making sure the performance is the best. All of this leads to increased revenue for the business.

Create AWS Windows VM

I wrote a post a few weeks about creating an Azure Windows VM so wanted to follow up with a post about creating an AWS Windows VM to compare both platforms. I like Azure and AWS so I’m not going to throw either one under the bus. Both are great and easy to use.

Let’s create an AWS (EC2) Windows VM.

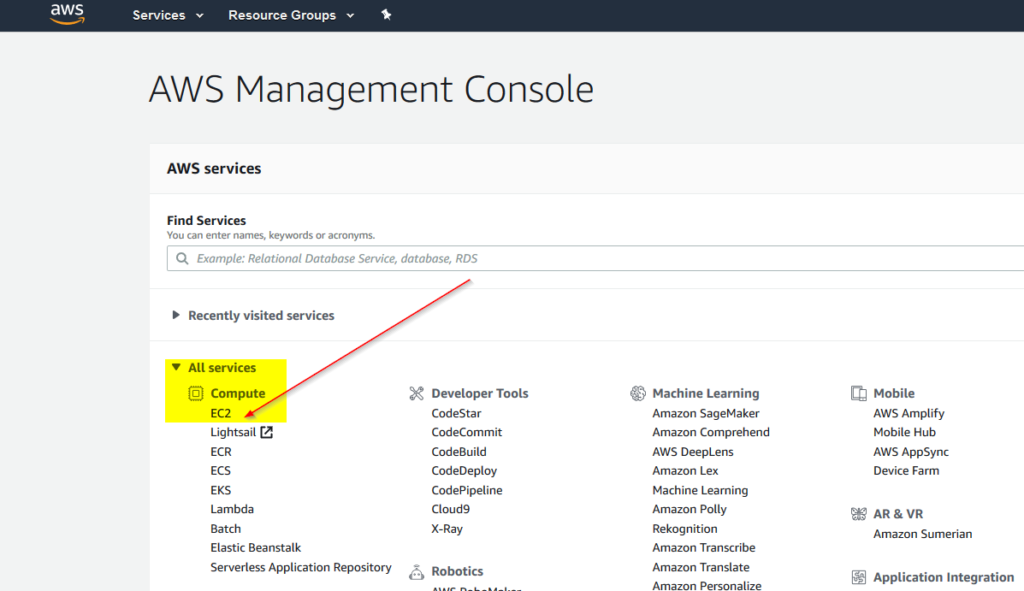
Log into the AWS portal and click on EC2 under All Services, Compute:

AWS Management Console

Next, click Launch Instance:

AWS Create Instance

Step 1 allows you to choose an Amazon Machine Image or AMI. There are tons of options here, but for this post, I’m going to use Microsoft Windows Server 2019 Base

Windows 2019 Base

Once I click Select, I’m brought to Step 2: Choose an Instance Type. Instance Types comprise varying combinations of CPU, memory, storage, and networking capacity and give you the flexibility to choose the appropriate mix of resources for your applications. Each instance type includes one or more instance sizes, allowing you to scale your resources to the requirements of your target workload. More info here: https://aws.amazon.com/ec2/instance-types/

For this post, and for cost sake, I’m going to use the free tier t2.micro type which is 1 CPU, 1GB RAM

Once I’ve selected my instance type I’ll click Next:Configure Instance Details.

Step 3: Configure Instance Details is where we’ll configure our new server. Let’s go down the list.

  • Number of Instances – This is the number of servers you want to create. If you need 5 of the same servers, this makes it easy.
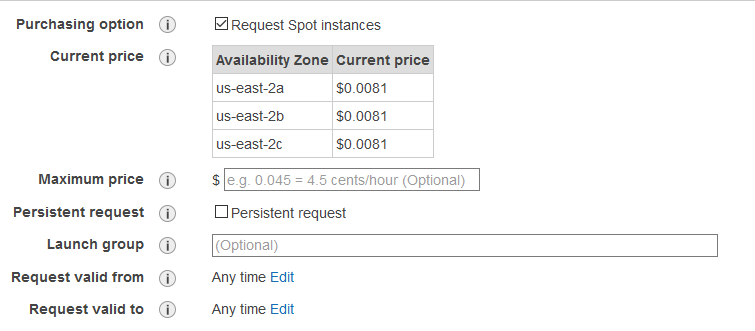
  • Spot Instances – A Spot Instance is an unused EC2 instance that is available for less than the On-Demand price. Because Spot Instances enable you to request unused EC2 instances at steep discounts, you can lower your Amazon EC2 costs significantly. The hourly price for a Spot Instance is called a Spot price. The Spot price of each instance type in each Availability Zone is set by Amazon EC2, and adjusted gradually based on the long-term supply of and demand for Spot Instances. Your Spot Instance runs whenever capacity is available and the maximum price per hour for your request exceeds the Spot price.
AWS Spot Instances
  • Network – The network you want the new server to join. You can create an Amazon Virtual Private Cloud (VPC) and select your own IP address range, subnets, gateways, etc. Learn more here: https://us-east-2.console.aws.amazon.com/vpc/home?region=us-east-2
  • Subnet: the range of IP addresses in your VPC that can be used to isolate different EC2 resources from each other or the internet.
  • Auto-assign Public IP – requests a public IP address from Amazon’s public IP address pool, to make the server reachable from the internet.
  • Placement Group: You can launch or start instances in a placement group, which determines how instances are placed on underlying hardware. When you create a placement group, you specify one of the following strategies for the group:
    • Cluster – clusters instances into a low-latency group in a single Availability Zone
    • Partition – spreads instances across logical partitions, ensuring that instances in one partition do not share underlying hardware with instances in other partitions
    • Spread – spreads instances across underlying hardware
    • There is no charge for creating a placement group. Learn more: https://docs.aws.amazon.com/AWSEC2/latest/UserGuide/placement-groups.html
  • Capacity Reservations – enables you to reserve capacity for your Amazon EC2 instances in a specific Availability Zone for any duration. This gives you the ability to create and manage capacity reservations independently from the billing discounts offered by Reserved Instances (RI). By creating Capacity Reservations, you ensure that you always have access to EC2 capacity when you need it, for as long as you need it.
  • Domain join directory – enables you to join a domain that you’ve already created.
  • IAM role – automatically deploys AWS credentials to resources that assume it.
  • Shutdown behavior – specifies what happens when an OS level shutdown is performed.
  • Enabled termination protection – You can protect instances from being accidentally terminated. Once enabled, you won’t be able to terminate the instance until this option has been disabled.
  • Monitoring – Monitor the instance with Amazon CloudWatch.
  • Tenancy – You can select to run your server on a shared server or a dedicated server.
  • Elastic Graphics – Enables graphic acceleration.

For this post I’ll use defaults and click Next.

Step 4 is Add Storage.

I’m not going to go over each Storage option, but you can get more info here: https://docs.aws.amazon.com/AWSEC2/latest/UserGuide/Storage.html?icmpid=docs_ec2_console

AWS Storage

Selecting default and clicking next.

Step 5: Add Tags.

Like Azure, A tag consists of a case-sensitive key-value pair. For example, you could define a tag with key = Name and value = Webserver. A copy of a tag can be applied to volumes, instances or both. Tags will be applied to all instances and volumes

Click Next.

Step 6 is Configure Security Group

A security group is a set of firewall rules that control the traffic for your instance. On this page, you can add rules to allow specific traffic to reach your instance. For example, if you want to set up a web server and allow Internet traffic to reach your instance, add rules that allow unrestricted access to the HTTP and HTTPS ports. By default, the RDP port is added, but it allows all IP addresses to connect. Changing the Source column will allow you to filter what IP’s are able to RDP into the server. For this post, I’m going to change the Source column to allow “My IP”

AWS Security Groups

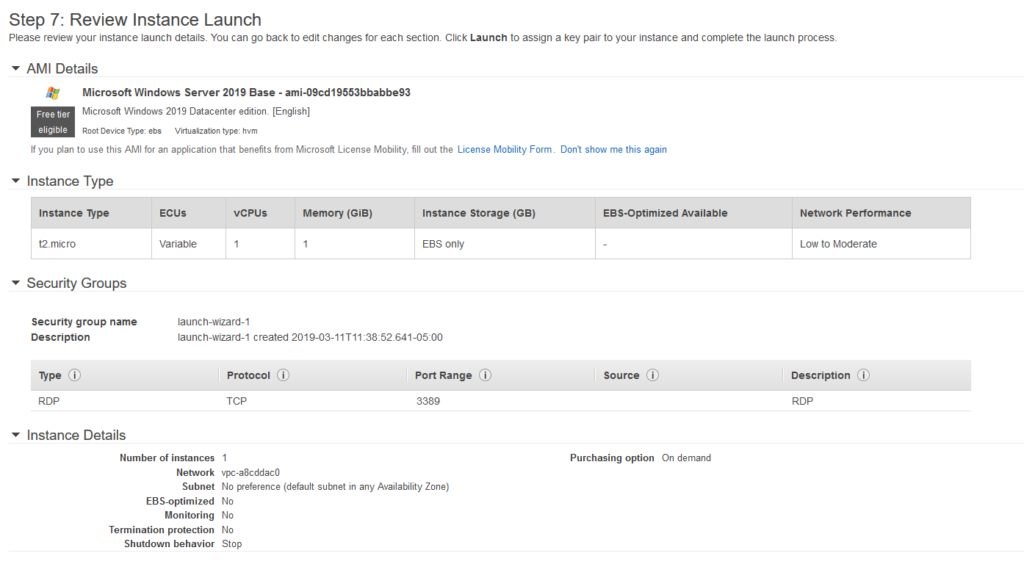
Next…and last page is a summary of the options selected. To finish configuring the instance, click Launch.

AWS EC2 Summary

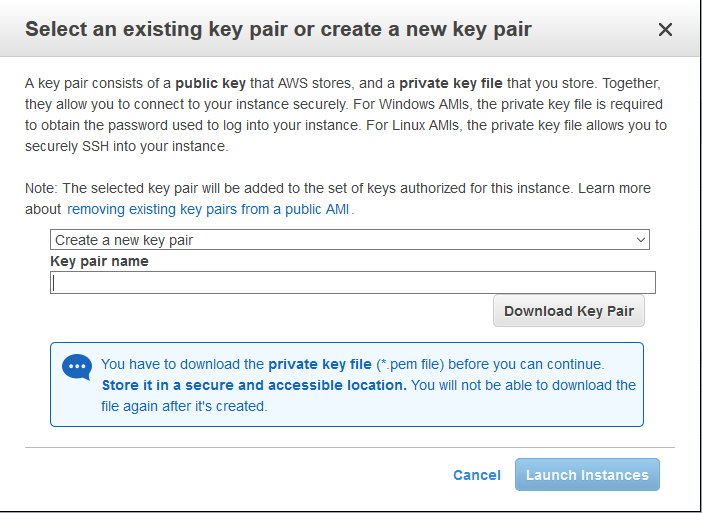
After clicking launch, you will see a popup where you can create or use an existing key pair. A key pair consists of a public key that AWS stores, and a private key file that you store. Together, they allow you to connect to your instance securely. For Windows AMIs, the private key file is required to obtain the password used to log into your instance. For Linux AMIs, the private key file allows you to securely SSH into your instance.

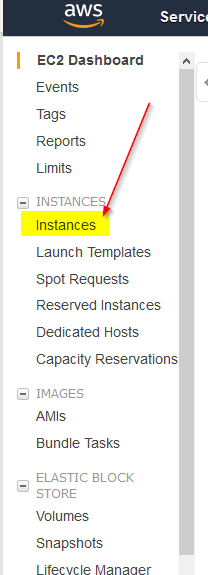
Once the new VM is created, you can go back to the EC2 dashboard and click on Instances to see the new VM:

AWS EC2 Dashboard