SQL Server High Availability Options

Finding the right high availability option can be tricky.  The decision really depends on these items:

  • Needs
  • Budget
  • Scope
  • SQL Server version
  • Level of automation
  • Team level support
  • etc.

At a high level, there are five main high availability options including a new feature set to be release with SQL Server 2012:

  • Replication
  • Mirroring
  • Log Shipping
  • Clustering
  • AlwaysON

SQL Server Replication Overview

At a high level, replication involves a publisher and subscriber, where the publisher is the primary server and the subscriber is the target server. Replication’s main purpose is to copy and distribute data from one database to another. There are four types of replication that we will outline:

  • Snapshot replication
  • Transactional replication
  • Merge replication
  • Peer to Peer replication

Snapshot: Snapshot replication occurs when a snapshot is taken of the entire database and that snapshot is copied over to the subscriber. This is best used for data that has minimal changes and is used as an initial data set in some circumstances to start subsequent replication processes.

Transactional: Transactional replication begins with a snapshot of the primary database that is applied to the subscriber. Once the snapshot is in place all transactions that occur on the publisher will be propagated to the subscriber. This option provides the lowest latency.

Merge: Merge replication begins with a snapshot of the primary database that is applied to the subscriber. Changes made at the publisher and subscriber are tracked while offline. Once the publisher and subscriber are back online simultaneously, the subscriber synchronizes with the publisher and vice versa. This option could be best for employees with laptops that leave the office and need to sync their data when they are back in the office.

Peer to Peer: Peer to Peer replication can help scale out an application.  This is because as transactions occur they are executed on all of the nodes involved in replication in order to keep the data in sync in near real time.

Pros and Cons for SQL Server Replication
Pros
Cons
Can replicate to multiple servers
Manual failover
Can access all databases being replicated
Snapshot can be time consuming if you have a VLDB
Replication can occur in both directions
Data can get out of sync and will need to re-sync


SQL Server Database Mirroring Overview

Database Mirroring involves a principal server that includes the principal database and a mirror server that includes the mirrored database. The mirror database is restored from the principal with no recovery leaving the database inaccessible to the end users. Once mirroring is enabled, all new transactions from the principal will be copied to the mirror. The use of a witness server is also an option when using the high safety with automatic failover option. The witness server will enable the mirror server to act as a hot standby server. Failover with this option usually only takes seconds to complete. If the principal server was to go down the mirror server would automatically become the principal.

Click here to view the rest of this post.

Statistics IO and Statistics TIME

Statistics IO and Statistics TIME can help in performance tuning from a granular level and saves time compared to Execution Plans, SQL Server Profiler, etc. Let’s looks at an example of these two commands:

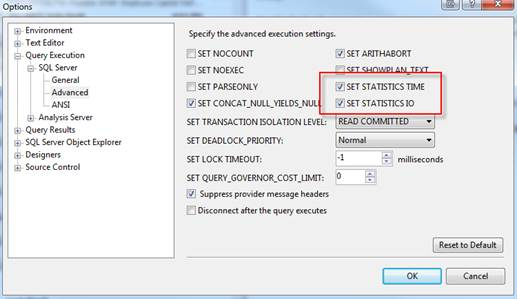
There a few different ways in which you can turn on these commands inside SQL Server Management Studio. If you want every query window to open up with statistics you can go to Tools, Options, Query Execution, SQL Server, Advanced and check SET STATISTICS TIME and SET STATISTICS IO:

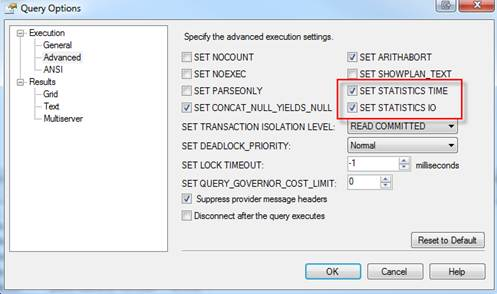
SQL Freelancer SQL Server SET STATISTICS TIME SET STATISTICS IOMost of the time you will just want to use statistics for a certain troublesome query. To turn these commands on for a specified query window, open the query window and go to Query, Query Options, Execution, Advanced and check SET STATISTICS TIME and SET STATISTICS IO:

SQL Freelancer SQL Server SET STATISTICS TIME SET STATISTICS IOOr you can simply use T-SQL and type the following to turn statistics on

SET STATISTICS IO ON
SET STATISTICS TIME ON

And to turn off simply use:

SET STATISTICS IO OFF
SET STATISTICS TIME OFF

In this example I’m going to run a query from AdventureWorks using statistics:

SET STATISTICS IO ON
SET STATISTICS TIME ON

SELECT pc.FirstName
,pc.LastName
,pc.EmailAddress
,he.Title
,hh.Rate
FROM Person.Contact pc
JOIN HumanResources.Employee he ON pc.ContactID = he.ContactID
JOIN HumanResources.EmployeePayHistory hh ON he.EmployeeID = hh.EmployeeID
WHERE hh.Rate > 10
ORDER BY hh.Rate

After the query finishes it will show you results like normal but if you click on the Messages tab you will see some extra information:

SQL Freelancer SQL Server SET STATISTICS TIME SET STATISTICS IO

You will see IO information at the top:

Scan Count – Number of index or table scans
Logical Reads – Number of pages read from the data cache
Physical Reads – Number of pages read from disk
Read-Ahead Reads – Number of pages placed into the cache for the query
LOB Logical Reads – Number of text, ntext, image, or large value pages read from the data cache
LOB Physical Reads – Number of text, ntext, image, or large value type pages read from disk
LOB Read-Ahead Reads – Number of text, ntext, image, or large value type pages placed into the cache for the query

Execution TIME information will be directly below:

CPU Time: How long the query worked with the CPU
Elapsed Time: How long the query took to gather data

Statistics, in general, is an excellent starting point to see why you might have a poor performing query. You can gather results such as execution time, compile time, reads, writes, cost, etc.

Import data from Microsoft Access to SQL Server

Microsoft has made importing data from Access much easier using Access 2007 or above than previous versions. Running SSIS packages or using the Import/Export wizard seemed time consuming and often would error out requiring more troubleshooting than it’s worth. I’m using an Access database with two tables named Customers and Orders for this post:

SQL Freelancer SQL Server Microsoft Access IntegrationFirst, make sure all tables are closed within in our Access database or we’ll get an error:

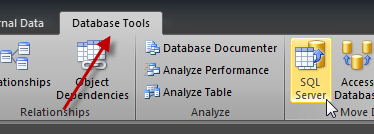
SQL Freelancer SQL Server Microsoft Access IntegrationOnce all tables are closed navigate to Database Tools | SQL Server as shown below:

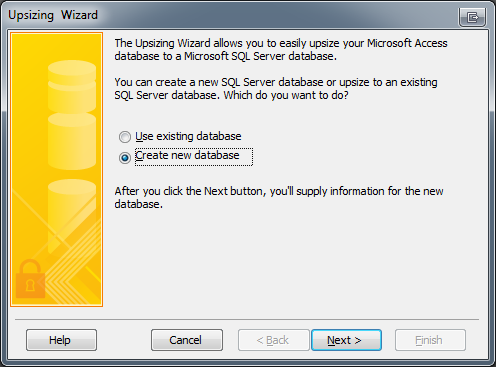
SQL Freelancer SQL Server Microsoft Access IntegrationAfter clicking SQL Server an Upsizing Wizard dialog box should appear. Since I don’t have a database created I will click “Create New Database” option as shown below.

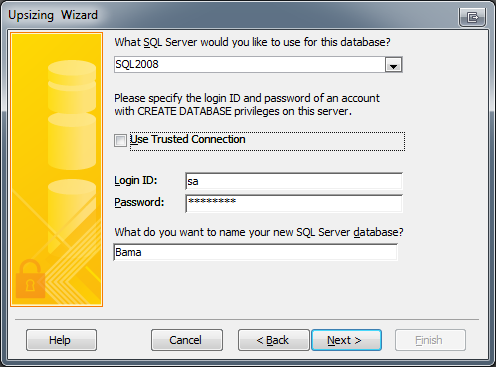
SQL Freelancer SQL Server Microsoft Access IntegrationIf there was already a database in place clicking “Use existing database” will bring up a few screens to setup a data source to a preexisting database. After clicking next, we need to enter some information to connect to our SQL Server and create our database. When specifying the Login ID make sure this user has CREATE DATABASE permissions on the server. For this example I will use SQL2008 for my server and create a database called Bama:

SQL Freelancer SQL Server Microsoft Access IntegrationClick here to view the rest of this post.

SQL Server Log Shipping

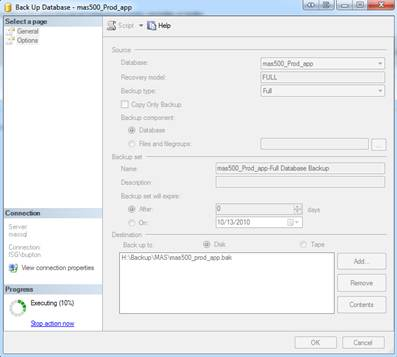
Backup Database on Primary Server:

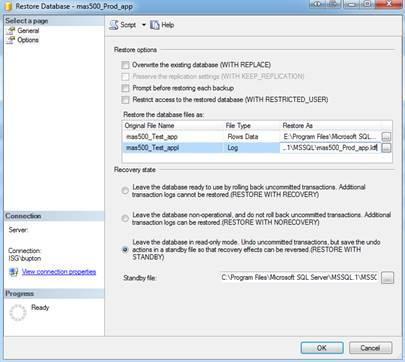
SQL Freelancer SQL Server Log ShippingRestore Database on Secondary Server: (RESTORE WITH STANDBY)

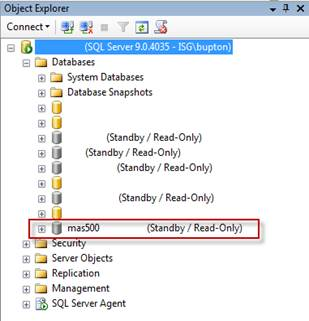
SQL Freelancer SQL Server Log Shipping(Picture of Object Explorer once restore is complete)

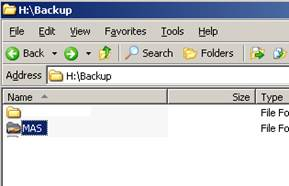
SQL Freelancer SQL Server Log ShippingCreate a shared folder on the primary server (SQL Server Agent service account must have read/write permissions):

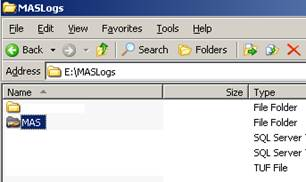
SQL Freelancer SQL Server Log ShippingCreate a shared folder on the secondary server (SQL Server Agent service account must have read/write permissions):

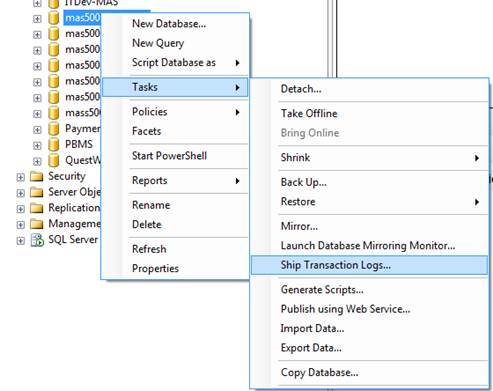
SQL Freelancer SQL Server Log ShippingEnable Log Shipping at the Publisher:

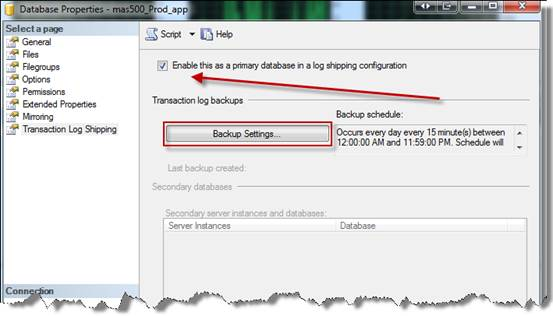
SQL Freelancer SQL Server Log ShippingClick “Enable this as a primary database in a log shipping configuration”, then click Backup Settings:

SQL Freelancer SQL Server Log Shipping

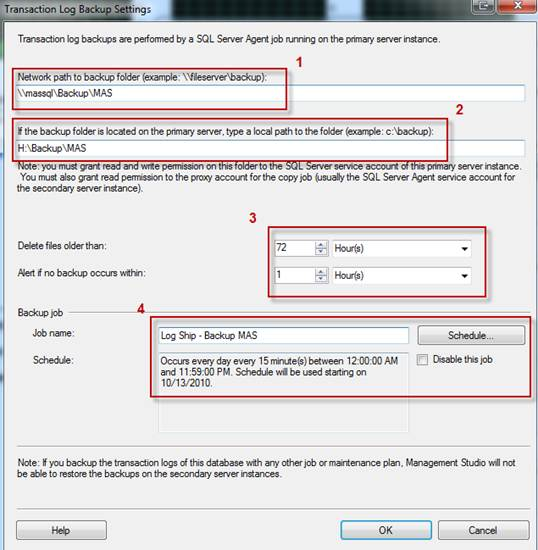
  1. Enter Network Share on Primary Server
  2. Enter Local Folder path on Primary Server
  3. Enter the number of Minutes, Hours, or Days to keep the deleted files and to Alert if no backup occurs
  4. Name the SQL Agent Job and determine a schedule to backup the log files

SQL Freelancer SQL Server Log Shipping

Click OK

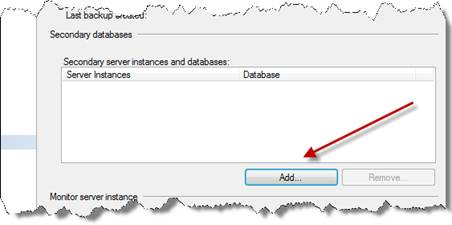
Click Add to add a secondary server:

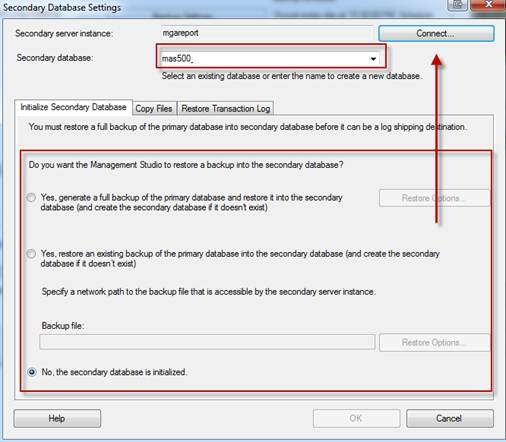
SQL Freelancer SQL Server Log ShippingClick Connect to connect to the secondary server:

SQL Freelancer SQL Server Log Shipping

Select No, since we initialized the database in the beginning by restoring in Standby Mode, otherwise you can choose one of the other options. Hit OK.

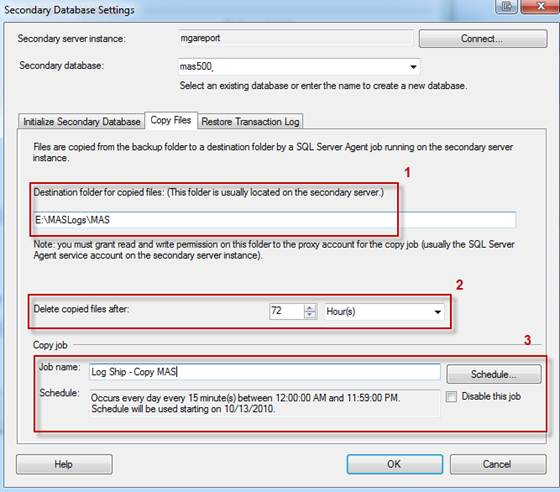
Go to next tab, Copy Files.

  1. Enter Local Folder Path on Secondary server
  2. Enter the number of Minutes, Hours, or Days to delete copied files
  3. Name the SQL Agent Job and determine a schedule to copy the log files

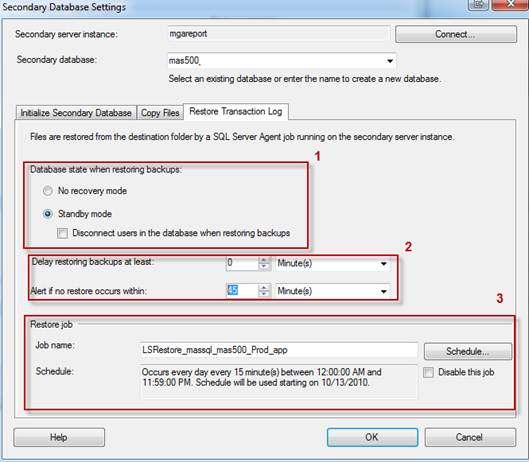
SQL Freelancer SQL Server Log ShippingGo to next tab, Restore Transaction Log.

    1. Since we put the database in Standby/Read Only mode select Standby Mode
    2. If you would like to delay restoring the transaction log you can enter a value in the “Delay restoring backups at least” otherwise leave at 0 minutes.
      Enter the number of Minutes, Hours, or Days to Alert if no restore occurs
    3. Name the SQL Agent Job and determine a schedule to restore the log files

SQL Freelancer SQL Server Log Shipping

Hit OK

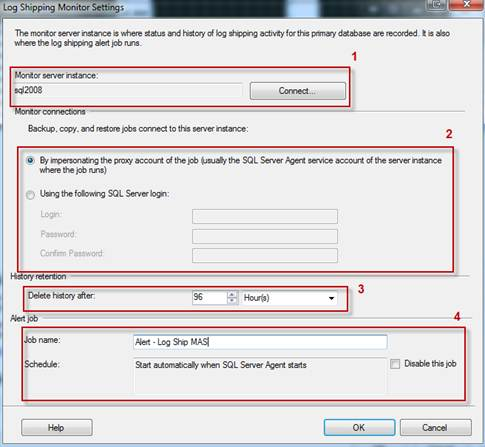
**OPTIONAL** To create a monitor server click “Use monitor server instance” and then click Settings

SQL Freelancer SQL Server Log Shipping

    1. Click Connect to connect to a monitor server instance
    2. Select the login method you would like to use to connect to the monitor server.
    3. Enter the number of Minutes, Hours, or Days to delete log file data
    4. Name the SQL Agent Job and determine a schedule to for the alert task

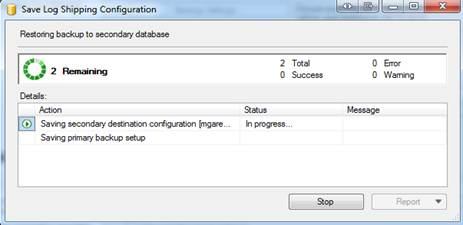
SQL Freelancer SQL Server Log ShippingHit OK twice.

SQL Freelancer SQL Server Log Shipping

Securing and protecting SQL Server data, log and backup files with TDE

In this post I’ll show you how to setup Transparent Data Encryption (TDE). TDE is new in SQL Server 2008 and serves as an encryption method that uses a database encryption key (DEK) to protect SQL Server’s data and log files. The DEK is a key secured by a certificate stored in the master database.

To setup TDE we’ll need to run a few scripts: (My test database is named TDE)

The following script will create the master key with a specified password ElephantRhin0:

USE master;
GO
CREATE MASTER KEY ENCRYPTION BY PASSWORD = 'ElephantRhin0';
GO

Next, we’ll create a certificate named TDECert that will be protected by the master key:

USE master;
GO
CREATE CERTIFICATE TDECert WITH SUBJECT = 'TDE Certificate';
GO

After creating the certificate we’ll backup the certificate to a specified source:

USE master;
GO
BACKUP CERTIFICATE TDECert TO FILE = 'C:\TDECert_backup' WITH 
PRIVATE KEY ( FILE = 'C:\TDECert_key' ,ENCRYPTION BY PASSWORD = 'ElephantRhin0' )
GO

Once the certificate is backed up we will create the DEK using the AES algorithm and protect it by the certificate:

USE TDE;
GO
CREATE DATABASE ENCRYPTION KEY
WITH ALGORITHM = AES_128
ENCRYPTION BY SERVER CERTIFICATE TDECert;
GO

The final step is to set our database to use encryption:

ALTER DATABASE TDE
SET ENCRYPTION ON;
GO

If everything completed successfully then we have officially encrypted our database with TDE, but don’t take my word for it, run the following query to confirm:

SELECT name, is_encrypted
FROM sys.databases
WHERE name = 'TDE'

SQL Freelancer SQL Server Transparent Data EncryptionClick here to view the rest of this post.

SQL Server Multi Server Administration

I seem to notice a lot of people do not use or even know about Multi Server Administration for their SQL Server Agent Jobs and Maintenance Plans. Multi Server Administration can be really useful when you need to create and run the same jobs or maintenance plans across numerous SQL Server instances. Let’s walk through setting up Multi Server Administration for SQL Server.

Here’s a basic look at how to setup Multi Server Administration. My environment has two separate VM’s running in VM Workstation with Windows 2008 R2 Datacenter Edition and SQL Server 2008 R2 Enterprise named Principal and Mirror.

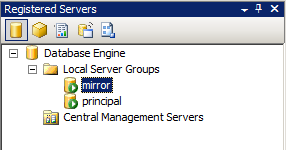
First thing I’m going to do is register both servers in SQL Server Management Studio (SSMS). If you do not see the Registered Servers tab in SSMS navigate to ‘View’ | ‘Registered Servers’ or press ‘Ctrl + Alt + G’.

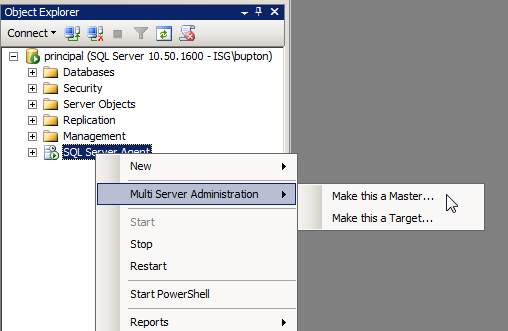
SQL Freelancer Multi Server AdministrationOnce both servers are registered I can start configuring Multi Server Administration. To do this right click on ‘SQL Server Agent’ on your master server and choose ‘Multi Server Administration’ | ‘Make this a Master…’ to begin the process.

SQL Freelancer Multi Server Administration

Click Next on the Welcome for the Master Server Wizard.

The next screen is where we can configure an operator. Just like when we create an operator for local jobs, we can create one for our Multi Server jobs. You can also leave this section blank if you prefer not to have an operator although I would not recommended this practice. Once completed, press the ‘Next’ button to continue.

Click here to view the rest of this post.

SQL Server performance tuning for each layer of an application

Performance tuning is a big subject and there are a lot of different pieces to troubleshooting a poor performing database or application. I like to use the 5 level process shown below:

  1. Server Hardware
  2. Operating System
  3. SQL Server
  4. Database
  5. Application

SQL Freelancer SQL Server Performance Tuning

Hardware

When troubleshooting poor performance don’t always assume it’s something wrong with the database itself. The problem often lies deeper. We’ll start with hardware. If the hardware isn’t up to par, your OS, database, and application will suffer.

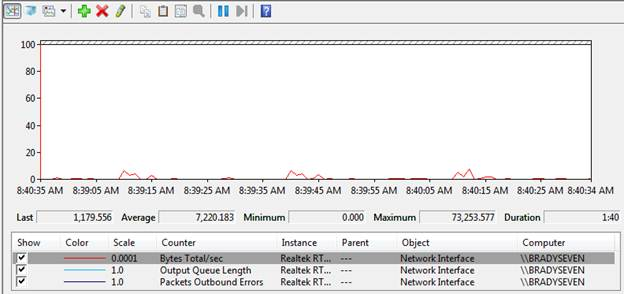
One of the best tools to monitor hardware are counters that are part of the Performance Monitor, or PerfMon for short. I’m not going to go into how to use PerfMon, which can be covered in a different tip, but I will tell you some of the most important counters to watch and a description of what they do.

Network Counters:

  • Network Interface: Bytes Total/sec – Bytes Total/sec is the rate at which bytes are sent and received over each network adapter, including framing characters. Network Interface\Bytes Total/sec is a sum of Network Interface\Bytes Received/sec and Network Interface\Bytes Sent/sec. This value should be pretty low.
  • Network Interface: Output Queue Length -Output Queue Length is the length of the output packet queue (in packets). If this is longer than two, there are delays and the bottleneck should be found and eliminated, if possible. Since the requests are queued by the Network Driver Interface Specification (NDIS) in this implementation, this should always be 0.
  • Network Interface: Packets Outbound Errors – Packets Outbound Errors is the number of outbound packets that could not be transmitted because of errors. This value should stay at 0 also.

SQL Freelancer SQL Server Performance TuningClick here to view the rest of this post.

Configure SQL Server Database Mirroring Using SSMS

In this post I am going to outline my environment and then walk through the process of setting up Database Mirroring.  This will include the configurations, backups, restores and verification process.  Let’s jump in.

My test environment consists of two separate VM’s running VM Workstation with Windows 2008 R2 Datacenter Edition and SQL Server 2008 R2 Enterprise named appropriately Principal and Mirror. The SQL Server and SQL Server Agent Services accounts are running as domain users (DOMAIN\User). Windows Firewall is OFF for the sake of this example.

I created a database on the Principal SQL Server instance and named it TestMirror. The recovery model is set to FULL RECOVERY.

SQL Freelancer Multi Server Administration

1st step: Issue a full backup of the database.

BACKUP DATABASE TestMirror TO DISK = 'C:\Program Files\Microsoft SQL 
Server\MSSQL10_50.MSSQLSERVER\MSSQL\Backup\Backup.bak';

2nd step: Issue a transaction log backup of the database.

BACKUP LOG TestMirror TO DISK = 'C:\Program Files\Microsoft SQL 
Server\MSSQL10_50.MSSQLSERVER\MSSQL\Backup\Backup.trn';

Below are the two files in the file system:

SQL Freelancer Configure SQL Server Database Mirroring
Click here to view the rest of this post.