Performance Tuning Series – Database Design

Database design is a critical component of SQL Server performance. A well-designed database not only ensures efficient data storage but also optimizes query execution and minimizes maintenance overhead. Poorly designed databases can lead to issues like slow queries, increased I/O, and inefficient use of memory and CPU resources. By focusing on best practices during the design phase, you can lay a strong foundation that supports scalability, reliability, and performance.

The Impact of Database Design on Performance

A database’s architecture affects how SQL Server retrieves, processes, and stores data. Good database design reduces redundancy, minimizes the need for expensive joins or subqueries, and ensures that the system can efficiently handle growing datasets. It’s easier to address performance concerns in the design phase than to attempt optimization after the database is in production.

Best Practices for Database Design

1. Normalization vs. Denormalization

Normalization is the process of structuring a relational database to minimize data redundancy and dependency. It organizes data into separate tables based on logical relationships, ensuring that each table contains only relevant data.

  • Benefits of Normalization:
    • Reduces redundant data, which saves storage space and improves data consistency.
    • Simplifies updates and deletions, reducing the chance of anomalies.

However, excessive normalization can lead to performance issues by increasing the number of joins required in queries. This is where denormalization comes in—a strategic process where certain normalized tables are combined to reduce the need for joins in performance-critical queries.

  • Best Practice:
    • Start with normalization (3rd Normal Form is often a good starting point), then selectively denormalize where performance gains justify the added redundancy. For example, when querying data frequently involves multiple joins, denormalize to reduce the join overhead.
    • Balance between normalization and denormalization depending on the nature of the workload, ensuring that performance isn’t compromised for the sake of maintaining pure data integrity.

2. Choose Appropriate Data Types

Choosing the right data types for each column is crucial for both performance and storage efficiency. Using larger data types than necessary wastes memory and increases I/O, while inappropriate data types can result in slower query execution.

  • Best Practice:
    • Use the smallest data type that can accommodate the data. For example, if a column only needs to store numbers between 1 and 100, use TINYINT (1 byte) rather than INT (4 bytes).
    • For string data, use VARCHAR (variable-length) instead of CHAR (fixed-length) to save space. For columns with predictable length, such as country codes, use CHAR with a defined length.
    • Avoid overusing NVARCHAR unless absolutely necessary (e.g., for multi-language support with Unicode). Non-Unicode data types like VARCHAR consume less space.
    • Match data types in joins and filters: If you use mismatched data types in queries, SQL Server may need to perform implicit conversions, which add overhead and slow down execution.

3. Primary Keys and Foreign Keys

Primary keys uniquely identify records in a table and are critical for data integrity and indexing. SQL Server automatically creates a clustered index on the primary key by default, which affects how data is stored and retrieved.

Foreign keys enforce relationships between tables, ensuring referential integrity. Although they don’t directly improve performance, they prevent orphaned records and ensure data consistency.

  • Best Practice:
    • Choose the right primary key: Use an integer-based key whenever possible, as smaller data types are faster to index and join. Avoid composite or complex keys if they aren’t necessary.
    • Use foreign keys: Even though foreign key constraints don’t directly improve performance, they ensure database integrity, which is crucial for long-term stability and reducing potential performance-killing errors.

4. Index Design

Indexes are critical for optimizing query performance, but they must be carefully designed to avoid performance degradation due to maintenance overhead or excessive index usage.

  • Best Practice:
    • Create clustered indexes on frequently queried columns that define the logical order of the table. Generally, the primary key should be the clustered index unless there’s a more frequently queried column.
    • Use non-clustered indexes to speed up search queries, especially on columns frequently used in WHERE, JOIN, or ORDER BY clauses.
    • Avoid over-indexing: Creating too many indexes can lead to increased maintenance costs (e.g., during INSERT, UPDATE, and DELETE operations) and longer execution times. Be selective about which columns to index.
    • Regularly analyze index usage with SQL Server’s Dynamic Management Views (DMVs) to identify unused or underutilized indexes that can be removed to improve performance.

5. Partitioning for Large Tables

Partitioning allows you to split large tables into smaller, more manageable chunks. SQL Server’s table partitioning feature distributes table data across multiple partitions, based on a defined column (such as a date). This helps SQL Server read smaller portions of the table during queries, leading to improved performance, especially for large datasets.

  • Best Practice:
    • Use partitioning to improve query performance on large tables, especially when queries frequently filter by the partition key (such as OrderDate or TransactionDate).
    • Partition by range for time-based data to enable SQL Server to prune irrelevant partitions during queries, reducing I/O.
    • Balance the number of partitions; too many small partitions can lead to overhead, while too few may not improve performance significantly.

6. Schema and Object Naming Conventions

A clear and consistent naming convention for database objects (tables, indexes, stored procedures) helps maintain organization and ease troubleshooting.

  • Best Practice:
    • Use descriptive names for tables and columns that clearly describe their purpose (e.g., CustomerAddress or OrderDetails). Avoid ambiguous or overly abbreviated names.
    • Group related objects into schemas to simplify permissions management and improve organization. For example, use a schema like Sales for all objects related to sales data.

7. Avoid Overly Complex Queries

Poor database design often forces developers to write complex queries, including multiple joins, subqueries, and scalar functions, which can severely degrade performance.

  • Best Practice:
    • Simplify queries by using appropriate indexes and database design techniques like denormalization where necessary.
    • Avoid using correlated subqueries that run for each row in the outer query, as they can result in extremely poor performance. Instead, use joins or common table expressions (CTEs) when possible.
    • Minimize scalar functions in WHERE clauses or SELECT statements. Scalar functions can slow down queries because they execute row by row. Inline table-valued functions are a better alternative when complex logic is required.

8. Consider Data Archiving and Purging

Large databases that store data indefinitely can slow down performance over time. By regularly archiving or purging old or irrelevant data, you can reduce the size of your active dataset and improve query performance.

  • Best Practice:
    • Implement a data retention policy to archive or delete old data that’s no longer needed. This reduces the overall size of tables and indexes, leading to faster queries and less disk space consumption.
    • For large datasets that need to be retained for compliance reasons, consider using partitioning or moving older data to a separate archive database.

Conclusion

Solid database design lays the groundwork for optimal SQL Server performance. By following best practices like appropriate normalization, thoughtful indexing, partitioning for large datasets, and the strategic use of primary/foreign keys, you can ensure that your database not only performs well today but remains scalable and maintainable as your data grows. When combined with ongoing query tuning and regular database maintenance, strong design principles provide the foundation for long-term success in SQL Server environments.

Create Always Encrypted Certificate

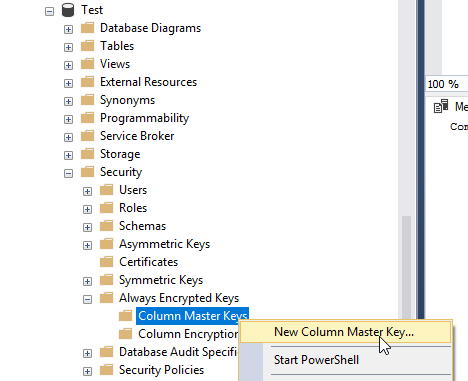
In SSMS, browse to Database, Security, Always Encrypted Keys, right click Column Master Keys and click New Column Master Key:

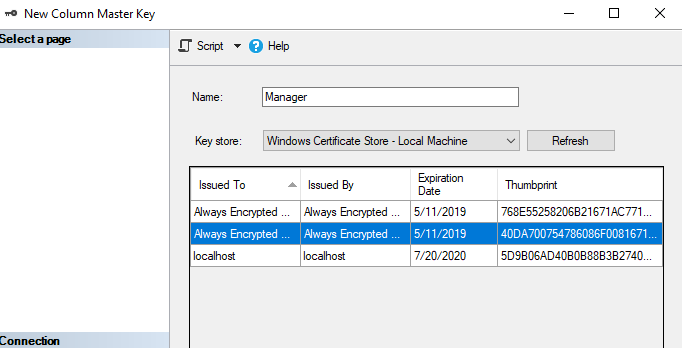
In the New Column Master Key box you can choose from several key stores. The most popular stores are Current User or Current Machine. See below for description.

Local machine certificate store
This type of certificate store is local to the computer and is global to all users on the computer. This certificate store is located in the registry under the HKEY_LOCAL_MACHINE root.

Current user certificate store
This type of certificate store is local to a user account on the computer. This certificate store is located in the registry under the HKEY_CURRENT_USER root.

Be aware that all current user certificate stores inherit the contents of the local machine certificate stores. For example, if a certificate is added to the local machine Trusted Root Certification Authorities certificate store, all current user Trusted Root Certification Authorities certificate stores also contain the certificate.

In this example, we’ll use Local Machine. Type a name for the Master Key, choose Key Store and click Generate Certificate.

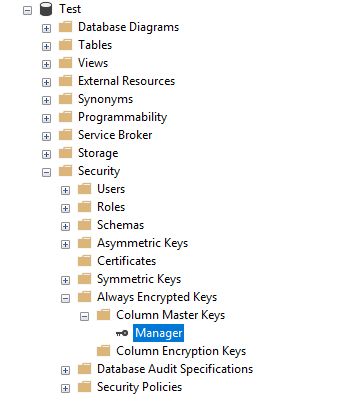
Click OK and a new Column Master Key will appear:

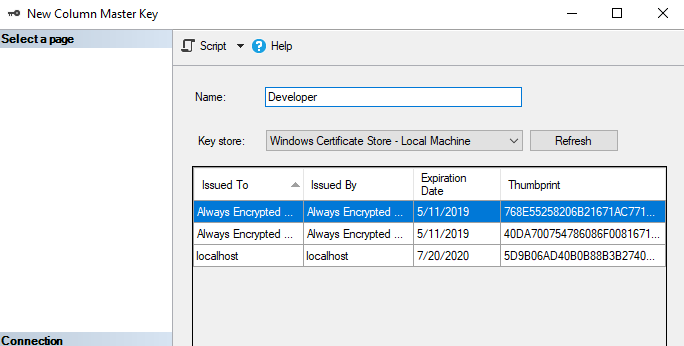
Do the same for any other master keys you would like to create. For example, Developer:

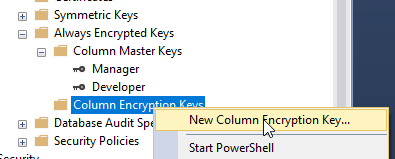
To create a Column Encryption Key, right click on Column Encryption Key and choose New Column Encryption key:

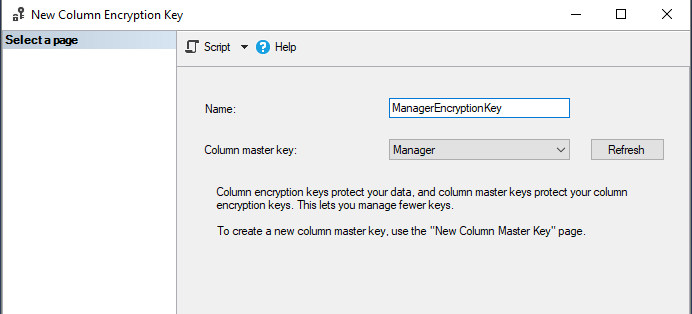
Give the key a name and select the Column Master Key that you would like to associate it with:

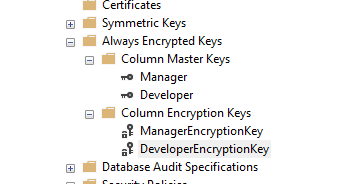
Do the same for the Developer keys. You should have two column master keys and two column encryption keys:

To view Local Machine certificates:

Open Certlm.msc

Browse to Personal, Certificates:

Double click a certificate and go to the Detail tab where you will see the thumbprint:

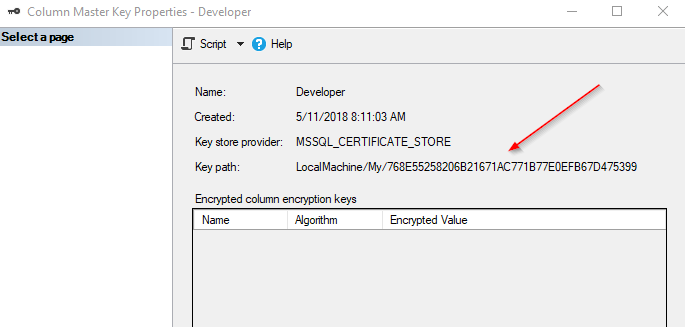
Match this thumbprint with the Column Master Key in SSMS:

Right click the certificate in Certlm.msc and choose Properties. Enter a friendly name to identify which certificate belongs with the Column Master Key.

To Export and certificate, right click and choose All Tasks, Export:

Managing the Transaction Log

In this post, I’ll discuss some tasks that you can do to manage the transaction log. The transaction log is very important to SQL Server and there are books alone on how to manage the log so this will be an introduction post.

Where do I start? The transaction log is an integral part of SQL Server. Every database has a transaction log that is stored within the log file that is separate from the data file. A transaction log basically records all database modifications. When a user issues an INSERT, for example, it is logged in the transaction log. This enables the database to roll back or restore the transaction if a failure were to occur and prevents data corruption. For example, let’s say Sue is using an application and inserts 2000 rows of data. While SQL Server is processing this data let’s say someone pulls the plug on the server. (Again, this is just an example, I hope nobody would actually do this). Because the INSERT statement was writing to the transaction log and it knows a failure occurred it will roll back the statement. If this wasn’t put in place, could you imagine having to sift through the data to see how many rows it inserted and then change the code to insert the remaining rows? Or even better, what if the application inserted random columns in no order and you had to determine what data was inserted and what data was left out? This could take forever!

The transaction log supports the following:

ROLLBACK TRANSACTION – If a user or application issues the ROLLBACK statement, or if the DB engine detects a failure, the log records are used to roll back the transaction.

Recover Incomplete Transactions – If you have ever started SQL Server from a failure you may have noticed databases in the (In Recovery) mode:

SQL Freelancer SQL Server Transaction Log

This is an indication that SQL Server is rolling back transactions that did not complete before the SQL Server was restarted or it is rolling forward all modifications that were recorded in the log but not written to the data file.

Rolling a restored DB, file, filegroup, or page forward to the point of failure – If SQL Server were to fail and you need to restore the database back to the point in which the failure occurred you can as long as you are using the FULL recovery model. Start with a full backup, then apply the latest differential, and the subsequent transaction log backups up to the point of failure.

High availability solutions – Transactional replication, mirroring, and log shipping all use the transaction log.


Transaction Log Truncation

One thing that I see a lot of administrators ask about is transaction log size and how to truncate it. Log records that are not managed correctly will eventually fill up the disk causing no more modifications to the database. Transaction log growth can occur for a few different reasons. Long running transactions, incorrect recovery model configuration and lack of log backups can grow the log.

Log truncation frees up space in the log file so the transaction log can reuse it. Unless there is some kind of unexpected delay, log truncation will occur automatically after a checkpoint (if the database is in SIMPLE recovery model) or after a log backup (if the database is in FULL or BULK-LOGGED recovery model). MSSQLTips.com offers plenty of tips regarding transaction log truncation.


Recovery Models

I mentioned recovery models above so I’ll give a brief overview of each one…

Full – In the Full recovery model, log files should be backed up on a regular basis to prevent the disk from filling up the drive. Also, in the Full recovery model, you can restore a database to the point of failure depending on your log backup schedules. This is the default for the model database in SQL Server. If you leave this recovery model set to Full, make sure you schedule log backups.

Simple – In the Simple recovery model, transaction log backups cannot be used. This means that SQL Server will automatically reclaim disk space at certain intervals, which can be good, but it also means that if a failure were to occur you can only restore back to the last full backup since all transactions are lost in between. This is generally used in development environments.

Bulk Logged – In the Bulk Logged recovery model, certain large scale or bulk copy operations are minimally logged. I have never left a database in the Bulk Logged recovery model for a large amount of time. I usually will have a database in the Full recovery model and if I’m doing a bulk insert and don’t need to log the transactions, I’ll switch to Bulk Logged and then back to Full once this is complete. Bulk Logged, however, does support log backup and point in time recovery.


Backup the Log File

When using the Full or Bulk Logged recovery models it is recommended to backup the transaction log regularly. Remember, when the log is backed up, it will automatically truncate.

Before you backup the transaction log, you must have a full backup otherwise you will get an error:

SQL Freelancer SQL Server Transaction Log

You can perform a backup using SQL Server Management Studio (SSMS) or the following syntax:

BACKUP LOG [Demo]
TO DISK = N'D:\Backups\Demo.bak'

Monitoring the Log

Monitoring the log file is very important and SQL Server has made it fairly easy for us to do this. One way to find information about the log is in the catalog view sys.database_files. This view returns information about data and log files that include type of file, name, location, state, size, growth, etc. The following query will filter down to only the log file and displays some very useful information:

SELECT name AS [File Name], physical_name AS [Physical Name], size/128.0 AS [Total Size in MB], size/128.0 - CAST(FILEPROPERTY(name, 'SpaceUsed') AS int)/128.0 AS [Available Space In MB], [growth], [file_id]
FROM sys.database_files
WHERE type_desc = 'LOG'

SQL Freelancer SQL Server Transaction LogYou can also use DBCC SQLPERF (‘logspace’) which has been around for a while. This command displays useful details such as DB name, Log Size (MB) and Log Space Used (%):

SQL Freelancer SQL Server Transaction Log

Controlling the growth of the transaction log can help in performance issues. To change the growth increment, use the FILEGROWTH option. A value of 0 indicates that automatic growth is set to off and no additional space is permitted. A small autogrowth increment on a log file can reduce performance. The file growth increment on a log file should be sufficiently large to avoid frequent expansion. The default growth increment of 10 percent is generally suitable.

As you can see, the transaction log is used throughout SQL Server, and the information above will get you started managing the transaction log. There are multiple items that I did not cover in this tip that include:

  • Modifying the log file
  • Shrinking the log file
  • Adding/Removing a log file
  • How a log file is used in High Availability solutions
  • How to restore to a point in time

Creating a Table Warehouse to Retain Historical Data for a SQL Server Table

A lot of applications, including SCOM and even SSRS groom their databases so they don’t grow out of control. For instance, in SSRS there is a table called ExecutionLogStorage in the ReportServer database. This table holds details about report executions. SSRS grooms this table so that it only keeps a specified number of days of data. This is good for performance reasons obviously because the larger the table grows, the worse it will perform. However, what if you need to keep more days than specified? You can probably change the number of days in a config file but then the table will begin to grow and the server will not perform optimally. In cases like this, I like to create what I call a table warehouse. A table warehouse is basically a new table that stores data from another table, but doesn’t get groomed. A table warehouse will grow much larger than the source table, but the application doesn’t use this table so it shouldn’t effect performance, but it will effect disk space so make sure you plan accordingly. This is basically a data warehouse, but I like to think of a data warehouse as more than one table and I usually transform and massage the data before I move it to a data warehouse.

Some reasons why you might want to create a table warehouse include archiving data and reporting on older data that may get deleted in the future.

You can probably create this type of table several different ways but I like to use the UNION operator. In this post, I’ll show you the statement I use and we’ll walk through it.

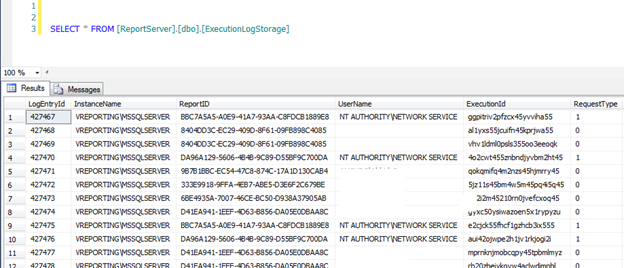
First, let’s look at the ExecutionLogStorage table:

SQL Freelancer SQL Server Table Warehouse

This table stores information such as InstanceName, UserName, Format, Parameters, Start/End Time, etc. By default, it only stores information for 60 days. Every night, SSRS grooms this table so that the 61st day of data is deleted. We need to keep more than 60 days of data so that’s where the table warehouse comes into play.

First thing we’ll need to do is create our table warehouse table that will hold the data. I don’t need all the columns from the ExecutionLogStorage table so I’ll just create my table warehouse to store InstanceName, UserName, Format, TimeStart, TimeEnd, TimeProcessing, Status, ByteCount and RowCount.

  CREATE TABLE [dbo].[ExecutionLogStorageTW](
 [InstanceName] [nvarchar](38) NOT NULL,
 [UserName] [nvarchar](260) NULL,
 [Format] [nvarchar](26) NULL,
 [TimeStart] [datetime] NOT NULL,
 [TimeEnd] [datetime] NOT NULL,
 [TimeProcessing] [int] NOT NULL,
 [Status] [nvarchar](40) NOT NULL,
 [ByteCount] [bigint] NOT NULL,
 [RowCount] [bigint] NOT NULL
    )

Next we can use the following query to see the differences between the ExecutionLogStorage table and our new ExecutionLogStorageTW table:

SELECT MIN(TableName) AS TableName
 ,InstanceName
 ,UserName
 ,[Format]
 ,TimeStart
 ,TimeEnd
 ,TimeProcessing
 ,[Status]
 ,ByteCount
 ,[RowCount]
FROM (
 SELECT 'ELS' AS TableName
  ,els.InstanceName
  ,els.UserName
  ,els.[Format]
  ,els.TimeStart
  ,els.TimeEnd
  ,els.TimeProcessing
  ,els.[Status]
  ,els.ByteCount
  ,els.[RowCount]
 FROM [ReportServer].[dbo].[ExecutionLogStorage] els

 UNION ALL

 SELECT 'ELSDW' AS TableName
  ,elstw.InstanceName
  ,elstw.UserName
  ,elstw.[Format]
  ,elstw.TimeStart
  ,elstw.TimeEnd
  ,elstw.TimeProcessing
  ,elstw.[Status]
  ,elstw.ByteCount
  ,elstw.[RowCount]
 FROM [ReportServer].[dbo].[ExecutionLogStorageTW] elstw
 ) tmp
GROUP BY InstanceName
 ,UserName
 ,[Format]
 ,TimeStart
 ,TimeEnd
 ,TimeProcessing
 ,[Status]
 ,ByteCount
 ,[RowCount]
HAVING COUNT(*) = 1

This query will UNION all the results from ExecutionLogStorage and ExecutionLogStorageTW and display the data that is different. As you can see from the results below there are 72325 results that are different. The TableName column displays the table that the data resides in, therefore you can see that all the data resides in the ELS (ExecutionLogStorage) table.

Since ExecutionLogStorageTW is empty it should show the exact results as:

SELECT * FROM [ReportServer].[dbo].[ExecutionLogStorage]

Click here to view the rest of this post

SQL Server Index Properties in Management Studio

Understanding indexes and how they work can be complicated enough for a Jr. DBA, but throw in all the different options and properties and an index can soon be overwhelming. In this post, I’ll discuss the different options available when creating a basic index.

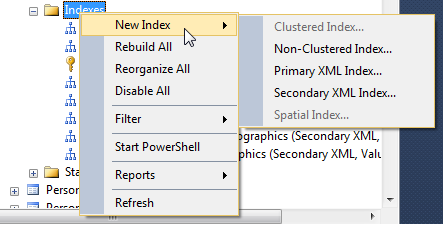
To create an index using SSMS, expand the tree for a table and right click on Indexes and select New Index: (This tip will not discuss the anatomy of an index, but will focus on the properties.)

SQL Freelancer SQL Server Index Properties

After choosing the index type, you will notice that there a few tabs on the left side that will define how your index will act. These tabs will differ between SSMS versions but basically have the same information. In this tip, we’ll be using SQL Server 2012 SSMS.

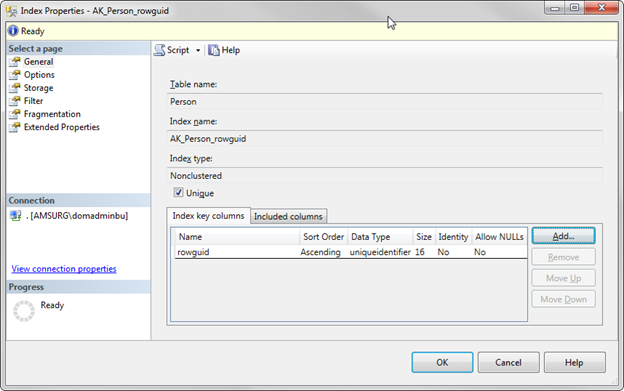
The first tab, General, is where you can set the index name, the key columns, and the included columns (if any). This tab also shows the table name and index type you selected:

SQL Freelancer SQL Server Index Properties
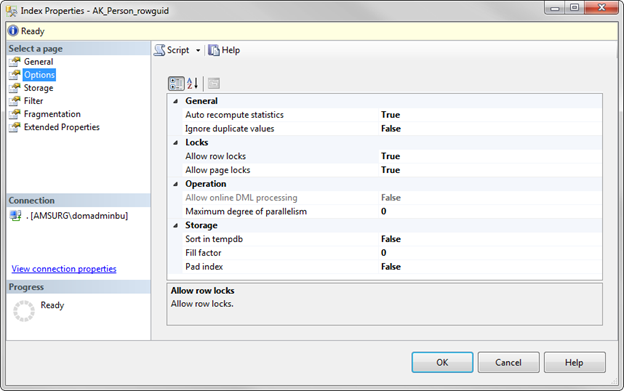
The next tab, Options, is where you can view or modify the properties for the index:

SQL Freelancer SQL Server Index Properties

Let’s go over each property.

Index Properties Options Page

We will begin with the options page.

Auto recompute statistics

This property defines whether or not you want SQL Server to automatically update the index statistics. Best practice is to leave this option set to True, otherwise you will have to manually update the statistics.

According to Microsoft, statistics are considered outdated when the following happens:

  • The table size has gone from 0 to >0 rows.
  • The number of rows in the table when the statistics were gathered was 500 or less, and the column modification counters (colmodctr) of the leading column of the statistics object has changed by more than 500 since then.
  • The table had more than 500 rows when the statistics were gathered, and the colmodctr of the leading column of the statistics object has changed by more than 500 + 20% of the number of rows in the table when the statistics were gathered.

Outdated statistics can lead to performance problems.

As the link above states, the statistics auto update is triggered by query optimization or by execution of a complied plan, and it involves only a subset of the columns referred to in the query.

Ignore duplicate values

This property specifies where a duplicate key value can be inserted into the column that is part the index. If set to “True”, SQL Server will issue a warning when an INSERT statement is about to create a duplicate key and will ignore the duplicate row. If this option is set to “False”, SQL Server will issue an error message and rolls back the INSERT statement.

Example:

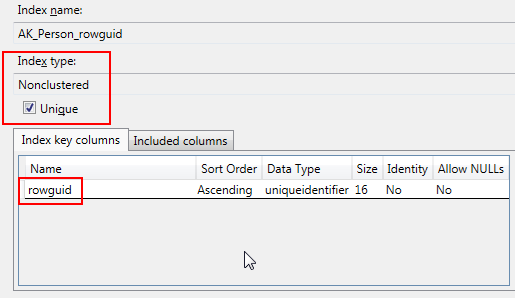
In this example (AdventureWorks2012.Person.Person), I have a Non-clustered, unique index. My key column is rowguid.

SQL Freelancer SQL Server Index Properties
I’ve set the Ignore duplicate values to “False”

SQL Freelancer SQL Server Index Properties

If I try to INSERT a duplicate value for rowguid, I get the following error:

Msg 2601, Level 14, State 1, Line 1 Cannot insert duplicate key row in object ‘Person.Person’ with unique index ‘AK_Person_rowguid’. The duplicate key value is (92c4279f-1207-48a3-8448-4636514eb7e2). The statement has been terminated.

If I change the Ignore duplicate values to “True” and try to INSERT a duplicate value for rowguid I get the following:

(0 row(s) affected)

As you can see, neither of these inserted the duplicate value because it was a UNIQUE index but one returned an error message and ended the statement while the other didn’t return an error. If I was inserting multiple records the first message would have rolled back the transaction while the second message would have inserted all the unique values and skipped over the unique record.

The default value for this option is “False” and can only be used on UNIQUE indexes.

Click here to view the rest of this post.

Change Schema on all SQL tables

Today I ran into a problem where all of my SQL Server tables used a different schema than dbo and the application couldn’t understand the different schema. Using the ALTER SCHEMA statement you can chance the schema of a table, for example, the following statement will change the schema from compmsauser to dbo.

ALTER SCHEMA dbo TRANSFER compmsauser.tablename

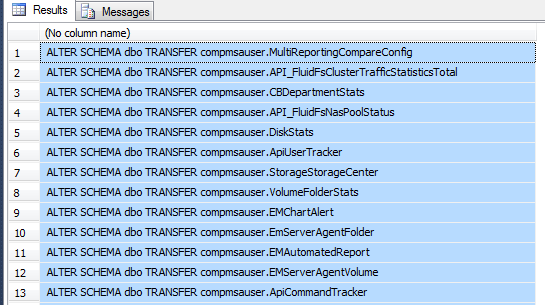
This works perfectly unless you have to change hundreds of table schemas. The following query will create the T-SQL needed to change every table: (change the WHERE clause to the schema you need to replace)

SELECT 'ALTER SCHEMA dbo TRANSFER ' + s.Name + '.' + o.Name
FROM sys.Objects o
INNER JOIN sys.Schemas s on o.schema_id = s.schema_id
WHERE s.Name = 'compmsauser'
And (o.Type = 'U' Or o.Type = 'P' Or o.Type = 'V')

SQL Freelancer SQL Server Schema Changes
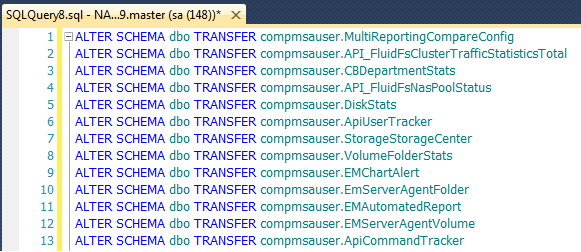
This query will create the ALTER SCHEMA statement for you! All you have to do now is copy and paste all of the results in a new query window and execute.

SQL Freelancer SQL Server Schema Changes

Identify and Correct SQL Server Forwarded Records

Forwarded records in SQL Server can cause performance issues on heap tables because the record outgrows the page and the database engine uses pointers to reference the data. For those that don’t know what a heap is, it is a table without a clustered index. The best practice is to have a clustered index on every table, however, sometimes there are cases when a clustered index is not needed. In this case, DBA’s should be aware of all heap tables and should be concerned about forwarded records causing poor performance.  In this post, I’ll discuss forwarded records and how fix them.

Forwarded records are records in a SQL Server table that have grown too large for the page that it currently resides on.  These types of records can only be found in heaps because tables with a clustered index keep the data sorted based on the clustered index.  With a heap, once the record outgrows the page, the record is moved to a new page and a forwarding pointer is left in the original location to point to the new location.

Let’s look at an example of a forwarding record.

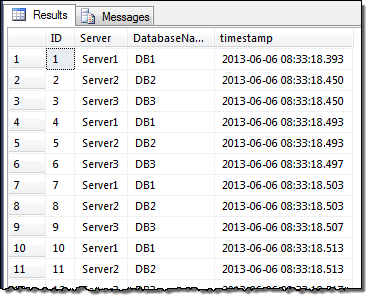
First, let’s create a table and insert some records:

CREATE TABLE [dbo].[Demo](
 [ID] [int] IDENTITY(1,1),
 [Server] [nvarchar](50) NULL,
 [DatabaseName] [nvarchar](100) NULL,
 [timestamp] [datetime] default getdate())
GO 
    CREATE INDEX idx_Server ON Demo(Server)
GO
    INSERT INTO Demo
    (Server,DatabaseName)
    VALUES  ('Server1', 'DB1') 
    INSERT INTO Demo
    (Server,DatabaseName)
    VALUES  ('Server2', 'DB2')
    INSERT INTO Demo
    (Server,DatabaseName)
    VALUES  ('Server3', 'DB3')
GO 100

SQL Freelancer SQL Server Forwarded Records
Next, let’s use the following DMV query to check our table:

SELECT
    OBJECT_NAME(ps.object_id) as TableName,
    i.name as IndexName,
    ps.index_type_desc,
    ps.page_count,
    ps.avg_fragmentation_in_percent,
    ps.forwarded_record_count
FROM sys.dm_db_index_physical_stats (DB_ID(), NULL, NULL, NULL, 'DETAILED') AS ps
INNER JOIN sys.indexes AS i
    ON ps.OBJECT_ID = i.OBJECT_ID  
    AND ps.index_id = i.index_id
WHERE OBJECT_NAME(ps.object_id) = 'Demo'

SQL Freelancer SQL Server Forwarded Records

Notice that the HEAP index type has 0 forwarded records.

Next we will change the table definition by modifying the DatabaseName column.

ALTER TABLE Demo ALTER COLUMN [DatabaseName] nvarchar(MAX)

If we run the DMV query again you will see that the forwarded_record_count has changed (along with a lot of fragmentation):

SQL Freelancer SQL Server Forwarded Records

The page count increased to 3 on the HEAP indicating that a new page was created and 50 forwarded records were created.

In a real world situation you will probably not know exactly when this happens so by changing the WHERE clause in the DMV query you can find all the forwarded records in a database. I would monitor heap tables at least monthly and if you notice high I/O on a heap, then that should be a hint that something needs to be looked at and possibly modified.

SELECT
    OBJECT_NAME(ps.object_id) as TableName,
    i.name as IndexName,
    ps.index_type_desc,
    ps.page_count,
    ps.avg_fragmentation_in_percent,
    ps.forwarded_record_count
FROM sys.dm_db_index_physical_stats (DB_ID(), NULL, NULL, NULL, 'DETAILED') AS ps
INNER JOIN sys.indexes AS i
    ON ps.OBJECT_ID = i.OBJECT_ID  
    AND ps.index_id = i.index_id
WHERE forwarded_record_count > 0

On my Test DB, you will notice I have two HEAP tables that have forwarded records including the one I just created.

SQL Freelancer SQL Server Forwarded Records
Click here to view the rest of this post.

Understanding Column Properties for a SQL Server Table

Designing a table can be a little complicated if you don’t have the correct knowledge of data types, relationships, and even column properties. In this post, I’ll go over the column properties and provide examples.

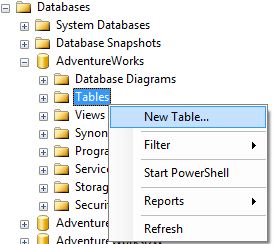
To create a new table using SSMS, expand the tree for a database and right click on Tables and select “New Table…” as shown below.

SQL Freelancer SQL Server Table Column Properties
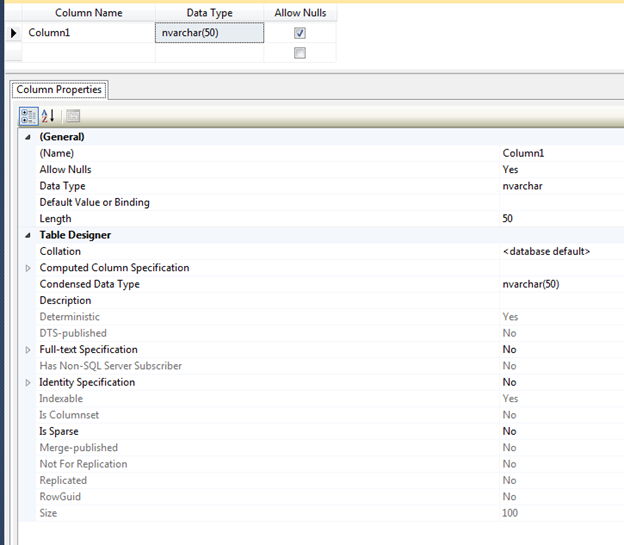
A new window will open and once you enter a Column Name and a Data Type you will see the appropriate Column Properties for that data type as shown below:

SQL Freelancer SQL Server Table Column Properties

Note: Some properties only appear for certain data types

OK, let’s go over each property.


(Name)

Name, simply, is the name of the column. You can change the name of the column in the table design view or in the column properties.


Allow Nulls

Allow Nulls indicates whether or not the column will allow null values. If the column does not allow null values then some sort of data must be put into this record. You can change this value in the table design view by checking/unchecking the Allow Nulls box or from the column properties.


Data Type

Data type, like its name implies, is the type of data stored for the column. You can learn more about data types in this article. You can change the data type in the table design view or the column properties.


Default Value or Binding

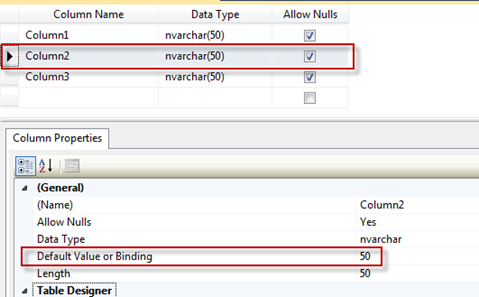
The Default Value option will allow you to enter a default value in case a value is not specified in an insert statement. For example, let’s say we have three columns in a table named Demo (Column1, Column2, and Column3) and we put a value of 50 in the Default Value or Binding for Column2.

SQL Freelancer SQL Server Table Column Properties

In the query below we are inserting data to Column1 and Column3, but nothing for Column2 so this will get the default value of 50.

INSERT INTO DEMO (Column1, Column3)
VALUES (1, ‘Brady Upton')

Our result set should be:

SQL Freelancer SQL Server Table Column Properties
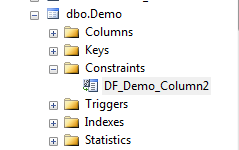
By creating a default value, this also creates a default constraint automatically as well as shown below:

SQL Freelancer SQL Server Table Column Properties


Length

Length displays the number of characters for character-based data types. For example, nvarchar(50) has a length of 50. You can change the length in table design view or column properties.


Collation

Collation can be specified at the instance level, database level, and even down to the column level. This property displays the collating sequence that SQL Server applies to the column. To change the collation using column properties, click the ellipsis and choose the collation:

SQL Freelancer SQL Server Table Column Properties

Computed Column Specification

Computed Column Specification displays information about a computed column. A computed column is a logical column that is not physically stored in the table unless the column is marked as Persisted (see Is Persisted below)

  • Formula: This field is where you can use formula’s. (See below for an example)
  • Is Persisted: This field indicates whether the results of the formula are stored in the database or are calculated each time the column is referenced

Click here to view the rest of this post.