Introducing SIOS high availability for SQL Server 2008/R2 in Azure

Support for SQL Server 2008 and 2008 R2 ended on July 9, 2019. That means the end of regular security updates. However, if you move those SQL Server instances to Azure or Azure Stack, Microsoft will give you three years of extended security updates at no additional cost. If you’re currently running SQL Server 2008 or 2008 R2 and you are unable to update to a later version of SQL Server, you will want to take advantage of this offer rather than running the risk of facing a future security vulnerability. An unpatched instance of SQL Server could lead to data loss, downtime, or a devastating data breach.

If you have a SQL Server failover cluster instance (FCI) or use hypervisor-based high availability, or other clustering technology on-premises for high availability, you’ll probably need the same in Azure. If you need to migrate to Azure/Azure Stack at end of support, and you require high availability for SQL Server 2008/2008 R2, there’s only one solution recommended by Microsoft: SIOS DataKeeper. SIOS DataKeeper enables clustering in the cloud, including the creation of a SQL Server 2008/2008 R2 failover cluster instance, allowing you to achieve your high availability goals.

Click here to view the rest of this post.

Always On Availability Group Latency Reports

With SQL Server 2012 we introduced Always On Availability Groups, and the Always On Availability Group Dashboard in SQL Server Management Studio (SSMS). This dashboard can be utilized by database administrators to view the current health of an Availability Group and its availability replicas and databases. While the dashboard can be configured to provide information regarding the latency between Primary and Secondary Replicas (can be calculated using the Commit LSN, Sent LSN and harden LSN values), it does not provide insights into the reason for the latency. To understand the reason for latency, requires capture and analysis of Extended Events and Performance Monitor counters. This activity can be time consuming and requires extensive knowledge of the Extended Events associated with Always On.

With the new SSMS 17.4 release, we are introducing the Availability Group Latency data collection and reporting built into the Availability Group dashboard. This feature masks the capture and analysis of the Extended Events from the end user and provides an easy to understand report detailing the time spent during the various phases of the Log Transport process.

What to use it for?

The Latency data collection functionality and the associated reports allows a database administrator to quickly discern the bottleneck in the log transport flow between the Primary and the Secondary replicas of an Availability Group. This feature does NOT answer the question “Is there latency in the Availability Group deployment?” but rather provides a way to understand why there is latency in the Availability Group Deployment. This functionality provides a way to narrow down the potential cause of latency in an Availability Group deployment.

How does it Work?

As seen below, the Availability Group Latency Data Collection functionality can be accessed from the Availability Group Dashboard.

Click here to view the rest of this post.

SQL Server AlwaysOn – Part 2 – Availability Groups Setup

In Part 1 we configured prerequisites for SQL Server 2012 new AlwaysOn and in Part 2 we’ll go over the fun stuff…configuring the High Availability Groups.

Create Sample Database and Create Backups

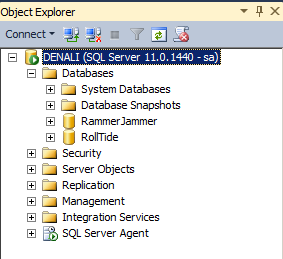
First thing we need to do is connect to the primary server using SSMS and create two databases and back them up to the network share we created. In this example I’ll create database RammerJammer and RollTide and then create database backups.

SQL Freelancer SQL Server AlwaysON

Specify Name

In SSMS go to Management, right click Availability Groups and click New Availability Group Wizard. Once the wizard appears click Next on the main screen and create a unique Availability Group name on the Specify Availability Group Name screen. I’ll name my group AG-Bama and then click Next.

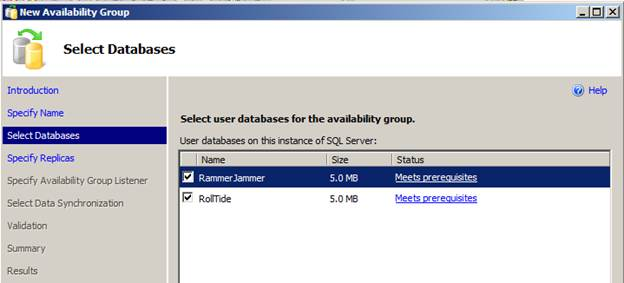
Select Databases

On the next screen we will need to select our databases that we want added to our availability groups. This screen also has a status column that will let us know ahead of time if our databases meet the prerequisites. I’ll select both databases and click Next.SQL Freelancer SQL Server AlwaysON

Specify Replicas

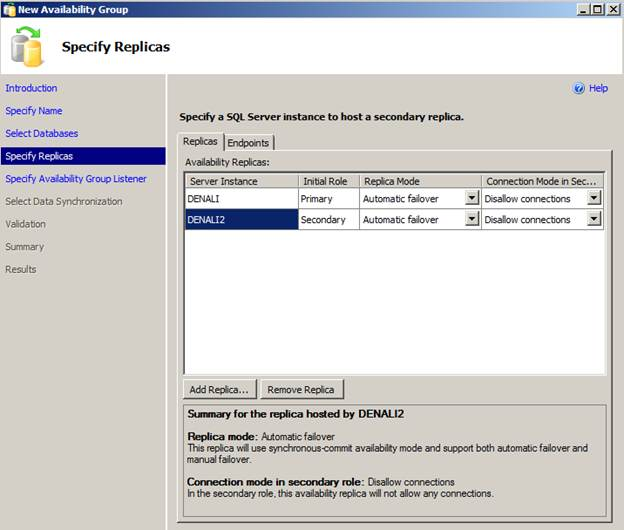
On the next screen click Add Replica… and connect to the other server (Denali2) Replica Mode can be set to Automatic Failover, High Performance, or High Safety.

  • Automatic Failover: This replica will use synchronous-commit availability mode and support both automatic failover and manual failover.
  • High Performance: This replica will use asynchronous-commit availability mode and support only forced failover (with possible data loss).
  • High Safety: This replica will use synchronous-commit availability mode and support only manual failover.

Connection Mode in Secondary Role can be set to Disallow connections, Allow only read-intent connections, or Allow all connections.

  • Disallow connections: This availability replica will not allow any connections.
  • Allow only read-intent connections: This availability replica will only allow read-intent connections.
  • Allow all connections: This availability replica will allow all connections for read access, including connections running with older clients. For this example, I’ll choose Automatic Failover and Disallow connections to my secondary role and click Next.SQL Freelancer SQL Server AlwaysON

Click here to view the rest of this tip.


New SQL Server AlwaysOn Feature – Part 1 configuration

SQL Server has produced some excellent High Availability options, but I was looking for an option that would allow me to access my secondary database without it being read-only or in restoring mode. I need the ability to see transactions occur and query the secondary database.

Enter SQL Server 2012 AlwaysON High Availability Groups.

The new AlwaysOn feature combines the powers of clustering and mirroring into one High Availability option, but also allows you to interact with the secondary databases something that clustering and mirroring do not allow.  In addition, AlwaysOn Availability Groups allows you to configure failover for one database, a set of databases or the entire instance again something you could not do with database mirroring.  Another feature is that you can create multiple failover targets where in the past database mirroring only allowed one failover partner.

In this tip I’ll show you a basic look at how to setup SQL Server 2012 AlwaysON Availability Groups.  Note that this tip is separated into 2 parts: Part 1 will consist of installing and configuring the prerequisites for AlwaysOn and Part 2 will consist of setting up the Availability Groups and showing how they work.

Let’s get started…

Environment:  I have setup two separate VM’s running in VM Workstation with Windows 2008 R2 Enterprise Edition and SQL Server 2008 R2 Enterprise named Denali and Denali2.

First thing we need to do is make sure both servers have .NET Framework 3.0 Features and Failover Clustering installed. To do this, go to Server Manager, Features, Add Feature. Check .NET Framework 3.0 and Failover Clustering and Install as shown below.
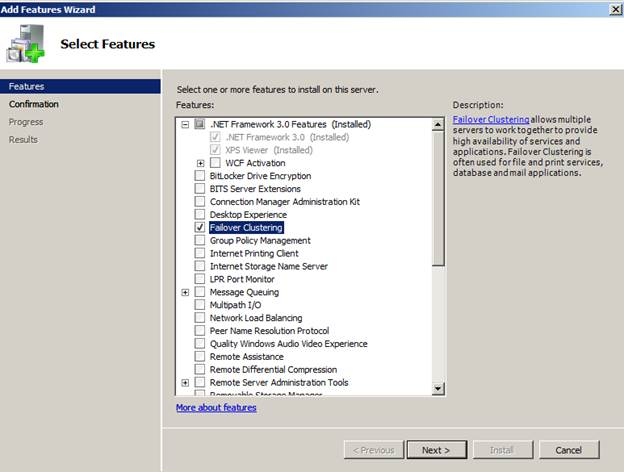
SQL Freelancer SQL Server AlwaysON

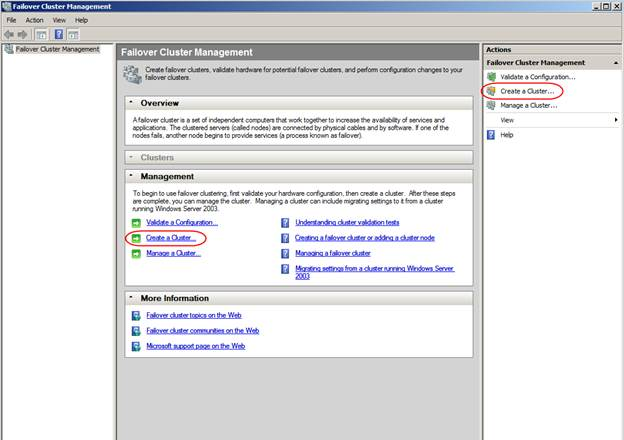
Once .NET and Failover Clustering are installed we can configure the cluster. Go to Control Panel, Administrative Tools, Failover Cluster Manager and click Validate a Configuration.
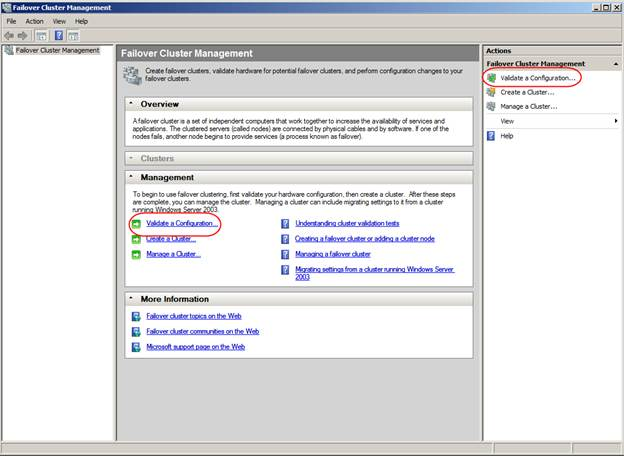
SQL Freelancer SQL Server AlwaysONOn the “Validate A Configuration Wizard” page click Next, then enter the names of the SQL Servers you want to configure. In this example we are using Denali and Denali2.
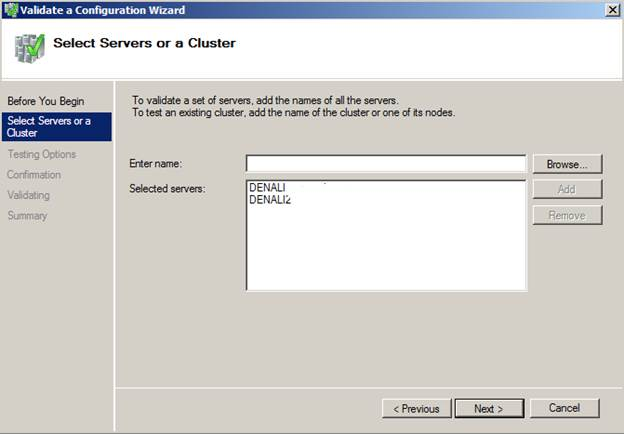
SQL Freelancer SQL Server AlwaysONClick Next to run through some validation tests. If you receive any errors click View Report to view the errors.
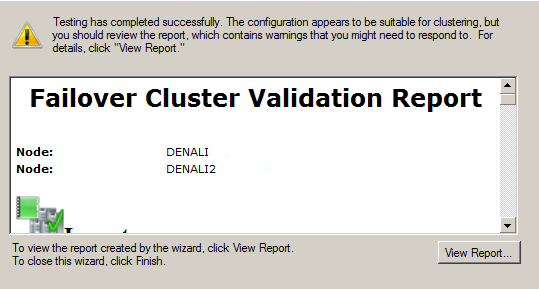
SQL Freelancer SQL Server AlwaysONAs you can see from above I received errors on my validation, because I am only using one network card. This means I have a single point of failure. In a production environment you would want to fix this, but this is only a warning and does not stop us from configuring clustering. From the main screen click “Create a Cluster

SQL Freelancer SQL Server AlwaysONAfter clicking “Create a Cluster” and clicking Next on the main page you should see the “Access Point for Administering the Cluster”. Here is where you will type in the name of your cluster. This doesn’t need to be your server name. Use a name to distinguish this cluster from other clusters. In this example, I’ll use DenaliCluster.

Click here to view the rest of this post.

SQL Server High Availability Options

Finding the right high availability option can be tricky.  The decision really depends on these items:

  • Needs
  • Budget
  • Scope
  • SQL Server version
  • Level of automation
  • Team level support
  • etc.

At a high level, there are five main high availability options including a new feature set to be release with SQL Server 2012:

  • Replication
  • Mirroring
  • Log Shipping
  • Clustering
  • AlwaysON

SQL Server Replication Overview

At a high level, replication involves a publisher and subscriber, where the publisher is the primary server and the subscriber is the target server. Replication’s main purpose is to copy and distribute data from one database to another. There are four types of replication that we will outline:

  • Snapshot replication
  • Transactional replication
  • Merge replication
  • Peer to Peer replication

Snapshot: Snapshot replication occurs when a snapshot is taken of the entire database and that snapshot is copied over to the subscriber. This is best used for data that has minimal changes and is used as an initial data set in some circumstances to start subsequent replication processes.

Transactional: Transactional replication begins with a snapshot of the primary database that is applied to the subscriber. Once the snapshot is in place all transactions that occur on the publisher will be propagated to the subscriber. This option provides the lowest latency.

Merge: Merge replication begins with a snapshot of the primary database that is applied to the subscriber. Changes made at the publisher and subscriber are tracked while offline. Once the publisher and subscriber are back online simultaneously, the subscriber synchronizes with the publisher and vice versa. This option could be best for employees with laptops that leave the office and need to sync their data when they are back in the office.

Peer to Peer: Peer to Peer replication can help scale out an application.  This is because as transactions occur they are executed on all of the nodes involved in replication in order to keep the data in sync in near real time.

Pros and Cons for SQL Server Replication
Pros
Cons
Can replicate to multiple servers
Manual failover
Can access all databases being replicated
Snapshot can be time consuming if you have a VLDB
Replication can occur in both directions
Data can get out of sync and will need to re-sync


SQL Server Database Mirroring Overview

Database Mirroring involves a principal server that includes the principal database and a mirror server that includes the mirrored database. The mirror database is restored from the principal with no recovery leaving the database inaccessible to the end users. Once mirroring is enabled, all new transactions from the principal will be copied to the mirror. The use of a witness server is also an option when using the high safety with automatic failover option. The witness server will enable the mirror server to act as a hot standby server. Failover with this option usually only takes seconds to complete. If the principal server was to go down the mirror server would automatically become the principal.

Click here to view the rest of this post.