How to create and use Temp tables in SSIS

Creating temp tables in SSIS seems like a straight-forward process using the Execute SQL Task, however there are a couple of properties that must be changed. In this post, we’ll walk through creating a simple temp table in SSIS.

Creating Sample SSIS Package

First, I will drag an Execute SQL Task into my Design view and rename it Create Temp Table:

SQL Freelancer SQL Server SSIS Temp Tables
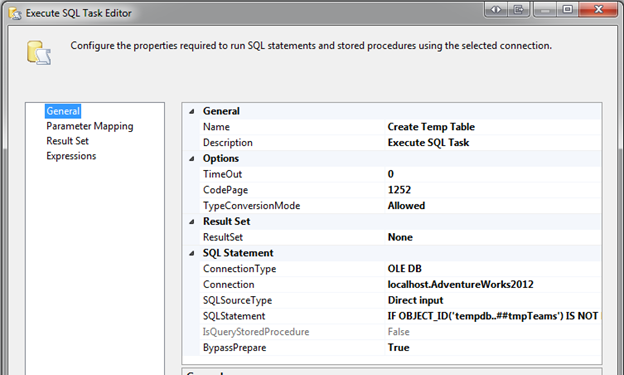
Next, I will right click and edit and choose my connection and SQLStatement:

SQL Freelancer SQL Server SSIS Temp Tables

IF OBJECT_ID('tempdb..##tmpTeams') IS NOT NULL
    DROP TABLE ##tmpTeams
    CREATE TABLE ##tmpTeams
    (
        Team VARCHAR(255),
        Mascot VARCHAR(255),
  State VARCHAR (2)
    )
    INSERT INTO ##tmpTeams VALUES
       ('Auburn', 'Tigers', 'AL'),
       ('Alabama', 'Crimson Tide', 'AL'),
       ('Mississippi', 'Rebels', 'MS'),
       ('Louisiana State', 'Tigers', 'LA'),
       ('Mississippi State', 'Bulldogs', 'MS'),
 ('Arkansas', 'Razorbacks', 'AR'),
 ('Texas A&M', 'Aggies', 'TX'),
 ('Georgia', 'Bulldogs', 'GA'),
 ('Tennessee', 'Volunteers', 'TN'),
 ('Vanderbilt', 'Commodores', 'TN'),
 ('Florida', 'Gators', 'FL'),
 ('South Carolina', 'Gamecocks', 'SC'),
 ('Missouri', 'Tigers', 'MO')

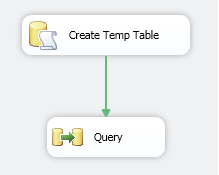
Next, I will drag a Data Flow task into my Design view, rename it Query and drag the precedence constraint between the two:

SQL Freelancer SQL Server SSIS Temp Tables
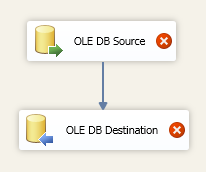
For the Data Flow task we are going to query the temp table and export the results to a database table. Right click the Data Flow task and choose Edit. Drag a OLE DB Source and a OLE DB Destination task into the Design view.

SQL Freelancer SQL Server SSIS Temp Tables

To avoid errors when configuring the OLE DB Source we need to create the temp table first using SSMS. In SSMS run the following statement to create a global temp table:

CREATE TABLE ##tmpTeams
    (
        Team VARCHAR(255),
        Mascot VARCHAR(255),
  State VARCHAR (2)
    )

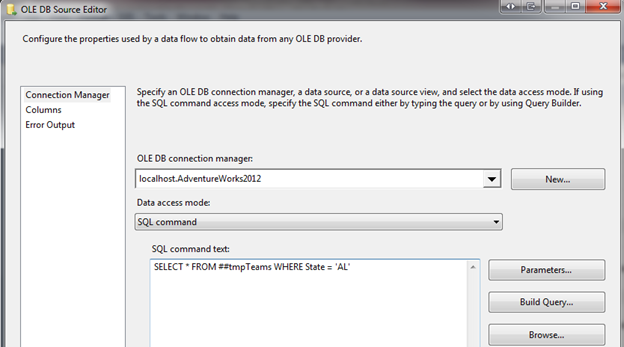
Once the table has been created, let’s go back into our SSIS package. Right click OLE DB Source and choose Edit. Choose your data source and choose SQL command for the Data access mode dropdown. In the SQL command text we will need to create our SQL statement:

SQL Freelancer SQL Server SSIS Temp Tables

Click here to view the rest of this post.

Report to Capture Table Growth Statistics for SQL Server

There are a few tools that monitor table size growth, but with the use of sp_spaceused and SQL Server Reporting Services (SSRS) you can make custom reports.

Using sp_spaceused

The system stored procedure sp_spaceused displays the number of rows, disk space reserved, and disk space used by a table, indexed view, or Service Broker queue in the current database in an object is provided or it displays the disk space reserved and used by the whole database.

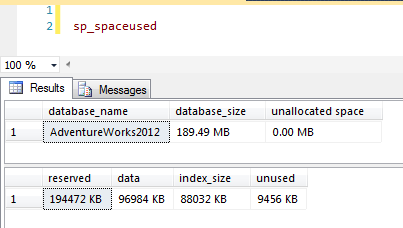
This procedure, sp_spaceused can be used at the database or table level. For example, sp_spaceused at the database level returns the following:

SQL Freelancer SQL Server SSRS Table Growth
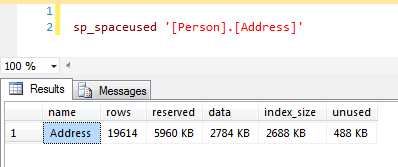
And sp_spaceused at the table level displays:
SQL Freelancer SQL Server SSRS Table Growth


Creating the Report

To create our custom report, first we will need to create a table that will store the data from sp_spaceused. For this example, I’ll create a table named TableSizeGrowth.

CREATE TABLE [dbo].[TableSizeGrowth](
[id] [int] IDENTITY(1,1) NOT NULL,
[table_schema] [nvarchar](256) NULL,
[table_name] [nvarchar](256) NULL,
[table_rows] [int] NULL,
[reserved_space] [int] NULL,
[data_space] [int] NULL,
[index_space] [int] NULL,
[unused_space] [int] NULL,
[date] [datetime] NULL
) ON [PRIMARY]

I’m also going to add a default constraint that will automatically update the date column to the current date for each new row.

ALTER TABLE [dbo].[TableSizeGrowth] ADD CONSTRAINT [DF_TableSizeGrowth_date]  
DEFAULT (dateadd(day,(0),datediff(day,(0),getdate()))) FOR [date]
GO

Next, we need to create a stored procedure that moves the data from sp_spaceused to the table we created above. I have put comments throughout the stored procedure to help you figure out what is going on. Also make sure you change the table names to match your tables. For this example, I want to monitor HumanResources.Employee, Production.Product, and Purchasing.Vendor tables.

SET ANSI_NULLS ON
GO
SET QUOTED_IDENTIFIER ON
GO
CREATE PROCEDURE [dbo].[sp_TableSizeGrowth] 
AS
BEGIN
 SET NOCOUNT ON

 --DECLARE VARIABLES
 DECLARE
 @max INT,
 @min INT,
 @table_name NVARCHAR(256),
 @table_schema NVARCHAR(256),
 @sql NVARCHAR(4000)

 --DECLARE TABLE VARIABLE
 DECLARE @table TABLE(
 id INT IDENTITY(1,1) PRIMARY KEY,
 table_name NVARCHAR(256),
 table_schema NVARCHAR(256))

 --CREATE TEMP TABLE THAT STORES INFORMATION FROM SP_SPACEUSED
 IF (SELECT OBJECT_ID('tempdb..#results')) IS NOT NULL
 BEGIN
  DROP TABLE #results
 END

 CREATE TABLE #results
 (
  [table_schema] [nvarchar](256) NULL,
  [table_name] [nvarchar](256) NULL,
  [table_rows] [int] NULL,
  [reserved_space] [nvarchar](55) NULL,
  [data_space] [nvarchar](55) NULL,
  [index_space] [nvarchar](55) NULL,
  [unused_space] [nvarchar](55) NULL
 )

 --LOOP THROUGH STATISTICS FOR EACH TABLE
 INSERT @table(table_schema, table_name)
 SELECT  
  table_schema, table_name
 FROM
  information_schema.tables 
 WHERE table_schema + '.' + table_name IN ('HumanResources.Employee','Production.Product', 'Purchasing.Vendor') --INSERT TABLE NAMES TO MONITOR

 SELECT
  @min = 1,
  @max = (SELECT MAX(id) FROM @table)

 WHILE @min = @max
 BEGIN
  SELECT 
   @table_name = table_name,
   @table_schema = table_schema
  FROM
   @table
  WHERE
   id = @min

  --DYNAMIC SQL
  SELECT @sql = 'EXEC sp_spaceused ''[' + @table_schema + '].[' + @table_name + ']'''

  --INSERT RESULTS FROM SP_SPACEUSED TO TEMP TABLE
  INSERT #results(table_name, table_rows, reserved_space, data_space, index_space, unused_space)
  EXEC (@sql)

  --UPDATE SCHEMA NAME
  UPDATE #results
  SET table_schema = @table_schema
  WHERE table_name = @table_name
  SELECT @min = @min + 1
 END

 --REMOVE "KB" FROM RESULTS FOR REPORTING (GRAPH) PURPOSES
 UPDATE #results SET data_space = SUBSTRING(data_space, 1, (LEN(data_space)-3))
 UPDATE #results SET reserved_space = SUBSTRING(reserved_space, 1, (LEN(reserved_space)-3))
 UPDATE #results SET index_space = SUBSTRING(index_space, 1, (LEN(index_space)-3))
 UPDATE #results SET unused_space = SUBSTRING(unused_space, 1, (LEN(unused_space)-3))

 --INSERT RESULTS INTO TABLESIZEGROWTH
 INSERT INTO TableSizeGrowth (table_schema, table_name, table_rows, reserved_space, data_space, index_space, unused_space)
 SELECT * FROM #results

 DROP TABLE #results
END

Now that the stored procedure has been created, let’s go ahead and execute it.

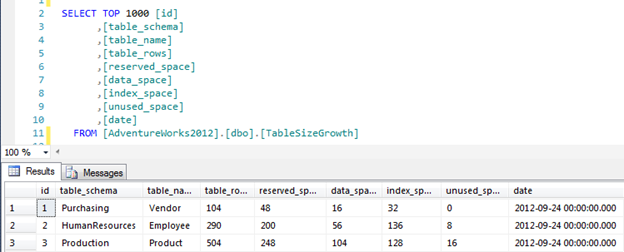
Once the stored procedure finishes we can view the table:

SQL Freelancer SQL Server SSRS Table Growth
Click here to view the rest of this post.

Creating a SharePoint Key Performance Indicator (KPI)

A KPI (Key Performance Indicator) is a graphical representation that displays progress against a predefined measure or business goal. KPIs make it easier for end users to evaluate the amount of progress without reading a bunch of data.

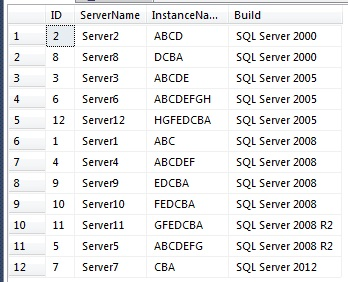
We will use the sample data (see below) I used in the previous post to create our KPI (this data is static since we imported it into Sharepoint as a separate list, so it will not report real time data)

Let’s say, for example, our DBA Manager wants to upgrade all the SQL Servers to at least SQL Server 2008 R2 and wants to know how many SQL Servers are not compliant. This is a good scenario for using a KPI to display this data.

SQL Freelancer SQL Server Sharepoint KPI


Creating the KPI

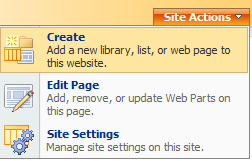
In Sharepoint, browse to the page where you want the KPI displayed and go to Site Actions > Create:

SQL Freelancer SQL Server Sharepoint KPI
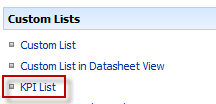
Custom Lists > KPI List:

SQL Freelancer SQL Server Sharepoint KPI
For this example, I’ll create a list called SQL Versions KPI:
SQL Freelancer SQL Server Sharepoint KPI
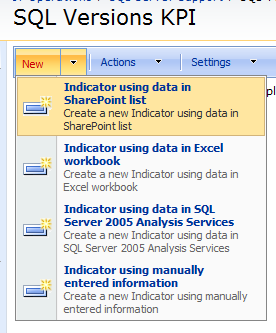
Once, the KPI list is created you should see a blank list. To add a KPI, click New > Indicator using data in Sharepoint list (you can also use other data sources for KPI’s):

SQL Freelancer SQL Server Sharepoint KPI
First, give the KPI a name:

SQL Freelancer SQL Server Sharepoint KPI
Click here to view the rest of this post.

Understanding Column Properties for a SQL Server Table

Designing a table can be a little complicated if you don’t have the correct knowledge of data types, relationships, and even column properties. In this post, I’ll go over the column properties and provide examples.

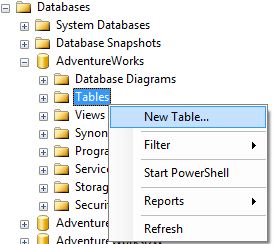
To create a new table using SSMS, expand the tree for a database and right click on Tables and select “New Table…” as shown below.

SQL Freelancer SQL Server Table Column Properties
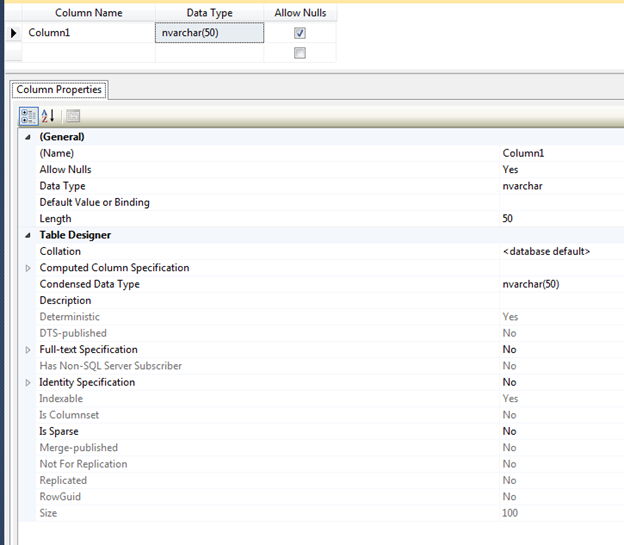
A new window will open and once you enter a Column Name and a Data Type you will see the appropriate Column Properties for that data type as shown below:

SQL Freelancer SQL Server Table Column Properties

Note: Some properties only appear for certain data types

OK, let’s go over each property.


(Name)

Name, simply, is the name of the column. You can change the name of the column in the table design view or in the column properties.


Allow Nulls

Allow Nulls indicates whether or not the column will allow null values. If the column does not allow null values then some sort of data must be put into this record. You can change this value in the table design view by checking/unchecking the Allow Nulls box or from the column properties.


Data Type

Data type, like its name implies, is the type of data stored for the column. You can learn more about data types in this article. You can change the data type in the table design view or the column properties.


Default Value or Binding

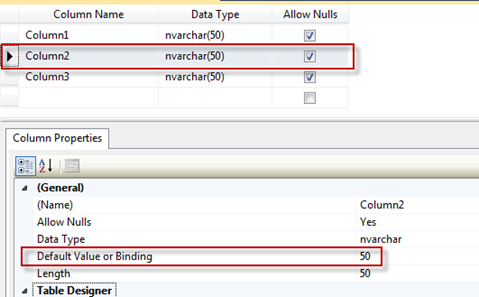
The Default Value option will allow you to enter a default value in case a value is not specified in an insert statement. For example, let’s say we have three columns in a table named Demo (Column1, Column2, and Column3) and we put a value of 50 in the Default Value or Binding for Column2.

SQL Freelancer SQL Server Table Column Properties

In the query below we are inserting data to Column1 and Column3, but nothing for Column2 so this will get the default value of 50.

INSERT INTO DEMO (Column1, Column3)
VALUES (1, ‘Brady Upton')

Our result set should be:

SQL Freelancer SQL Server Table Column Properties
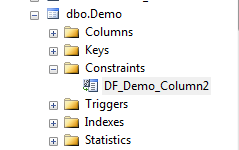
By creating a default value, this also creates a default constraint automatically as well as shown below:

SQL Freelancer SQL Server Table Column Properties


Length

Length displays the number of characters for character-based data types. For example, nvarchar(50) has a length of 50. You can change the length in table design view or column properties.


Collation

Collation can be specified at the instance level, database level, and even down to the column level. This property displays the collating sequence that SQL Server applies to the column. To change the collation using column properties, click the ellipsis and choose the collation:

SQL Freelancer SQL Server Table Column Properties

Computed Column Specification

Computed Column Specification displays information about a computed column. A computed column is a logical column that is not physically stored in the table unless the column is marked as Persisted (see Is Persisted below)

  • Formula: This field is where you can use formula’s. (See below for an example)
  • Is Persisted: This field indicates whether the results of the formula are stored in the database or are calculated each time the column is referenced

Click here to view the rest of this post.


Using SSIS to Automatically Populate a SharePoint List

In my opinion, the best (and easiest) way to accomplish this goal is using SSIS packages and a component from Codeplex called Sharepoint List Source and Destination. Ray Barley wrote a tip regarding this component a while back and he explained how to extract data from Sharepoint. I encourage everyone to check out his tip as it explains how to install the component and has some very good tips regarding the Sharepoint Source task. In this post, we’ll go over the Destination task in more detail.

Setup a Sharepoint List

For this tip, I’m just going to set up a quick custom list. This example is done in Sharepoint 2007, but Sharepoint 2010 should be close to the same.

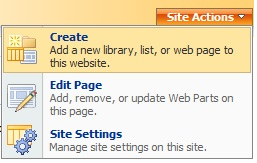
Go to Site Actions, Create:

SQL Freelancer SQL Server Sharepoint Populate List
Custom Lists, Custom List:

SQL Freelancer SQL Server Sharepoint Populate List
For this example, I’ll create a list called SQL Versions:
SQL Freelancer SQL Server Sharepoint Populate List
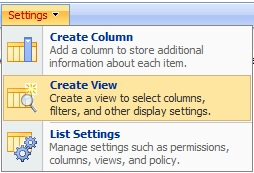
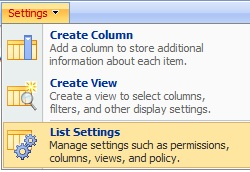
Once I have a list created, I need to create a view with custom columns that match my SQL query. For this example I need Server Name, Instance Name, and Build. To create a view click Settings, Create View:

SQL Freelancer SQL Server Sharepoint Populate List
Choose Standard View:

SQL Freelancer SQL Server Sharepoint Populate List
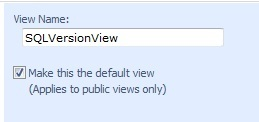
Name the View (for this example, I’ll name it SQLVersionView and make it my default view):
SQL Freelancer SQL Server Sharepoint Populate List
Next we’ll need to create custom columns. Go to Settings, List Settings:
SQL Freelancer SQL Server Sharepoint Populate List
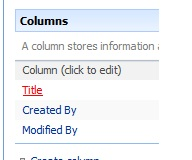
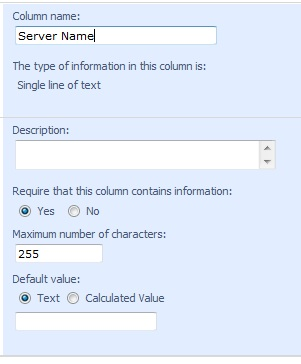
To create the first column click Title and rename it to Server Name:

SQL Freelancer SQL Server Sharepoint Populate ListSQL Freelancer SQL Server Sharepoint Populate List
Click here to view the rest of this post.

Finding what port SQL Server is listening on

SQL Server communicates over TCP/IP and listens for incoming connections over what is called a port. The default TCP/IP port for SQL Server is 1433. The port doesn’t have to be 1433, but 1433 is the official Internet Assigned Number Authority (IANA) socket number for SQL Server. (http://support.microsoft.com/kb/287932)

Named instances are configured for dynamic ports. This means when the SQL Server service is started it selects a random port. Best practice is to configure named instances to listen on a specific port.
You need to know what port your SQL Server is using so you can allow the ports through the firewall otherwise you can run into connection problems between the client and the server.

There are a few different ways to find the port number that SQL Server is listening on. Below you will find T-SQL statements that will allow you to find the port number for default and named instances.


--SQL Server 2000 Default Instance 
DECLARE @tcp_port nvarchar(5)

EXEC xp_regread
 @rootkey    =    'HKEY_LOCAL_MACHINE',
 @key        =    'SOFTWARE\Microsoft\MSSQLServer\MSSQLServer\SuperSocketNetLib\TCP',
 @value_name    =    'TcpPort',
 @value        =    @tcp_port OUTPUT

select @tcp_port

--SQL Server 2000 Named Instance
DECLARE @tcp_port nvarchar(5)

EXEC xp_regread
 @rootkey    =    'HKEY_LOCAL_MACHINE',
 @key        =     'SOFTWARE\Microsoft\Microsoft SQL Server(InstanceName)\MSSQLServer\SuperSocketNetLib\TCP',
 @value_name    =    'TcpPort',
 @value        =    @tcp_port OUTPUT

select @tcp_port

--SQL Server 2005 Default Instance
DECLARE @tcp_port nvarchar(5)

EXEC xp_regread
 @rootkey    =    'HKEY_LOCAL_MACHINE',
 @key        =    'SOFTWARE\Microsoft\Microsoft SQL Server\MSSQL.1\MSSQLServer\SuperSocketNetLib\TCP\IPAll',
 @value_name    =    'TcpPort',
 @value        =    @tcp_port OUTPUT

select @tcp_port

--SQL Server 2005 Named Instance
DECLARE @tcp_port nvarchar(5)

EXEC xp_regread
 @rootkey    =    'HKEY_LOCAL_MACHINE',
 @key        =    'SOFTWARE\Microsoft\Microsoft SQL Server\MSSQL.(#)\MSSQLServer\SuperSocketNetLib\TCP\IPAll',
 @value_name    =    'TcpPort',
 @value        =    @tcp_port OUTPUT

select @tcp_port

--SQL Server 2008 R2 Default Instance
DECLARE @tcp_port nvarchar(5)

EXEC xp_regread
 @rootkey    =    'HKEY_LOCAL_MACHINE',
 @key        =    'SOFTWARE\Microsoft\Microsoft SQL Server\MSSQL10_50.MSSQLSERVER\MSSQLServer\SuperSocketNetLib\TCP\IPAll',
 @value_name    =    'TcpPort',
 @value        =    @tcp_port OUTPUT

select @tcp_port

--SQL Server 2008 R2 Named Instance
DECLARE @tcp_port nvarchar(5)

EXEC xp_regread
 @rootkey    =    'HKEY_LOCAL_MACHINE',
 @key        =    'SOFTWARE\Microsoft\Microsoft SQL Server\MSSQL10_50.(InstanceName)\MSSQLServer\SuperSocketNetLib\TCP\IPAll',
 @value_name    =    'TcpPort',
 @value        =    @tcp_port OUTPUT

select @tcp_port

 --SQL Server 2012 Default Instance
DECLARE @tcp_port nvarchar(5)

EXEC xp_regread
 @rootkey    =    'HKEY_LOCAL_MACHINE',
 @key        =    'SOFTWARE\Microsoft\Microsoft SQL Server\MSSQL11.MSSQLSERVER\MSSQLServer\SuperSocketNetLib\TCP\IPAll',
 @value_name    =    'TcpPort',
 @value        =    @tcp_port OUTPUT

select @tcp_port

--SQL Server 2012 Named Instance
DECLARE @tcp_port nvarchar(5)

EXEC xp_regread
 @rootkey    =    'HKEY_LOCAL_MACHINE',
 @key        =    'SOFTWARE\Microsoft\Microsoft SQL Server\MSSQL11.(InstanceName)\MSSQLServer\SuperSocketNetLib\TCP\IPAll',
 @value_name    =    'TcpPort',
 @value        =    @tcp_port OUTPUT

select @tcp_port

Managing SQL Server Extended Events in Management Studio

SQL Server 2012 introduces a GUI in SQL Server Management Studio to create and manage extended events. Prior to the SQL Server 2012 integration, Extended Events could only be created using T-SQL. In this tip, I’ll show you step by step process on how to create a simple Extended Event in SQL Server 2012 using the new GUI in SQL Server Management Studio.

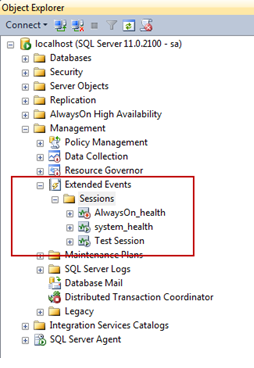
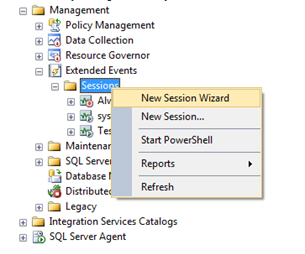
Creating an Extended Event has never been easier with SQL Server 2012. Open SSMS, and drilldown to Management, Extended Events, Sessions as shown in the image below.  By default, you should see an AlwaysOn_health and a system_health session already created. You will notice the AlwaysOn_health session is disabled and the system_health session is running. The system_health session collects system data that you can use to help troubleshoot performance issues. For the most part, SQL Server Extended Events use very little resources.

SQL Freelancer SQL Server Extended Events Management Studio SSMS
There are two ways to create a session. Right click on the Sessions folder and you can choose New Session or New Session Wizard. In this tip, we’ll step through using the wizard.

SQL Freelancer SQL Server Extended Events Management Studio SSMS

After clicking New Session Wizard, an Introduction window will appear that will give you a brief introduction. Click the “Next” button to continue.

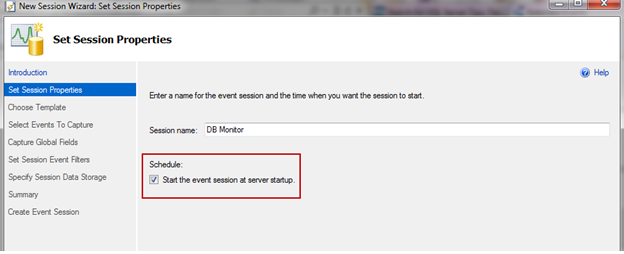
The next window, Set Session Properties, is where you can specify the session name and whether or not you want the session to start on server start-up. In this tip, I’ll name the session DB Monitor and choose to start the event session at server start-up. Click the “Next” button to continue.

SQL Freelancer SQL Server Extended Events Management Studio SSMS
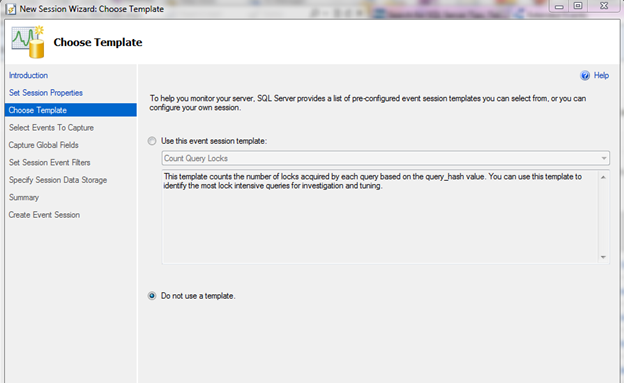
The next screen will allow us to choose a preconfigured template or create our own. If you’ve ever used SQL Server Profiler’s built in template, these function the same way. In this tip, we’ll create our own. Choose the “Do not use a template” option and click the “Next” button to continue.

SQL Freelancer SQL Server Extended Events Management Studio SSMS
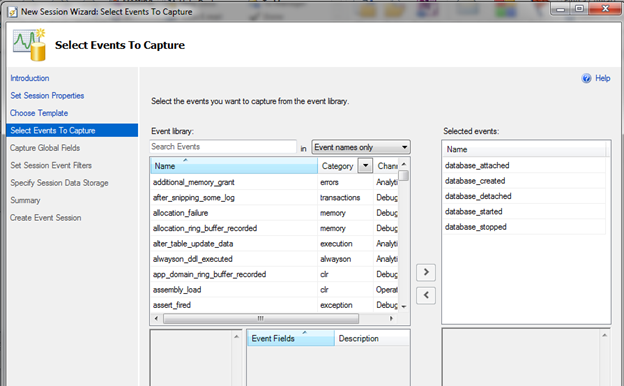
The “Select Events To Capture” window is an important one. This is where we select the events we want to capture. For this example, I want to monitor when my DB goes offline and when it becomes available, so I’ll choose the events that relate to this: database_attached, database_created, database_detached, database_started, and database_stopped. Once you select the events from the “Event library” (on the left), click the right arrow to move them to the “Selected events” (on the right). Click the “Next” button to continue.

SQL Freelancer SQL Server Extended Events Management Studio SSMS

Click here to view the rest of this post.

SQL Server User Defined Server Roles

A new feature to SQL Server 2012 is the ability to create user defined server roles and assign server level/scope permissions to these roles. DBA’s have always had the ability to create user defined database roles which act as a security layer at the database level, but we’ve never been able to create roles at the server level until SQL Server 2012.

In this post I will show you how to create user defined server roles using T-SQL and SQL Server Management Studio.

What Permissions Can Be Assigned

First, to view the list of permissions that can be assigned to a user defined server role run the following query:

USE master 
GO
SELECT * FROM sys.fn_builtin_permissions(DEFAULT) 
WHERE class_desc IN ('ENDPOINT','LOGIN','SERVER','AVAILABILITY GROUP','SERVER ROLE') 
ORDER BY class_desc, permission_name
GO

Create a Server Role in T-SQL

To create a server role called “juniordba” use the following:

USE master
GO
CREATE SERVER ROLE juniordba

Next we will create a login called Brady and then add it to the new juniordba role that was created:

USE master 
GO
ALTER SERVER ROLE juniordba ADD MEMBER Brady

We haven’t added any permissions to the server role, so Brady shouldn’t have access. To test this we can login as Brady and run the following query:

SELECT * FROM sys.dm_exec_connections

As you can see we get the following error message:

Msg 297, Level 16, State 1, Line 1 The user does not have permission to perform this action.

Click here to view the rest of this post.

SQL Server Clustering Management inside the command line

There are numerous commands you can run to manage a SQL Cluster from the command line. Below I’ll show you a few of these that include status checks and how to failover.

How to View SQL Clusters

This can be run from your workstation to view all SQL Clusters on the network you are connected to.

cluster /list

SQL Freelancer SQL Server Failover Cluster Command Prompt

View Status of Nodes

You can run this to view the status of all nodes in the cluster.

cluster node 
--or 
cluster node /status

SQL Freelancer SQL Server Failover Cluster Command Prompt

View Status of Cluster Groups

You can run this to view the status for all cluster resource groups.

cluster group 
--or 
cluster group /status

SQL Freelancer SQL Server Failover Cluster Command Prompt

View Status of Cluster Networks

You can run this to view the cluster networks status.

cluster network 
--or 
cluster network /status

SQL Freelancer SQL Server Failover Cluster Command Prompt
Click here to view the rest of this post.

Steps to Apply a Service Pack or Patch to Mirrored SQL Server Databases

In this post, I am going to outline my environment and then walk through the process of patching mirrored servers.

My test environment consists of two SQL Server 2005 SP2 servers named SSQL1 (principal) and SSQL2 (mirror) that contain eleven mirrored databases. The database mirroring operating mode is set to asynchronous and I’m upgrading to SP4.

Here is a look at the two mirrored instances.

SQL Freelancer SQL Server Mirroring Service Pack

Step 1
Always backup all system and user databases before applying patches.

Step 2
Remote Desktop into the “Mirror” server (SSQL2 in our example) and download/copy the patch to the server.

Step 3
Stop all SQL Services on the “Mirror” server.

Step 4
Run the patch on the “Mirror” server.

Step 5
Once the patch is complete, reboot the “Mirror” server.

Step 6 (optional)
If your database mirroring is set to asynchronous (High Performance mode), we will need to synchronize the databases first. To do this we will need to issue the following statement for every database on the “Principal” server that is mirrored.

ALTER DATABASE databasename SET SAFETY FULL

Here are the commands for the 11 databases on my server.

SQL Freelancer SQL Server Mirroring Service PackStep 7
The databases might change to “synchronizing” while the transactions catch up. Once all of the databases show “synchronized”, as shown below, we can perform the manual failover.
SQL Freelancer SQL Server Mirroring Service Pack

We can perform the failover using the following statement on the principal server for each database:

ALTER DATABASE databasename SET PARTNER FAILOVER

Here are the commands for the 11 databases on my server.

SQL Freelancer SQL Server Mirroring Service Pack
We can now see that the servers have switched roles.

SQL Freelancer SQL Server Mirroring Service Pack
Click here to view the rest of this post.