Capturing Deadlocks with Extended Events

I’ve been noticing a lot of deadlocks on my server. What’s the best way to track down the queries so I can fix the problem?

There are a few different ways that you can capture deadlock information. You can setup a trace flag (1222) to write the deadlock information to the error log, setup a Profiler trace to capture the deadlock graph, or setup an Extended Event to capture all sorts of information.

I’m going to focus on setting up an Extended Event in this post since MS continues to say Profiler will not be released in future versions. Extended Events are the future so why not start using them now?

In SSMS, drill down to Management, Extended Events. Right click on Sessions and click New Session Wizard:

Deadlocks with Extended Events 1

Click next on the Introduction screen and give the Session a name. I’m going to name this session Deadlocks:

Deadlocks with Extended Events 2

Click next. On the Choose Template screen you can choose a predefined template (like Profiler) or you can create your own events by choosing “Do not use a template”. For this post, let’s create our own:

Deadlocks with Extended Events 3

Click next and you’ll see hundreds of events (like Profiler). We only want to capture deadlock data so let’s scroll down to the very bottom and choose xml_deadlock_report. Click on the event and click the right arrow to move it into the Selected Events box:

Deadlocks with Extended Events 4

You can choose other events if needed, but for the simplicity of this post I’m just going to use this one. Click next. The Capture Global Fields page allows us to select what fields we want to capture. These are unique to each event selected. For this example, I’ll choose the following fields:

  • Callstack
  • Client_app_name
  • Client_hostname
  • Database_id
  • Database_name
  • Plan_handle
  • Process_id
  • Sql_text
  • Transaction_id
  • Transaction_sequence

Deadlocks with Extended Events 5

Click next. On this page you can apply filters if needed. I’ll setup a filter so that I only capture data from the RollTide database. There are hundreds of different filters that can be configured so that you don’t pull back data that is not needed:

Deadlocks with Extended Events 6

Click next to the Session Data Storage page. This page allows you to save data to a file or work with only the most recent data. I don’t want to keep thousands upon thousands of events so I’ll choose “Work with only the most recent data”

Deadlocks with Extended Events 7

The next page summarizes all the options we have selected. You can also script this session if you need to create it on other servers or save it for later. Click Finish to create the new session.

The last page allows you to start the session immediately and watch live data. For this post, I’ll choose both:

Deadlocks with Extended Events 8

You should see the new session under Extended Events and the Live Data tab should appear:

Deadlocks with Extended Events 9

Deadlocks with Extended Events 10

Once a deadlock occurs it should show the deadlock in the Live Data window:

Deadlocks with Extended Events 11

This view shows all of the fields we selected including the XML report. If you click on the Deadlock tab, you’ll see the graph:

Deadlocks with Extended Events 12

You can also use this query to see detailed information including the Deadlock graph and Event XML

SELECT
DATEADD(mi, DATEDIFF(mi, GETUTCDATE(), CURRENT_TIMESTAMP), DeadlockEventXML.value('(event/@timestamp)[1]', 'datetime2')) AS [EventTime],
DeadlockEventXML.value('(//process[@id[//victim-list/victimProcess[1]/@id]]/@hostname)[1]', 'nvarchar(max)') AS HostName,
DeadlockEventXML.value('(//process[@id[//victim-list/victimProcess[1]/@id]]/@clientapp)[1]', 'nvarchar(max)') AS ClientApp,
DB_NAME(DeadlockEventXML.value('(//process[@id[//victim-list/victimProcess[1]/@id]]/@currentdb)[1]', 'nvarchar(max)')) AS [DatabaseName],
DeadlockEventXML.value('(//process[@id[//victim-list/victimProcess[1]/@id]]/@transactionname)[1]', 'nvarchar(max)') AS VictimTransactionName,
DeadlockEventXML.value('(//process[@id[//victim-list/victimProcess[1]/@id]]/@isolationlevel)[1]', 'nvarchar(max)') AS IsolationLevel,
DeadlockEventXML.query('(event/data[@name="xml_report"]/value/deadlock)[1]') AS DeadLockGraph,
DeadlockEventXML
FROM
(
SELECT
XEvent.query('.') AS DeadlockEventXML,
Data.TargetData
FROM
(
SELECT
CAST(target_data AS XML) AS TargetData
FROM sys.dm_xe_session_targets st
JOIN sys.dm_xe_sessions s ON s.address = st.event_session_address
WHERE s.name = 'Deadlocks' AND
st.target_name = 'ring_buffer'
) AS Data
CROSS APPLY TargetData.nodes('RingBufferTarget/event[@name="xml_deadlock_report"]') AS XEventData(XEvent)
) AS DeadlockInfo 

Correct SQL Server TempDB Spills in Query Plans Caused by Outdated Statistics

Statistics are an integral part of SQL Server and query performance. In short, the query optimizer uses statistics to create query plans that will improve the overall performance of the queries ran. Each statistic object is created on a list of one or more table columns and includes a histogram displaying the distribution of values in the first column. The histogram can have up to 200 steps, but no more regardless of the number of rows in the column or index.

In this post we’ll take a look at one specific performance issue that you might find in an execution plan of a query. If you’ve ever noticed the following warning, then this post is for you:

1 - TempDB spills
Within the AdventureWorks2014 DB, I’ll use the following query for my example:

SELECT BusinessEntityID, FirstName, LastName, EmailPromotion
FROM [AdventureWorks2014].[Person].[Person]
WHERE EmailPromotion > 0
ORDER BY LastName

Looking at this query I can already tell contention may be present so I’ll go ahead and add a covering index:

CREATE NONCLUSTERED INDEX [IX_Person_EmailPromotion_INCLUDES]
ON [Person].[Person] ([EmailPromotion])
INCLUDE ([BusinessEntityID],[FirstName],[LastName])

When adding the index above, statistics were automatically created and updated. Since the addition of this index I’ve added a few thousand rows to the Person table.

Let’s run the query and make sure the “Include Actual Execution Plan” button is selected.

2 - TempDB spills

After the query executes let’s take a look at the execution plan by clicking on the tab in the Results pane:

3 - TempDB spills
These warnings were added to SQL Server Management Studio 2012 so if you’re using an older version you may not see this. The spill data to TempDB warning means that the query was not granted enough memory to finish the operation and spilled over into the TempDB to complete the operation. We all know reading from memory is much faster than reading from disk and this is exactly what is happening here. The query read as much as it could from memory before moving over to the TempDB disk.

Click here to view the rest of this post.

SQL Server 2016 Compare Showplan Option

Just released in SQL Server 2016 CTP 2.4 is a new feature that will allow us to compare execution plans. The main purpose of this feature is to provide a side-by-side comparison of two execution plans. This makes it easier to find similarities and changes on each plan. This is a very nice enhancement that aids in troubleshooting issues such as understanding the impact of rewriting queries or observing how a design change, such as an index, may impact the plan. In the tip below, we’ll go over how it works.

For this post, I’m using the AdventureWorks2014 database and I’m going to use the following query:

SELECT FirstName, LastName, CreditCardID 
FROM Person.Person p 
INNER JOIN Sales.PersonCreditCard c ON p.BusinessEntityID = c.BusinessEntityID
WHERE p.ModifiedDate > '2014-01-01'

pen SQL Server Management Studio (SSMS) 2016 and execute the query with SET STATISTICS IO ON and “Include Actual Execution plan“ enabled.

1-Compare Showplan SQL FreelancerClick the Messages tab and you’ll notice that we’re doing 3819 logical reads on the Person table. This is a sign that this query can be tuned. We’d like to get this number to the lowest possible.

2-Compare Showplan SQL Freelancer

Click the execution plan tab and you’ll see the plan along with some Missing Index Details.

3-Compare Showplan SQL Freelancer

The execution plan is what we’ll focus on in this tip, but I wanted to look at STATISTICS IO also to see if we can improve the number of logical reads.

To be able to compare plan we’ll need to save the execution plan. Right click anywhere in the plan window and select Save Execution Plan As… Choose a name and location and hit Save.

Click here to view the rest of this post.

SQL Server Management Studio 2015

Microsoft SQL Server Management Studio is a product I use throughout the day, every day. I’ve tried using other environments to access and manage SQL Server, but SSMS is what I learned using and what I always go back to. The problem with SSMS was that you couldn’t download it individually. You always had to have a licensed copy of SQL Server or install SQL Server Express with Tools to get this…..until now!

Microsoft has finally released a standalone download of SSMS. This release supports SQL Server 2016 through SQL Server 2005. It also provides the greatest level of support when working with Azure.

Some enhancements include:

  • New SSMS Installer – SSMS can now be installed with a light weight stand-alone web installer.
  • SSMS Updates – Receive notification within SSMS when new updates are available, and choose to install them at your convenience.
  • Enhanced SSMS support for Azure SQL Database – Several fixes and enhancements, including expanded SQL Server Management Objects (SMO) coverage, and an updated Import/Export wizard.

Let’s step through the install:

Download the SSMS-Web-Setup.exe from here.

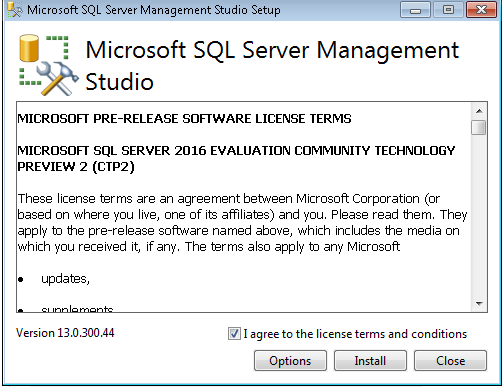
Start the install, agree to the license terms, and click Install.SSMS 2015 SQL Freelancer


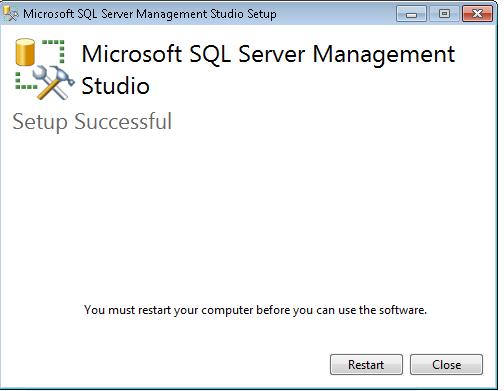
It should take a few minutes, but once this completes restart your computer and that’s it! Easy install.

SSMS 2015 SQL Freelancer 2


Passing Multiple Values into a Variable

Passing multiple values into a variable is a little more difficult than it should be. In other languages you can use functions such as Lists or Arrays, but SQL makes it a bit more complicated. To show you what I mean, let’s look at an example.

First, let’s create a Demo table:

CREATE TABLE [dbo].[Demo](
[ID] [int] NULL,
[Name] [varchar](50) NULL,
[Address] [varchar](50) NULL,
[State] [varchar](50) NULL,
[Zip] [int] NULL
)

Next, populate it with some data:

INSERT INTO [dbo].[Demo]
VALUES (1, 'Brady', '123 Main Street', 'TN', 12345)


INSERT INTO [dbo].[Demo]
VALUES (2, 'Tommy', '124 Main Street', 'TN', 12345)


INSERT INTO [dbo].[Demo]
VALUES (3, 'Jonny', '125 Main Street', 'TN', 12345)

Now that we have some data, let’s try a query using variables. I want to define a variable on the column ID.

DECLARE @MultipleValue varchar(200)
SET @MultipleValue = '1,2'

SELECT * FROM Demo WHERE ID IN (@MultipleValue)

After running this query, I get 0 results and an error:

Msg 245, Level 16, State 1, Line 24
Conversion failed when converting the varchar value ‘1,2’ to data type int.

Why? I know the ID’s 1 and 2 are in the table, but SQL is looking at this variable as one string. So unless I have 1,2 in the same ID column, it will show 0 results.

One way to get around this is to use a UDF, user defined function. In this function, we’re going to convert the comma separated values (1,2) into a table, then query from that.

CREATE FUNCTION [dbo].[MultipleValues] (@InStr VARCHAR(MAX))
RETURNS @TempTable TABLE
(id int not null)
AS
BEGIN

SET @InStr = REPLACE(@InStr + ',', ',,', ',')
DECLARE @SP INT
DECLARE @VALUE VARCHAR(1000)
WHILE PATINDEX('%,%', @INSTR ) <> 0

BEGIN

SELECT @SP = PATINDEX('%,%',@INSTR)
SELECT @VALUE = LEFT(@INSTR , @SP - 1)
SELECT @INSTR = STUFF(@INSTR, 1, @SP, '')
INSERT INTO @TempTable(id) VALUES (@VALUE)
END
RETURN
END
GO

Now that we have a UDF, let’s use this in the query:

DECLARE @MultipleValue varchar(200)
SET @MultipleValue = '1,2'

SELECT * FROM Demo WHERE ID IN (SELECT * FROM dbo.MultipleValues(@MultipleValue))

Ta da!

We now have two results. ID 1 and 2:

Passing multiple values into a variable

Using a DateTime Expression in a SSIS Destination

Recently, I’ve ran into a few situations where I needed to export some SQL data into a CSV on a daily basis. I also needed to keep these CSV files in an archive folder for reference in case a problem came up. Moving the files to an archive folder is not a problem using the “File System” task, but the CSV needs to be a unique name otherwise it will just overwrite the previous file. There are numerous ways to make the filename unique, but in the post I’ll describe adding a datetime stamp to each file which also helps determine when the file was created.

I’ll assume you already have a Data Flow task configured with a destination and a flat file source. In this example, I’m going to use the AdventureWorksDW2012 database and copy data from the DimProduct table to a CSV. I already have my OLE DB source task configured and now I’m going to configure the Flat Destination.

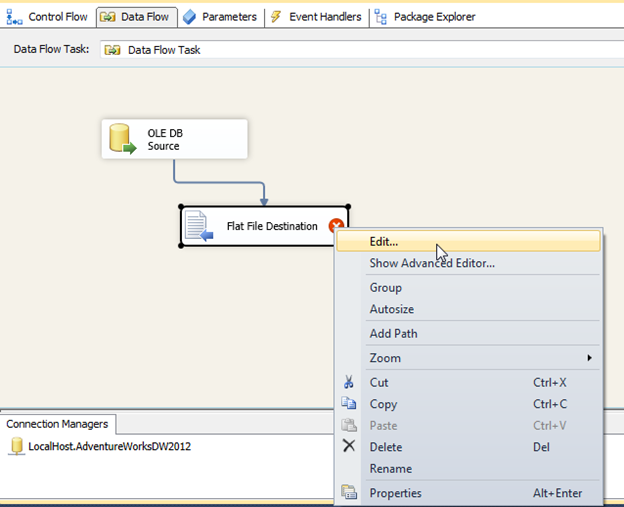
Right click the Flat File Destination and click Edit:

SSIS Expression Destination DateTime

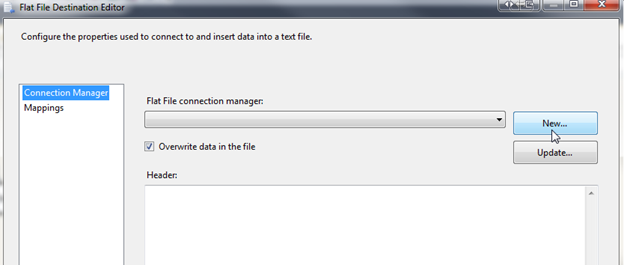
In the Flat File Destination Editor, click New…

SSIS Expression Destination DateTime

Select Delimited and click OK.

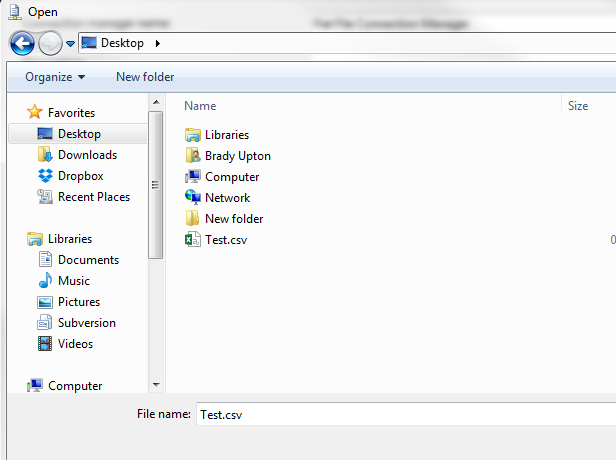
I’ve created a blank CSV on my Desktop which we’ll use for now, but this will eventually change:

SSIS Expression Destination DateTime

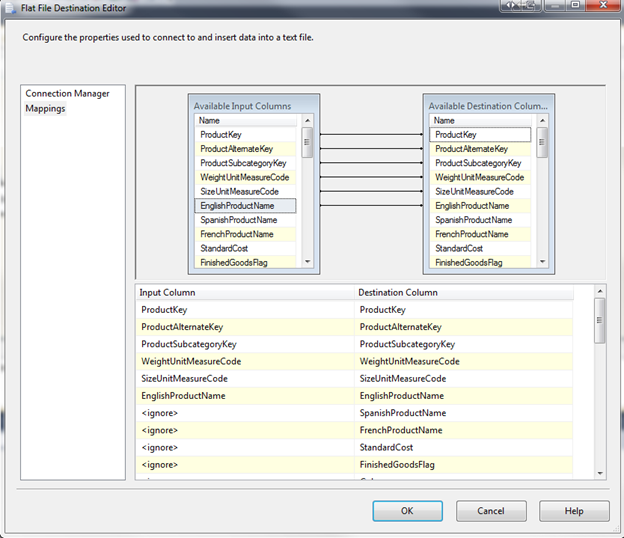
Click OK and select Mappings and verify all the mappings from the source are correct:

4 - SSIS Expression Destination DateTime

Once this is verified, click OK. (For this example, I only want to copy the first 6 columns)

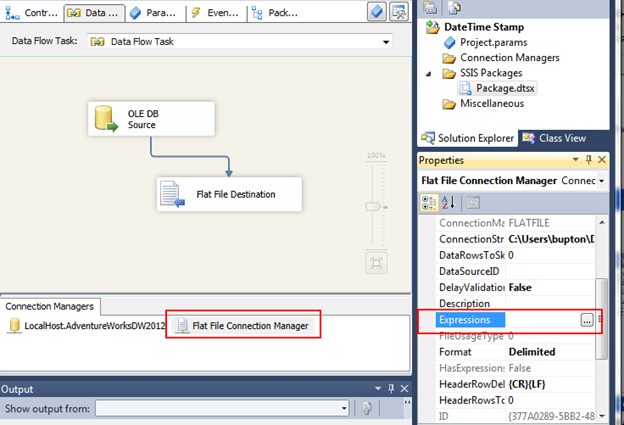
Next, we need to create an expression on the connection string so that it knows to add the datetime stamp. Click on the Flat File Connection Manager. Scroll down the Properties window until you see Expressions:

SSIS Expression Destination DateTime

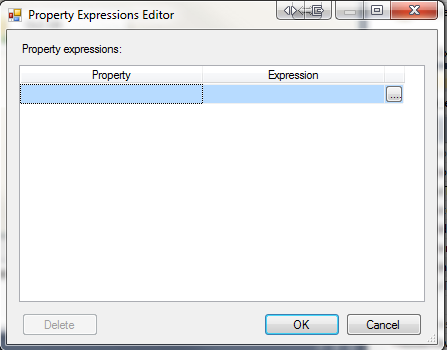
Click the ellipsis beside Expressions and the Property Expressions Editor will appear:

SSIS Expression Destination DateTime

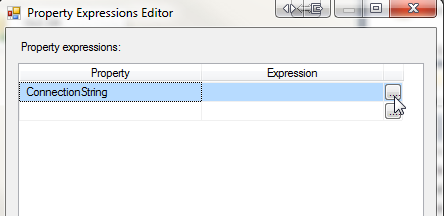
Under Property, select Connection String and click the ellipsis under Expression:

SSIS Expression Destination DateTime

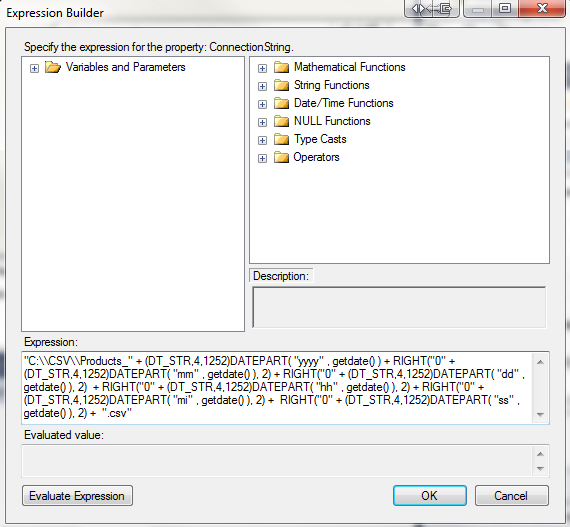
You should now see the Expression Builder window. Here is where we will define our complete file name including file path. For this example, I want to create the CSV in a directory named CSV on the C: drive. The filename that I will use is Products_datetime stamp.csv so the final output should be C:\CSV\Products_20150417092331.csv

The expression I’ll use to achieve this is below:

"C:\\CSV\\Products_" + (DT_STR,4,1252)DATEPART( "yyyy" , getdate() ) + RIGHT("0" + (DT_STR,4,1252)DATEPART( "mm" , getdate() ), 2) + RIGHT("0" + (DT_STR,4,1252)DATEPART( "dd" , getdate() ), 2) + RIGHT("0" + (DT_STR,4,1252)DATEPART( "hh" , getdate() ), 2) + RIGHT("0" + (DT_STR,4,1252)DATEPART( "mi" , getdate() ), 2) + RIGHT("0" + (DT_STR,4,1252)DATEPART( "ss" , getdate() ), 2) + ".csv"

Type your expression in the Expression window of the Expression builder:

SSIS Expression Destination DateTime

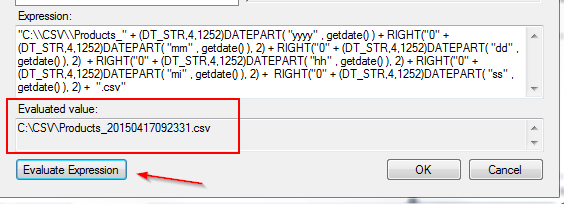
Click Evaluate Expression to view the output:

SSIS Expression Destination DateTime

Now that the expression is built, click OK twice. You should now see the expression formula icon beside the Flat File Connection Manager:

SSIS Expression Destination DateTime

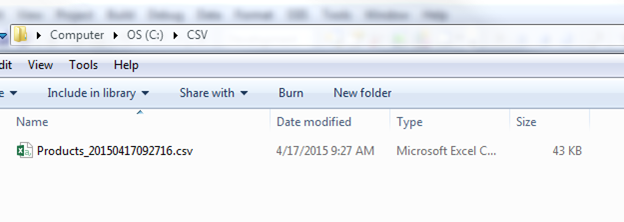
If we execute the package and look inside the CSV folder, you should see our new file:

SSIS Expression Destination DateTime

SQL Server Integration Services Connector for SalesForce

Problem:

I have a list of contacts in my SQL Server database that I would like to import into Salesforce and keep Salesforce up to date as new contacts are entered daily into my database. I know there are a few different ways to accomplish this but I’d like to use a SSIS package so I can automate.

Solution:

In my opinion, the best (and easiest) way to accomplish this goal is using SSIS packages and a component from CozyRoc called Salesforce Destination. CozyRoc provides advanced SSIS libraries of custom tasks, components and scripts for handling Zip, GZip, BZip2, Tar archives, enhanced script reuse and secure Internet communications. I always go to CozyRoc when I need a custom task. In this tip I’ll show you how to take a contact list from SQL Server and import it into SalesForce. I’ll also show you how to schedule this on a daily basis.

For this example, let’s say I have a contact table in my SQL Server database like the following:

SQL Server SSIS SalesForce

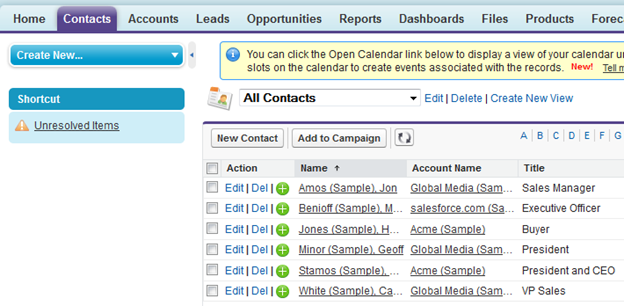
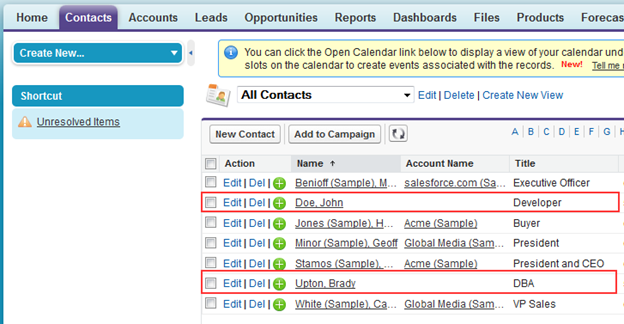
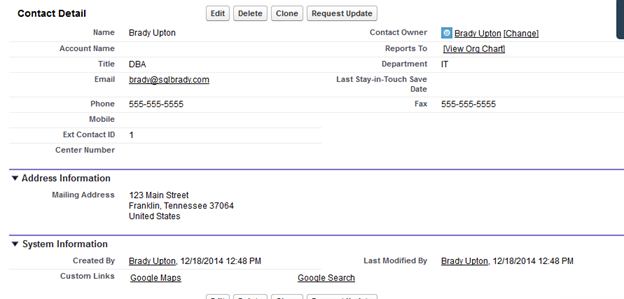
I need to import these records into my Contacts tab in SalesForce:

SQL Server SSIS SalesForce

Create SSIS package

First thing I’ll need to do is download the CozyRoc SalesForce component. This download can be found here: http://www.cozyroc.com/ssis/salesforce-destination

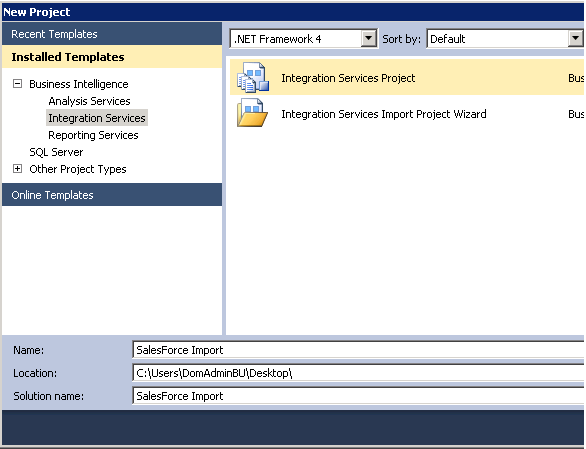
I’ll download and install this component on the server or workstation that I plan on developing the package. Once installed, open SQL Server Data Tools and create a SSIS project:

SQL Server SSIS SalesForce

First, let’s create a connection to the SQL Server database that stores the contact information and the Salesforce destination:

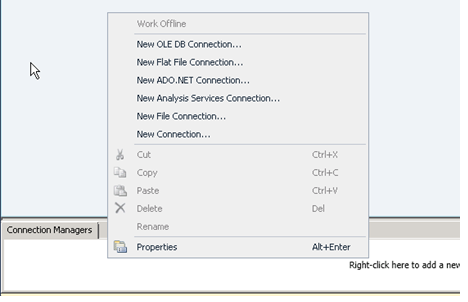
Right click in Connection Manager and create “New OLE DB Connection”:

SQL Server SSIS SalesForce

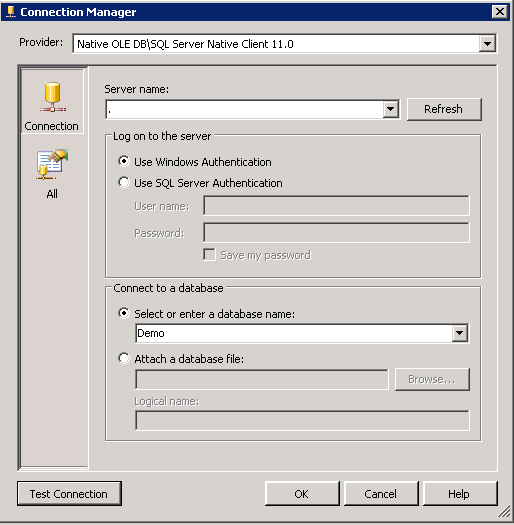
Type Server Name, credentials, and select database from drop down that stores the contact information. In this example, I’m selecting my local server and Demo database:

SQL Server SSIS SalesForce

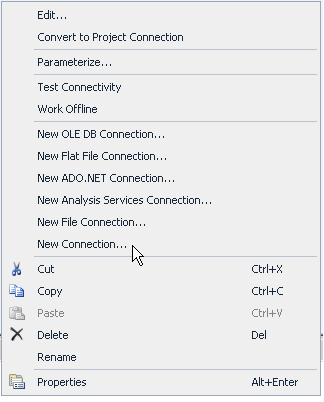
Test Connection and click OK. Right click on the Connection Manager again and click “New Connection”:

SQL Server SSIS SalesForce

If the Salesforce Destination component was installed properly, you should see a connection called “SFORCE”:

SQL Server SSIS SalesForce

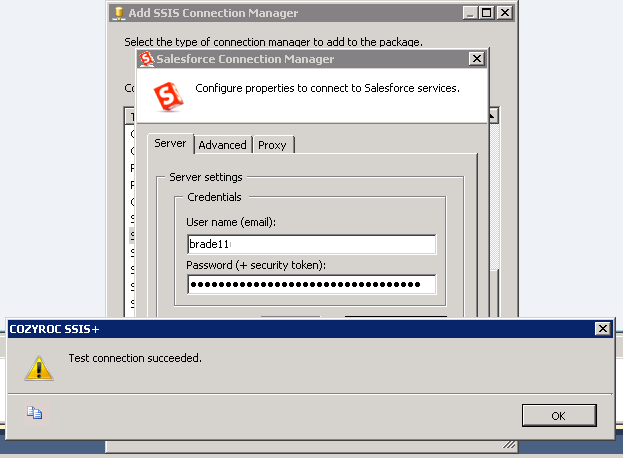
Click Add. Type your UserName and Password + Security token. If you don’t know your security token click here to read more about resetting it.

SQL Server SSIS SalesForce

Once you have entered your login credentials, make sure to test connection.

You should now have two connections in Connection Managers:

SQL Server SSIS SalesForce

Now to designing the package:

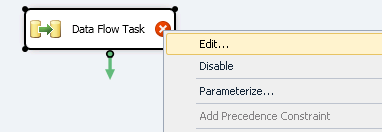
From the Control Flow we will add our Data Flow Task and right click to configure.

SQL Server SSIS SalesForce

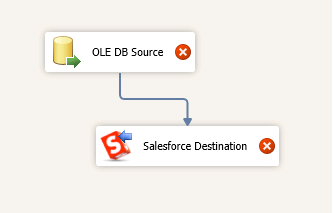
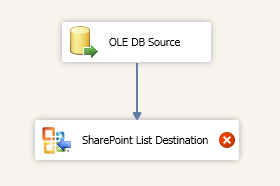
Add the OLE DB source and SalesForce Destination tasks to the designer:

SQL Server SSIS SalesForce

Configure OLE DB Source:

SQL Server SSIS SalesForce

To configure the SalesForce Destination right click and edit. Choose the connection manager you created earlier:

SQL Server SSIS SalesForce

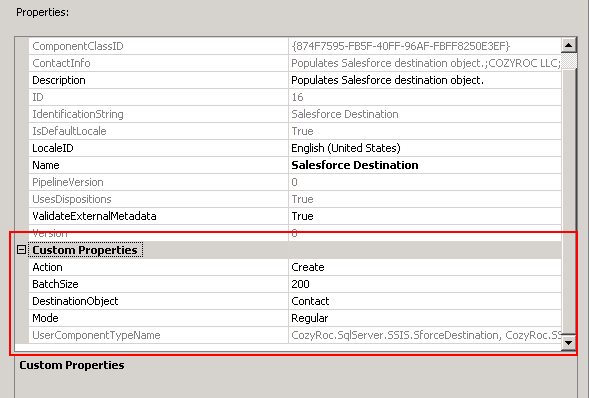
Click the Component Properties tab and you’ll notice a few options under Custom Properties:

Action:

Action Description
Create Create a new record in the destination object
Update Update an existing record in the destination object. You must specify the appropriate object record identifier for the update to work.
Delete Delete an existing record from the destination object. You must specify the appropriate object record identifier for the delete to work.
Upsert Update and insert a record in the destination object. Selecting this value displays the dynamic parameter ExternalId.


Batch Size: Specify the number of rows to be sent as a batch. The maximum for regular mode is 200. The maximum for bulk-load is 10,000\.

Destination Object: Specify the destination Salesforce object from a dropdown where the data is to be loaded.

ExternalID: Specify the external identifier field for updating the foreign key lookup with an external identifier.

Mode:

Value Description
Regular Process the data in regular mode
BulkData Process the data in bulk-load data mode
BulkBinary Process the data in bulk-load binary mode

SQL Server SSIS SalesForce

Since we are adding Contacts, we’ll select Create (Action) and Contact from the DestinationObject option.

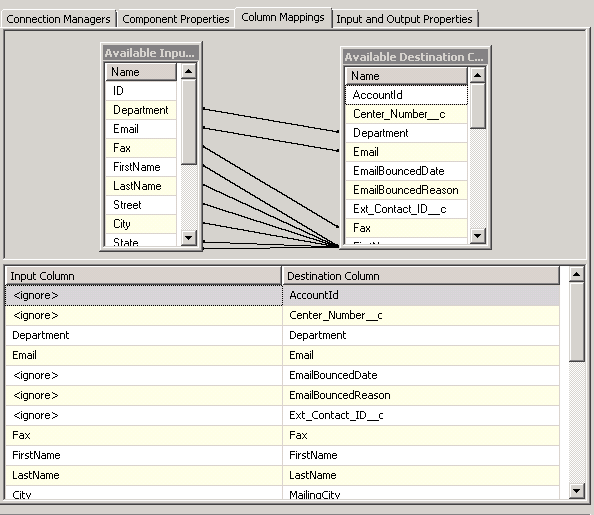
Click the Column Mappings tab and make sure all the columns are mapped correctly (delete mapping between ID’s for this example):

SQL Server SSIS SalesForce

Run the package and if everything is setup correctly your Salesforce instance should new contacts in it:

SQL Server SSIS SalesForceSQL Server SSIS SalesForce

Run this package as daily job

To run this package as a daily job that will populate Salesforce hourly, daily, weekly, etc. we’ll need to create a SQL Agent job and set a schedule.

Next Steps:

  • Updating Salesforce is a little more complicated and requires a custom field in Salesforce. The video titled “Upsert with external ID” located here will help with this.
  • Check out com for your custom SSIS needs.

Managing the size of the SQL Server SSIS catalog database

The SSIS catalog is the central point for working with Integration Services (SSIS) projects that you’ve deployed to the SSIS server. When the SSIS catalog is implemented, the SSISDB database is automatically created. The scope of this post will focus on the SSISDB growth more than the SSIS catalog itself.

SSIS projects, packages, parameters, environments, and operational history are all stored in the SSISDB database so if you have hundreds of SSIS packages or packages that run every few minutes you could see how the database storing all the historical information would grow exponentially.

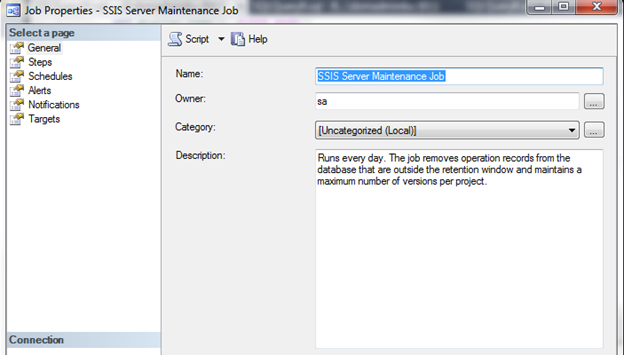
Also included when you enable this feature is a SQL Server Agent Job called SSIS Server Maintenance job:

SQL Freelancer SSIS Catalog 1
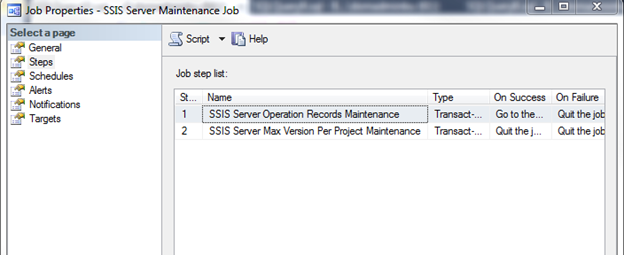
Inside this job are two steps, SSIS Server Operation Records Maintenance and SSIS Server Max Version Per Project Maintenance, that will help clean up the database. By default, this job is set to run at 12:00am nightly which is sufficient:

SQL Freelancer SSIS Catalog
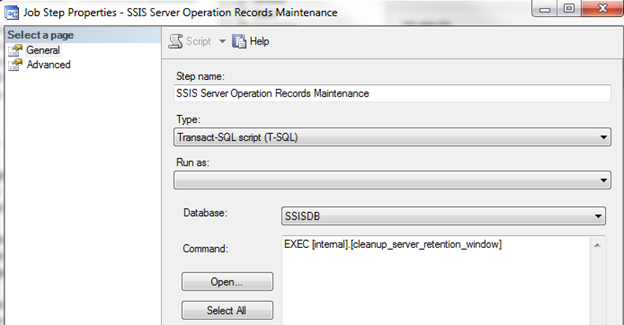
Looking at the first step, SSIS Server Operations Records Maintenance, you will notice that it executes a stored procedure named internal.cleanup_server_retention_window. This sounds like it could be the stored procedure that cleans up history:

SQL Freelancer SSIS Catalog
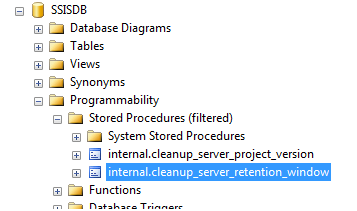
Let’s browse out to the stored procedure in Management Studio and take a look at the code:

SQL Freelancer SSIS Catalog
You can see from the very beginning of the stored procedure in the BEGIN TRY statement it first looks to see if Operation cleanup is enabled and if cleanup is enabled then it looks for the Retention Window:

SQL Freelancer SSIS Catalog
Click here to view the rest of this post.

SQL Server Maintenance Plans Reporting and Logging

This post will focus on the reporting and logging option of maintenance plans.

When a maintenance plan executes it’s nice to know the results especially in case of a failure. You can view the results in a few different ways that include the following:

  • Maintenance Plan history
  • SQL Server Agent Job history
  • SQL Server Error Log
  • sp_readerrorlog
  • Maintenance Plan Reporting and Logging

Maintenance Plan Reporting and Logging Options

The Maintenance Plan reporting and logging option is enabled by default, but a lot of DBA’s and developers don’t even realize it is an option, much less that it’s enabled.

To configure this option, open a maintenance plan and on the top bar beside Manage Connections…. you’ll notice a little chart/paper icon. It’s not hidden, but it doesn’t jump out at you and that’s probably why a lot of DBA’s don’t pay any attention.

SQL Freelancer SQL Server Maintenance Plan Reporting and Logging

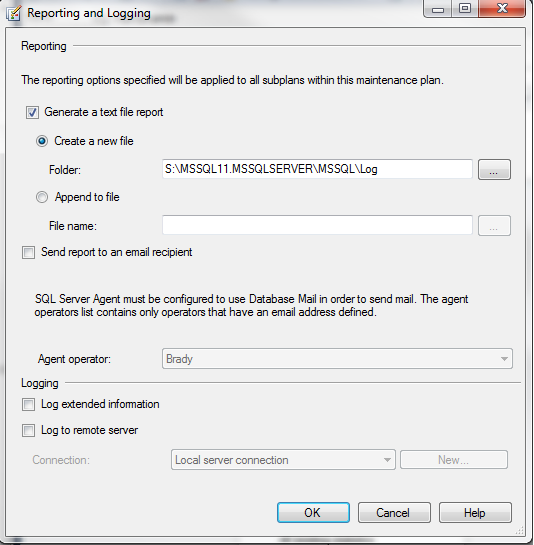
If you click the icon you’ll notice there are a few options to choose from:

SQL Freelancer SQL Server Maintenance Plan Reporting and Logging

Let’s go over each one of these:

Generate a text file report

This option allows you to enable or disable the text file report.

Create a new file

This option allows you to create a new report file each time a maintenance plan is executed. Create a new file is the default option and the default folder location is the folder you specified SQL Server to use for the LOG folder. You can specify a different location if preferred.

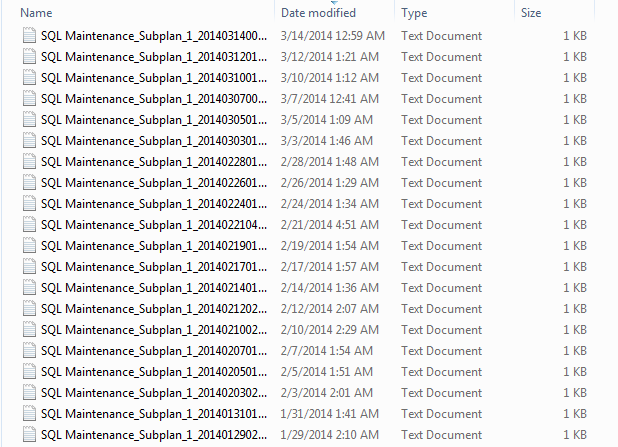
Here is a screenshot of Windows Explorer where a new file is created each execution:

SQL Freelancer SQL Server Maintenance Plan Reporting and Logging

You may notice that if you run a maintenance plan throughout the day that it could quickly fill up your drive with these 1kb files. Luckily, we don’t have to go in and check our file system and delete these files manually. SQL Server has a task that will automate this for us (see below).

While we are at this point, go ahead and check one of your servers. Check the location of a maintenance plan text file and then check the folder on the server. Or maybe you’ve noticed these files while browsing through your LOG folder and wasn’t sure where they came from.

Append to file

This option allows you to create one text file and append the results to that file. This will reduce the number of files, but will increase the size of the file and it makes it more difficult to read in my opinion.

Click here to view the rest of this post.

Managing the Transaction Log

In this post, I’ll discuss some tasks that you can do to manage the transaction log. The transaction log is very important to SQL Server and there are books alone on how to manage the log so this will be an introduction post.

Where do I start? The transaction log is an integral part of SQL Server. Every database has a transaction log that is stored within the log file that is separate from the data file. A transaction log basically records all database modifications. When a user issues an INSERT, for example, it is logged in the transaction log. This enables the database to roll back or restore the transaction if a failure were to occur and prevents data corruption. For example, let’s say Sue is using an application and inserts 2000 rows of data. While SQL Server is processing this data let’s say someone pulls the plug on the server. (Again, this is just an example, I hope nobody would actually do this). Because the INSERT statement was writing to the transaction log and it knows a failure occurred it will roll back the statement. If this wasn’t put in place, could you imagine having to sift through the data to see how many rows it inserted and then change the code to insert the remaining rows? Or even better, what if the application inserted random columns in no order and you had to determine what data was inserted and what data was left out? This could take forever!

The transaction log supports the following:

ROLLBACK TRANSACTION – If a user or application issues the ROLLBACK statement, or if the DB engine detects a failure, the log records are used to roll back the transaction.

Recover Incomplete Transactions – If you have ever started SQL Server from a failure you may have noticed databases in the (In Recovery) mode:

SQL Freelancer SQL Server Transaction Log

This is an indication that SQL Server is rolling back transactions that did not complete before the SQL Server was restarted or it is rolling forward all modifications that were recorded in the log but not written to the data file.

Rolling a restored DB, file, filegroup, or page forward to the point of failure – If SQL Server were to fail and you need to restore the database back to the point in which the failure occurred you can as long as you are using the FULL recovery model. Start with a full backup, then apply the latest differential, and the subsequent transaction log backups up to the point of failure.

High availability solutions – Transactional replication, mirroring, and log shipping all use the transaction log.


Transaction Log Truncation

One thing that I see a lot of administrators ask about is transaction log size and how to truncate it. Log records that are not managed correctly will eventually fill up the disk causing no more modifications to the database. Transaction log growth can occur for a few different reasons. Long running transactions, incorrect recovery model configuration and lack of log backups can grow the log.

Log truncation frees up space in the log file so the transaction log can reuse it. Unless there is some kind of unexpected delay, log truncation will occur automatically after a checkpoint (if the database is in SIMPLE recovery model) or after a log backup (if the database is in FULL or BULK-LOGGED recovery model). MSSQLTips.com offers plenty of tips regarding transaction log truncation.


Recovery Models

I mentioned recovery models above so I’ll give a brief overview of each one…

Full – In the Full recovery model, log files should be backed up on a regular basis to prevent the disk from filling up the drive. Also, in the Full recovery model, you can restore a database to the point of failure depending on your log backup schedules. This is the default for the model database in SQL Server. If you leave this recovery model set to Full, make sure you schedule log backups.

Simple – In the Simple recovery model, transaction log backups cannot be used. This means that SQL Server will automatically reclaim disk space at certain intervals, which can be good, but it also means that if a failure were to occur you can only restore back to the last full backup since all transactions are lost in between. This is generally used in development environments.

Bulk Logged – In the Bulk Logged recovery model, certain large scale or bulk copy operations are minimally logged. I have never left a database in the Bulk Logged recovery model for a large amount of time. I usually will have a database in the Full recovery model and if I’m doing a bulk insert and don’t need to log the transactions, I’ll switch to Bulk Logged and then back to Full once this is complete. Bulk Logged, however, does support log backup and point in time recovery.


Backup the Log File

When using the Full or Bulk Logged recovery models it is recommended to backup the transaction log regularly. Remember, when the log is backed up, it will automatically truncate.

Before you backup the transaction log, you must have a full backup otherwise you will get an error:

SQL Freelancer SQL Server Transaction Log

You can perform a backup using SQL Server Management Studio (SSMS) or the following syntax:

BACKUP LOG [Demo]
TO DISK = N'D:\Backups\Demo.bak'

Monitoring the Log

Monitoring the log file is very important and SQL Server has made it fairly easy for us to do this. One way to find information about the log is in the catalog view sys.database_files. This view returns information about data and log files that include type of file, name, location, state, size, growth, etc. The following query will filter down to only the log file and displays some very useful information:

SELECT name AS [File Name], physical_name AS [Physical Name], size/128.0 AS [Total Size in MB], size/128.0 - CAST(FILEPROPERTY(name, 'SpaceUsed') AS int)/128.0 AS [Available Space In MB], [growth], [file_id]
FROM sys.database_files
WHERE type_desc = 'LOG'

SQL Freelancer SQL Server Transaction LogYou can also use DBCC SQLPERF (‘logspace’) which has been around for a while. This command displays useful details such as DB name, Log Size (MB) and Log Space Used (%):

SQL Freelancer SQL Server Transaction Log

Controlling the growth of the transaction log can help in performance issues. To change the growth increment, use the FILEGROWTH option. A value of 0 indicates that automatic growth is set to off and no additional space is permitted. A small autogrowth increment on a log file can reduce performance. The file growth increment on a log file should be sufficiently large to avoid frequent expansion. The default growth increment of 10 percent is generally suitable.

As you can see, the transaction log is used throughout SQL Server, and the information above will get you started managing the transaction log. There are multiple items that I did not cover in this tip that include:

  • Modifying the log file
  • Shrinking the log file
  • Adding/Removing a log file
  • How a log file is used in High Availability solutions
  • How to restore to a point in time