SSIS Series: How to use SSIS Aggregate Data Flow Task – Basic and Advanced

From Microsoft, the Aggregate transformation applies aggregate functions, such as Average, to column values and copies the results to the transformation output. Besides aggregate functions, the transformation provides the GROUP BY clause, which you can use to specify groups to aggregate across.

The Aggregate transformation supports the following operations.

Operation Description
Group by Divides datasets into groups. Columns of any data type can be used for grouping. For more information, see GROUP BY (Transact-SQL).
Sum Sums the values in a column. Only columns with numeric data types can be summed. For more information, see SUM (Transact-SQL).
Average Returns the average of the column values in a column. Only columns with numeric data types can be averaged. For more information, see AVG (Transact-SQL).
Count Returns the number of items in a group. For more information, see COUNT (Transact-SQL).
Count distinct Returns the number of unique nonnull values in a group.
Minimum Returns the minimum value in a group. For more information, see MIN (Transact-SQL). In contrast to the Transact-SQL MIN function, this operation can be used only with numeric, date, and time data types.
Maximum Returns the maximum value in a group. For more information, see MAX (Transact-SQL). In contrast to the Transact-SQL MAX function, this operation can be used only with numeric, date, and time data types.

This transformation could also be implemented with a SQL query after an initial load, but this task makes it nice to take care of the transformation within SSIS so that the data is ready on export. Let’s take a quick look at how it works.

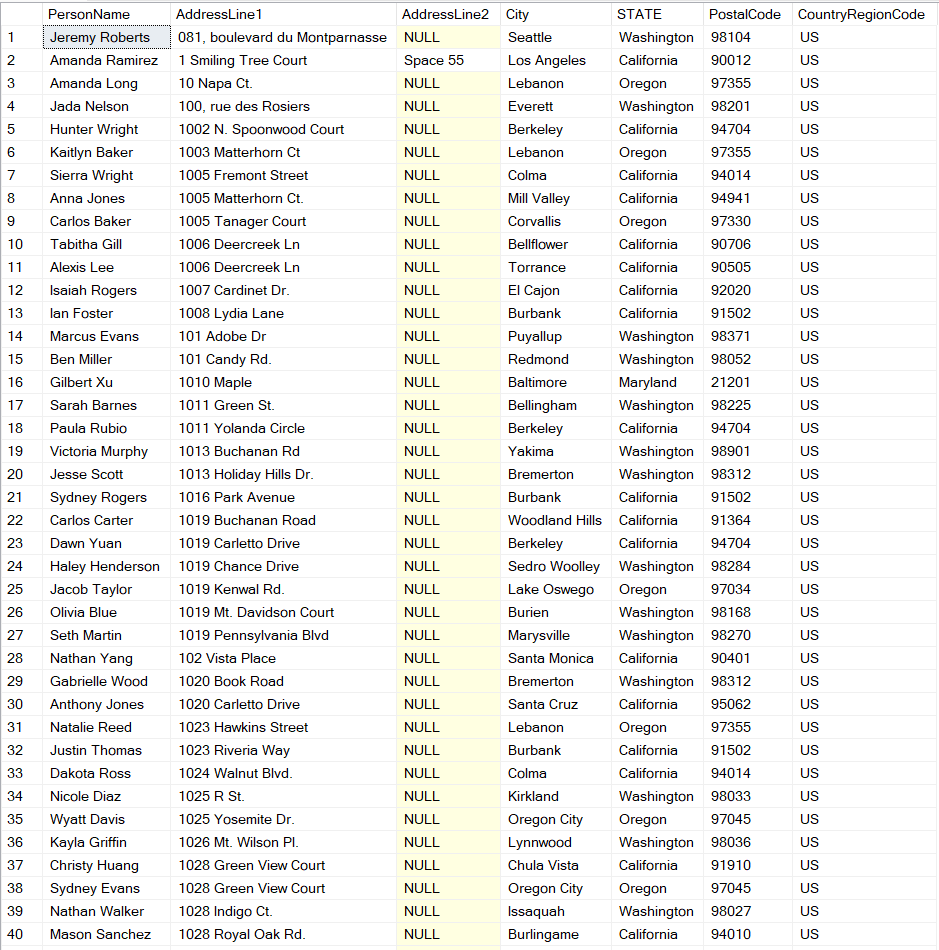
Using AdventureWorks database, I’ll run the following query which gives me everyone in the Person.Person table that is located in the US.

SELECT firstname + ' ' + lastname AS PersonName, AddressLine1, AddressLine2, City
,sp.[Name] AS STATE, PostalCode, CountryRegionCode
FROM person.Person p
JOIN person.BusinessEntityAddress bea ON p.BusinessEntityID = bea.BusinessEntityID
JOIN person.Address a ON bea.AddressID = a.AddressID
JOIN person.StateProvince sp ON a.StateProvinceID = sp.StateProvinceID
WHERE CountryRegionCode = 'US'

For this post, let’s pretend our boss wants to see how many people we have in each state. So a simple COUNT(*) and GROUP BY State query would work, but we’ll use SSIS to export this into a table using the Aggregate task.

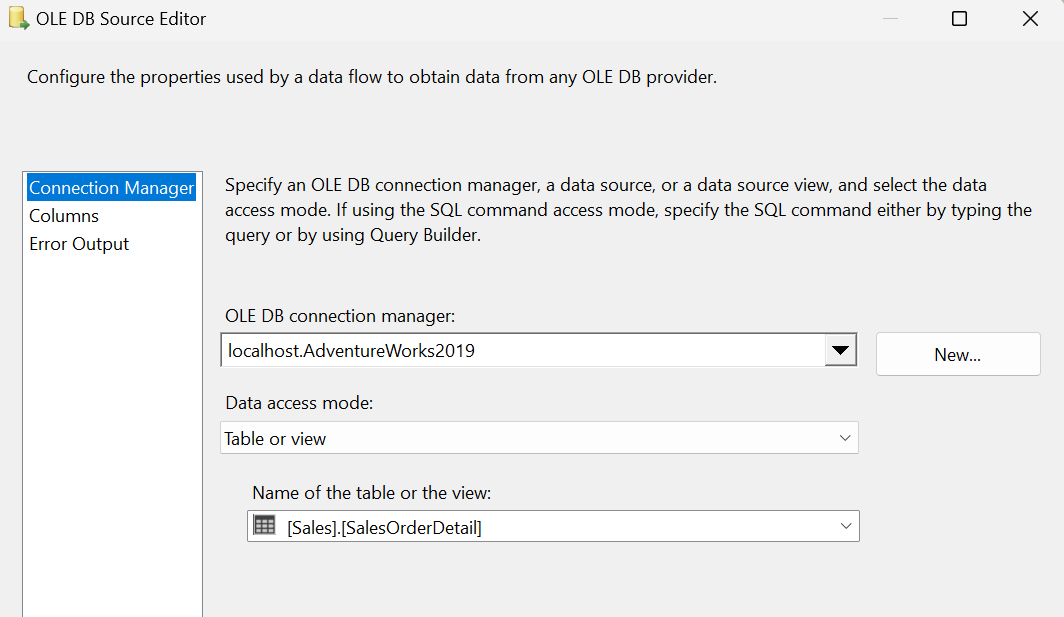
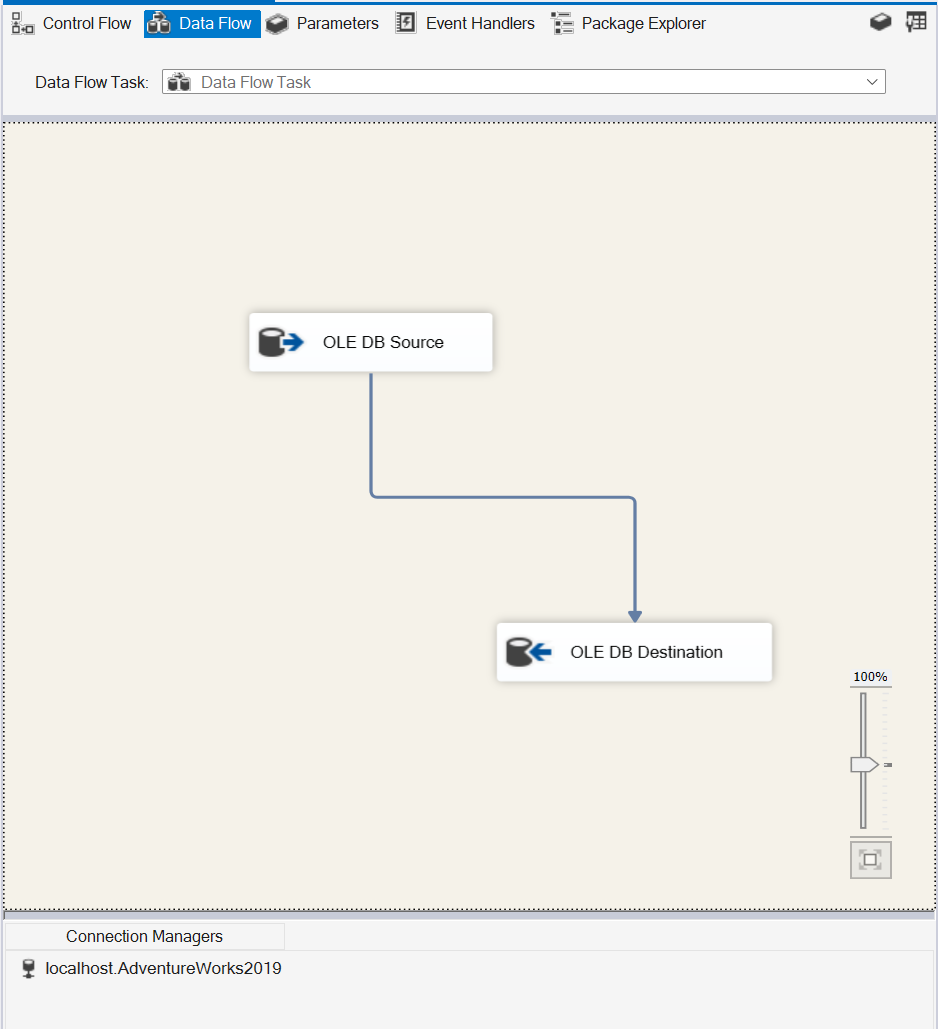
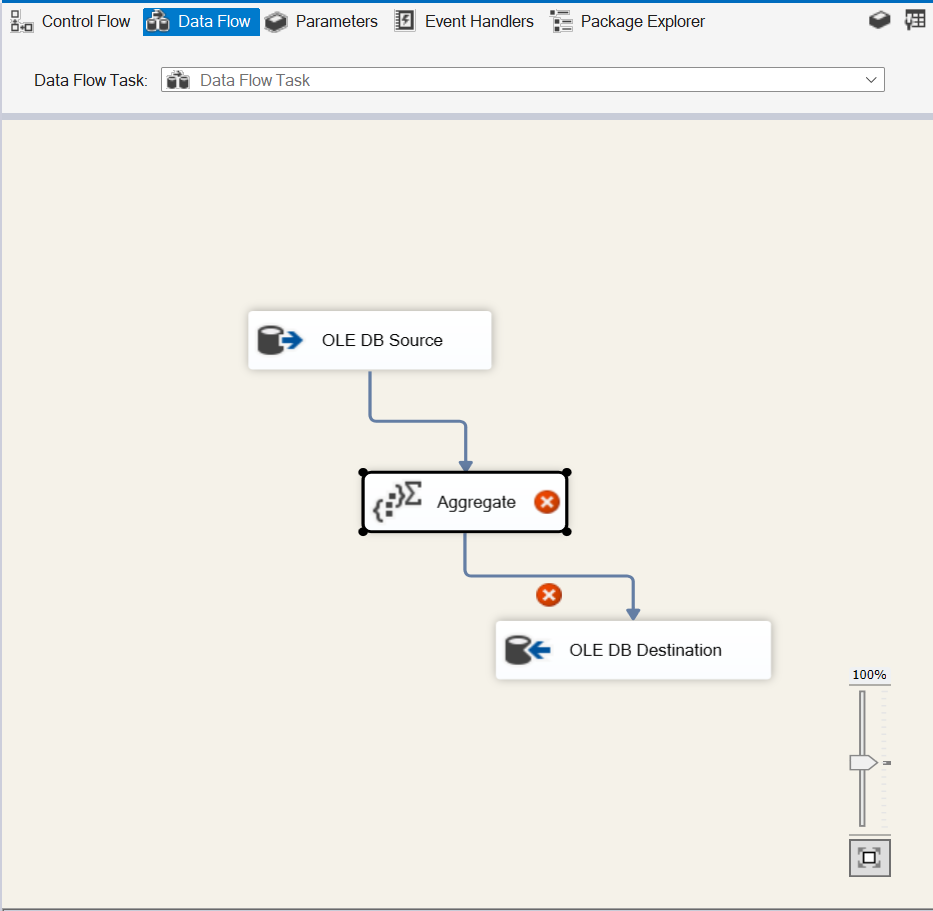
Fire up Visual Studio and let’s create a Data Flow Task, add source connection and destination connection.

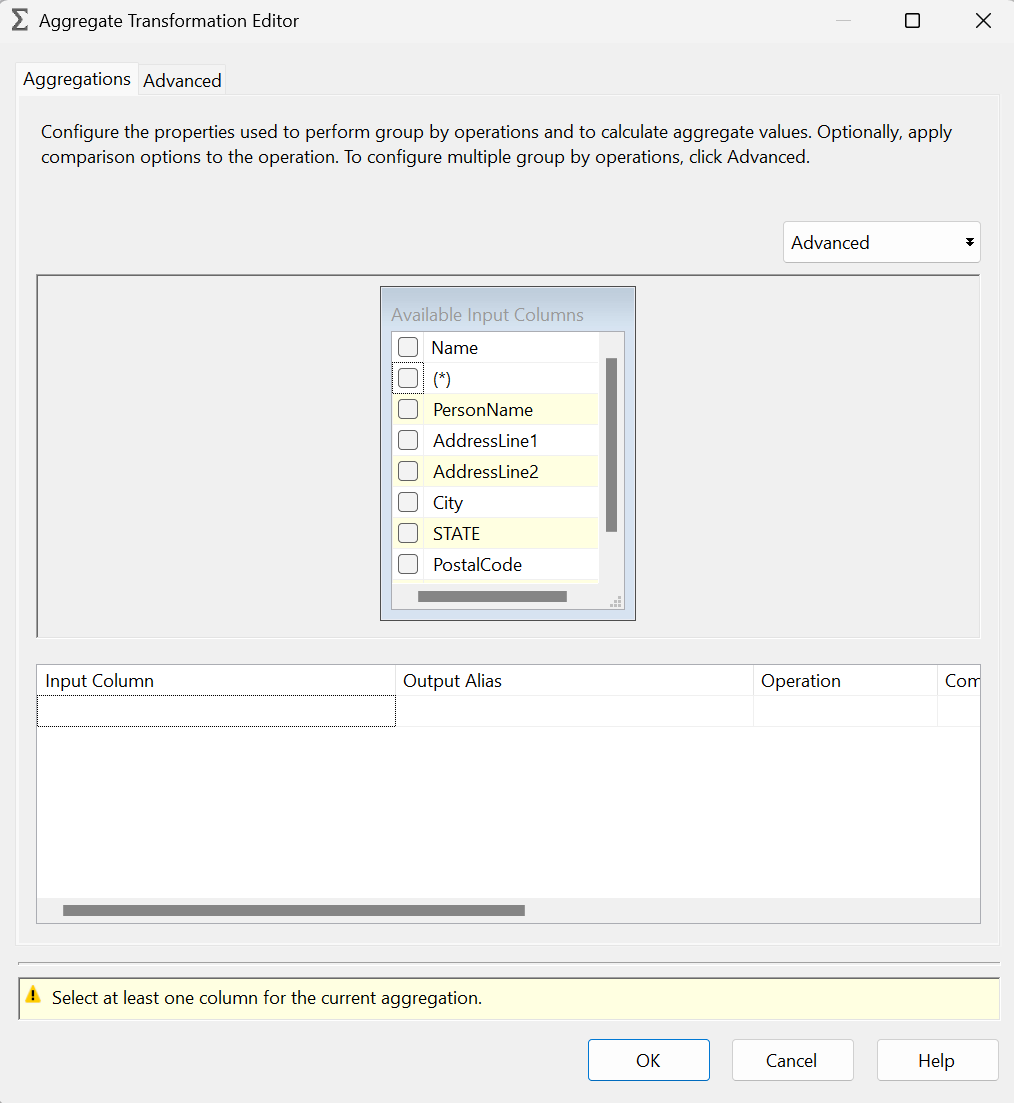
Next, let’s add our Aggregate task between our Source and Destination and open the editor:

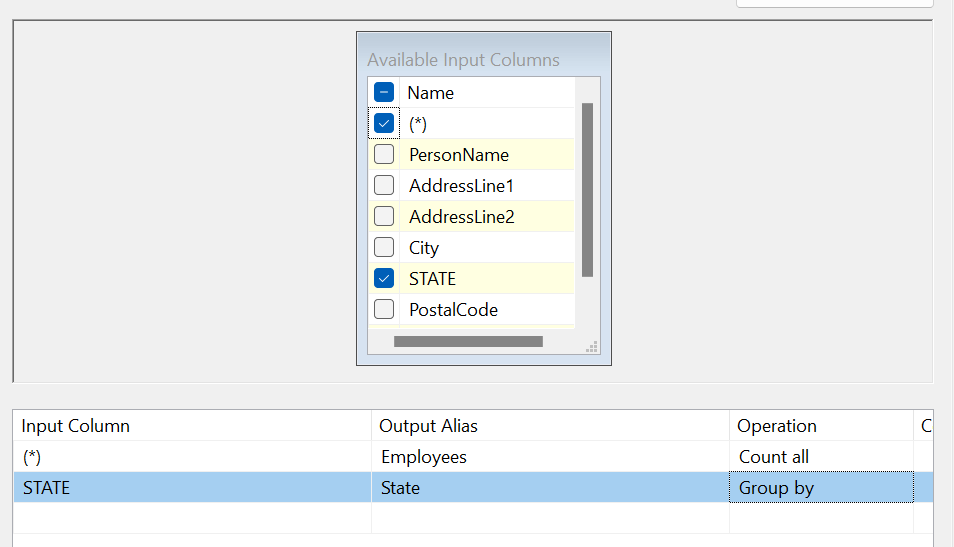
This example is pretty straightforward as we want to do a COUNT on all records so we’ll choose (*) under Input Column, give it a name under Output Alias and the only available option for * is Count All.

Next, we want to get the number of people per state, so we’ll add State to our Input Column, give it a name, and select GROUP BY for our operation:

We can use multiple options on this screen such as SUM, AVG, MIN, MAX, etc. depending on data types.

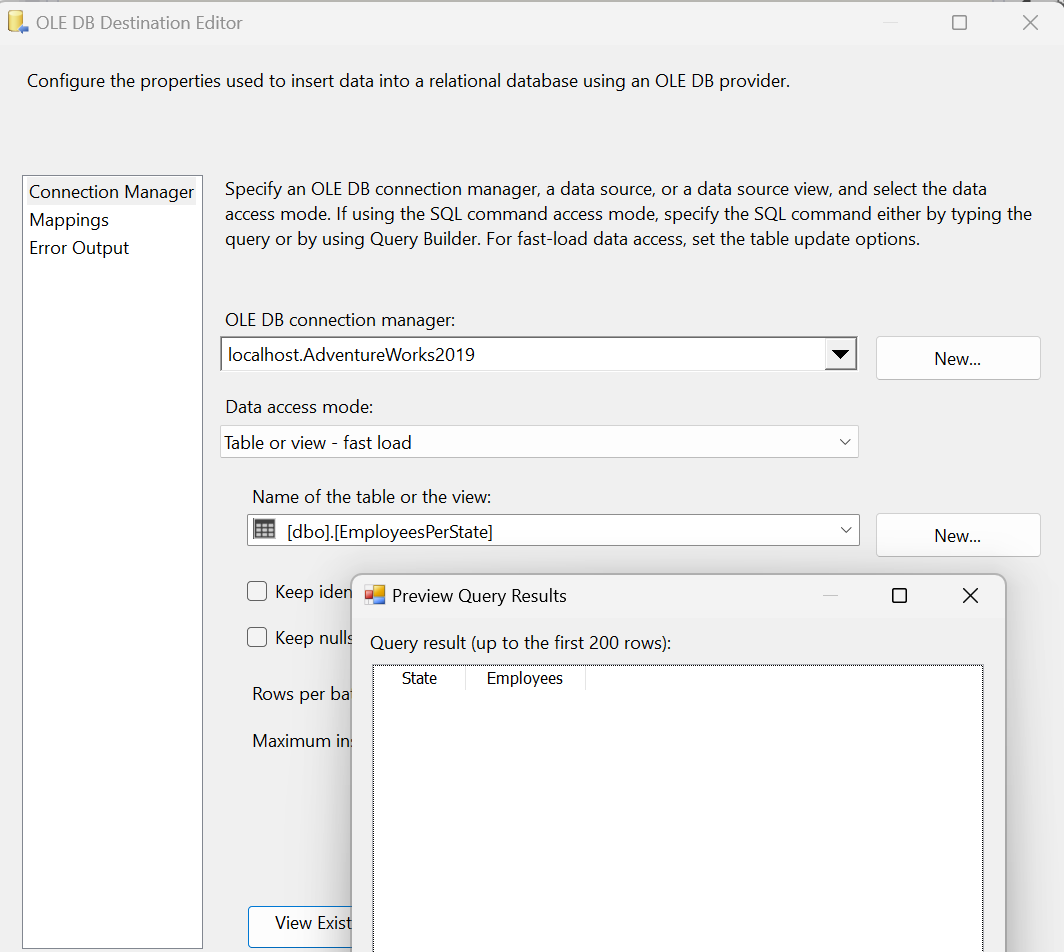
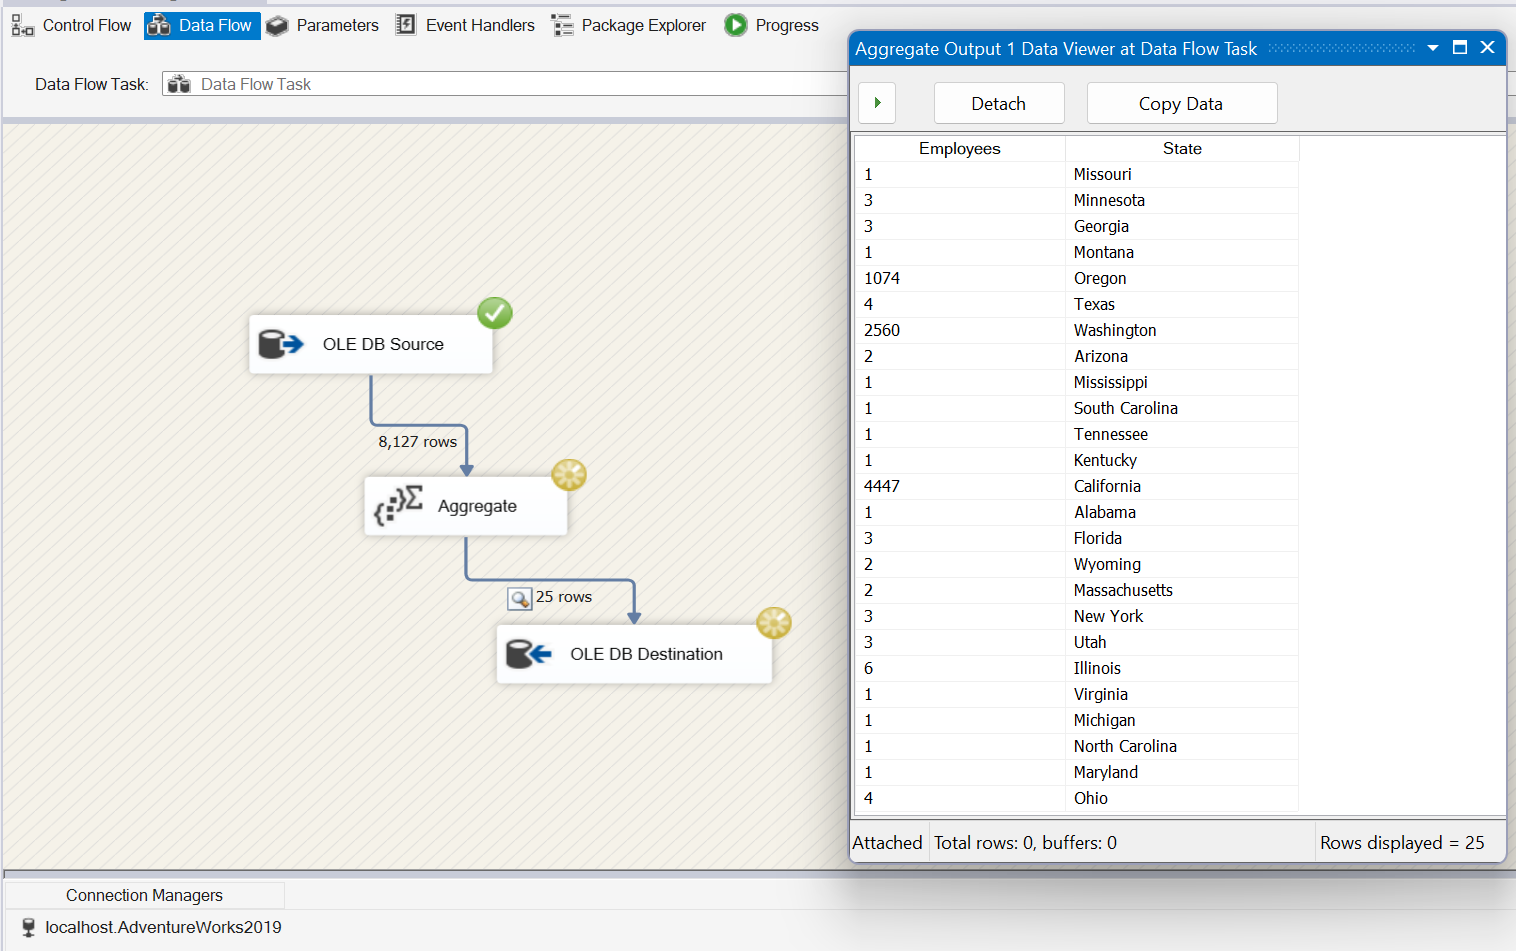
Hit OK on the screen which will take us back to our Data Flow task. Taking a look at our Destination task, you can see I have a table named EmployeesPerState with only two columns, Employee and State:

Save the package and execute and you can see that we’ve inserted the data we need. Boss is happy and gives you a $6 bonus.

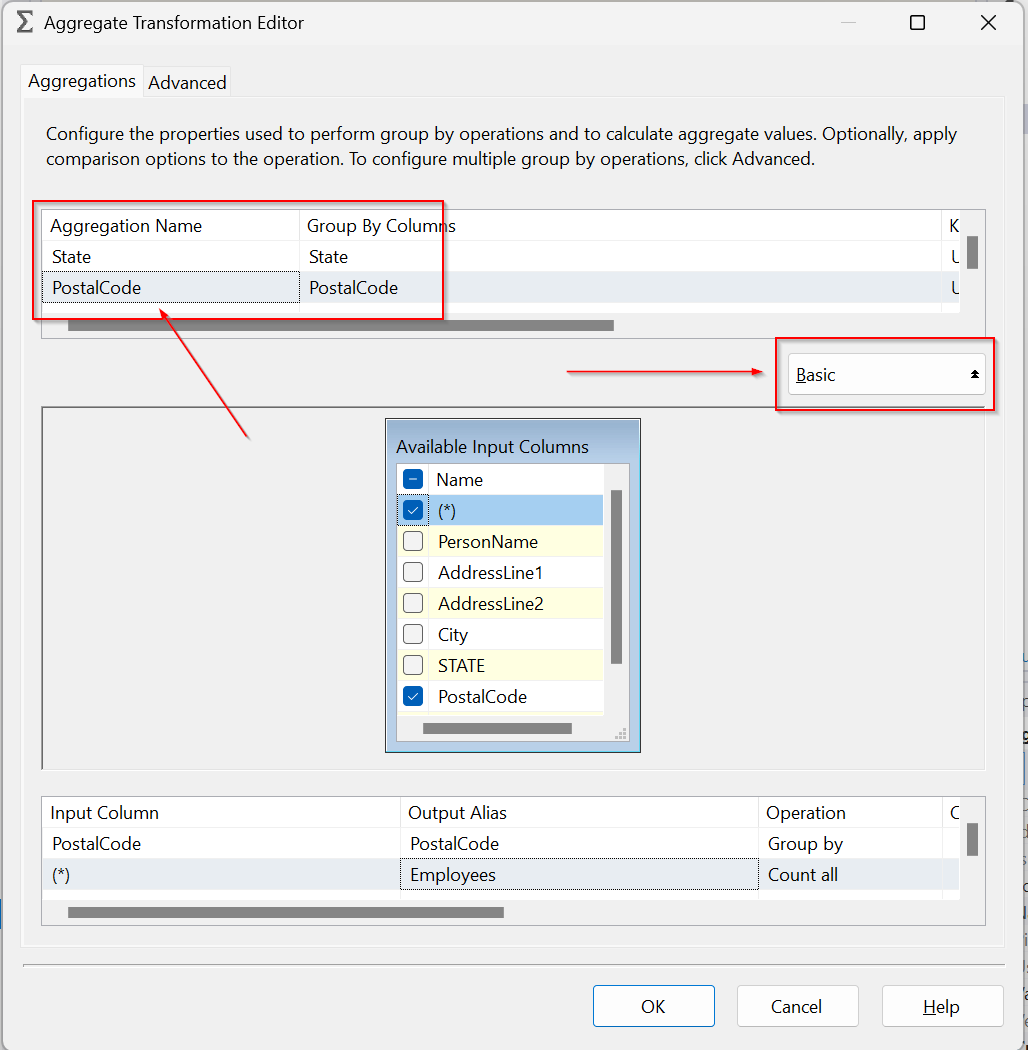
For Advanced Mode, you can create more than 1 GROUP BY criteria. For example, the boss now wants to see the number of people in each state, but he also wants to see how many people per zip code. For this, we would expand the Advanced/Basic drill down and add another input for his request. We’ll name the Aggregation PostalCode and Group by PostalCode. Like we did for our State aggregation, we’ll add a Count all Operation and (*) Input.


B

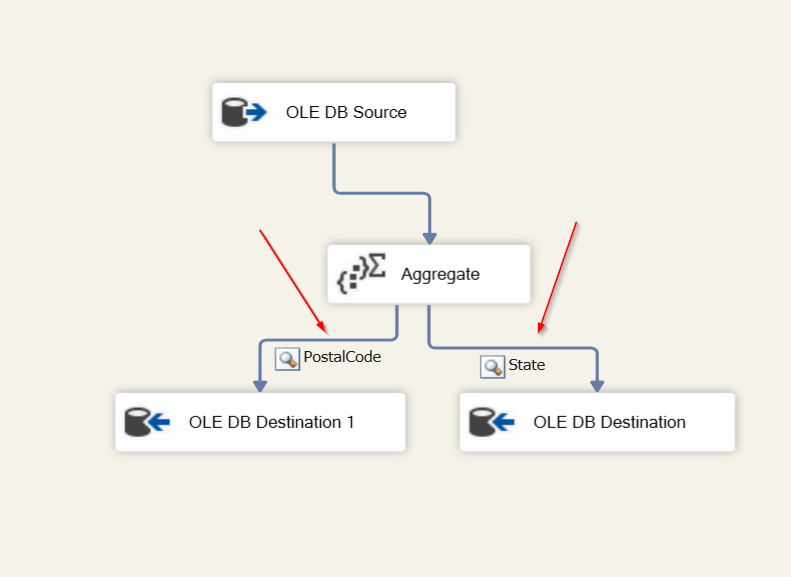
Back on the Data Flow task, we’ll drag another Destination task into the editor and configure.

You can now see both Destination tasks with a label for each.

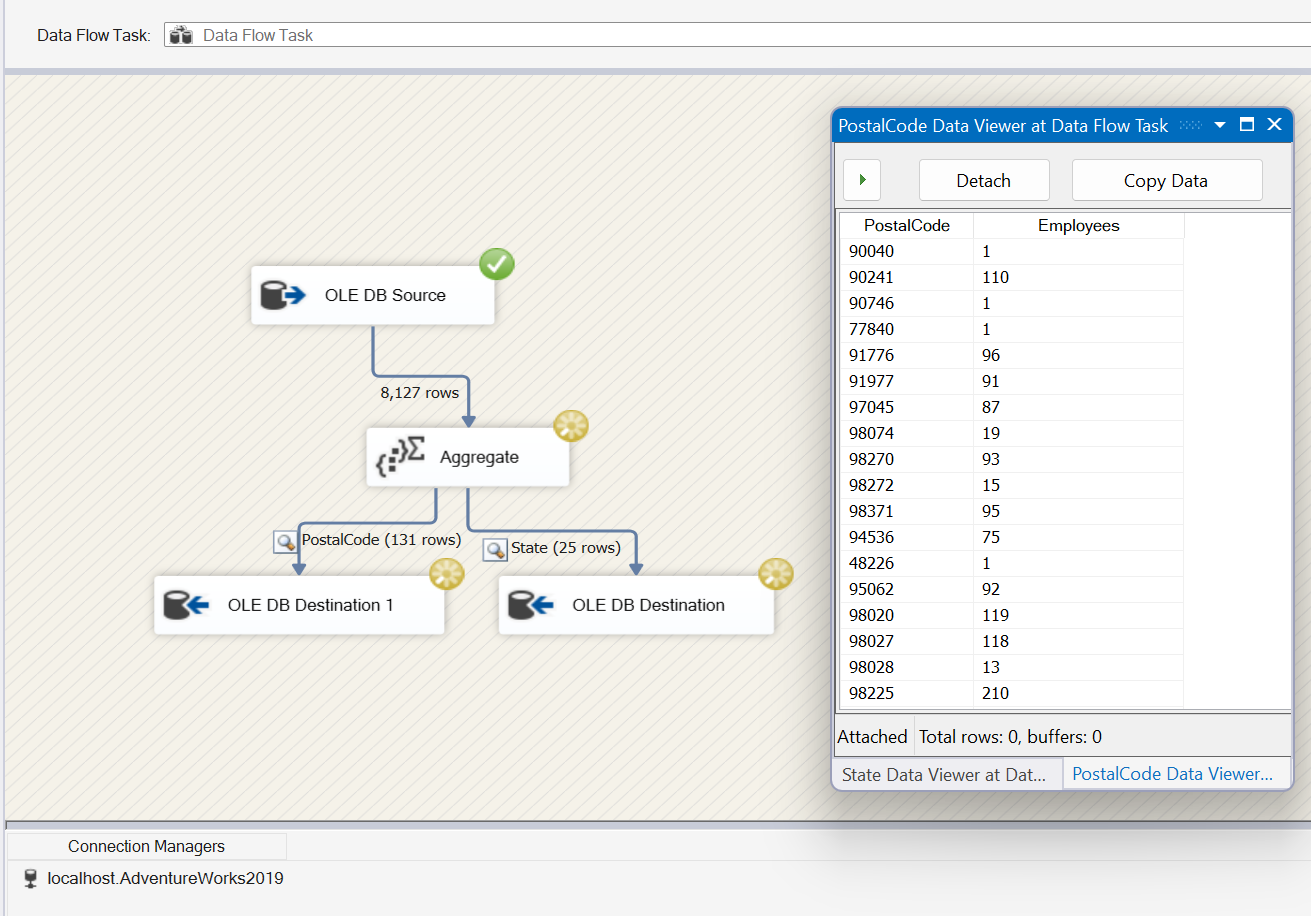
If we run the package again, you can see results have been inserted into our PostalCode table and the boss gives you another $6 bonus and let’s you take Sunday off.


Quick Backup/Restore Script

Throughout the years I’ve probably performed hundreds if not thousands of migrations or “refreshes” to lower environments. It’s pretty simple to run a quick maintenance plan or SQL job to backup all databases, but the more complex piece is creating a restore script to point to that backup location and the backup name. It can be done, but it takes a little longer, IMO. A lot of backup file names contain numeric characters such as date or time of backup.
John Morehouse created a dynamic script that simplifies everything and it can be easily modified to fit particular needs. I’ve had this script bookmarked for years and use it at least once a week. Kudos to John for sharing this with the SQL community. I’ll link the script below, but here’s a quick snippet.

DECLARE @date CHAR(8)
SET @date = (SELECT CONVERT(char(8), GETDATE(), 112))

DECLARE @path VARCHAR(125)
SET @path = '\\UNCPath\Folder\'

;WITH MoveCmdCTE ( DatabaseName, MoveCmd )
          AS ( SELECT DISTINCT
                        DB_NAME(database_id) ,
                        STUFF((SELECT   ' ' + CHAR(13)+', MOVE ''' + name + ''''
                                        + CASE Type
                                            WHEN 0 THEN ' TO ''D:\SQLData\'
                                            ELSE ' TO ''E:\SQLTLogs\'
                                          END
                                        + REVERSE(LEFT(REVERSE(physical_name),
                                                       CHARINDEX('\',
                                                              REVERSE(physical_name),
                                                              1) - 1)) + ''''
                               FROM     sys.master_files sm1
                               WHERE    sm1.database_id = sm2.database_ID
                        FOR   XML PATH('') ,
                                  TYPE).value('.', 'varchar(max)'), 1, 1, '') AS MoveCmd
               FROM     sys.master_files sm2
  )
SELECT
	'BACKUP DATABASE ' + name + ' TO DISK = ''' + @path + '' + name + '_COPY_ONLY_' + @date + '.bak'' WITH COMPRESSION, COPY_ONLY, STATS=5',
	'RESTORE DATABASE '+ name + ' FROM DISK = ''' + @path + '' + name + '_COPY_ONLY_' + @date + '.bak'' WITH RECOVERY, REPLACE, STATS=5 ' + movecmdCTE.MoveCmd
FROM sys.databases d
	INNER JOIN MoveCMDCTE ON d.name = movecmdcte.databasename
WHERE d.name LIKE '%DatabaseName%'
GO

To change the backup/restore path you can modify this section of code to fit your needs:

SET @path = '\\UNCPath\Folder\'

Another modification I perform initially is changing the where clause, for example, if I don’t want system databases I can change:

WHERE d.name LIKE '%DatabaseName%'

to

WHERE d.database_id > 4

A lot of times I don’t need to move the data and log files to a new location because I’m overwriting other databases so I just comment all of the MoveCmdCTE CTE code out:

DECLARE @date CHAR(8)
SET @date = (SELECT CONVERT(char(8), GETDATE(), 112))

DECLARE @path VARCHAR(125)
SET @path = '\\UNCPath\Folder\'

--;WITH MoveCmdCTE ( DatabaseName, MoveCmd )
--          AS ( SELECT DISTINCT
--                        DB_NAME(database_id) ,
--                        STUFF((SELECT   ' ' + CHAR(13)+', MOVE ''' + name + ''''
--                                        + CASE Type
--                                            WHEN 0 THEN ' TO ''D:\SQLData\'
--                                            ELSE ' TO ''E:\SQLTLogs\'
--                                          END
--                                        + REVERSE(LEFT(REVERSE(physical_name),
--                                                       CHARINDEX('\',
--                                                              REVERSE(physical_name),
--                                                              1) - 1)) + ''''
--                               FROM     sys.master_files sm1
--                               WHERE    sm1.database_id = sm2.database_ID
--                        FOR   XML PATH('') ,
--                                  TYPE).value('.', 'varchar(max)'), 1, 1, '') AS MoveCmd
--               FROM     sys.master_files sm2
--  )
SELECT
	'BACKUP DATABASE ' + name + ' TO DISK = ''' + @path + '' + name + '_COPY_ONLY_' + @date + '.bak'' WITH COMPRESSION, COPY_ONLY, STATS=5',
	'RESTORE DATABASE '+ name + ' FROM DISK = ''' + @path + '' + name + '_COPY_ONLY_' + @date + '.bak'' WITH RECOVERY, REPLACE, STATS=5 ' --+ movecmdCTE.MoveCmd
FROM sys.databases d
	--INNER JOIN MoveCMDCTE ON d.name = movecmdcte.databasename
WHERE d.name LIKE '%DatabaseName%'
GO

There’s a lot of option here and this script is quick and easy.

Link to script: https://gist.github.com/airtank20/a826c6f37439482edd5070e8aaeb1ee1

SQL Server 2022 is generally available!

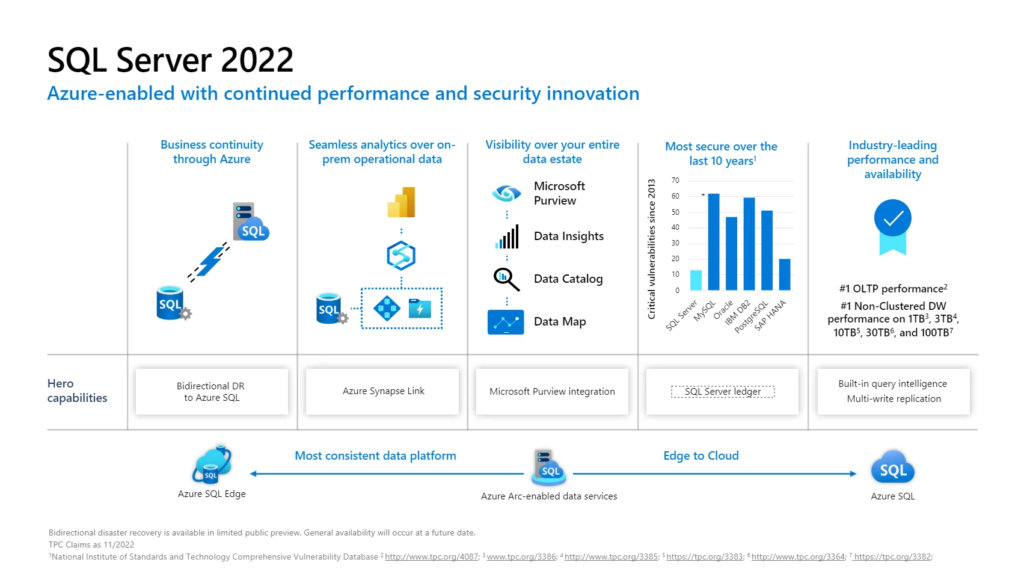
On November 16, 2022, Microsoft announced the general availability of SQL Server 2022, the most Azure-enabled release of SQL Server yet, with continued innovation across performance, security, and availability1. This marks the latest milestone in the more than 30-year history of SQL Server.

SQL Server 2022 is a core element of the Microsoft Intelligent Data Platform. The platform seamlessly integrates operational databases, analytics, and data governance. This enables customers to adapt in real-time, add layers of intelligence to their applications, unlock fast and predictive insights, and govern their data—wherever it resides.
To learn more, click here

SQL Server 2022 in Preview

On November 2, 2021, Microsoft announced the preview of SQL Server 2022, the most Azure-enabled release of SQL Server yet, with continued innovation in performance, security, and availability.

The rise of data represents a tremendous opportunity and also poses challenges. Companies are seeing their relational and nonrelational data proliferate exponentially on-premises, in the cloud, at the edge, and in hybrid environments. The most transformative companies drive predictive insights on current data, whereas others may struggle to drive even reactive insights to their historical data. Information may be siloed across geographies and divisions.

To learn more, click here

SSIS Series: Insert/Update a SQL Server table using Merge Join in SSIS

I was asked a question awhile back on the easiest way to do an incremental load from one SQL Server table into another SQL Server table. This is common in data warehouses or reporting tables as you wouldn’t want to truncate a large table and perform a full insert. Instead, you would want to only copy the changes from the source to the destination. This could be an insert or an update. The easiest way, IMO, is SSIS. Let’s take a look.

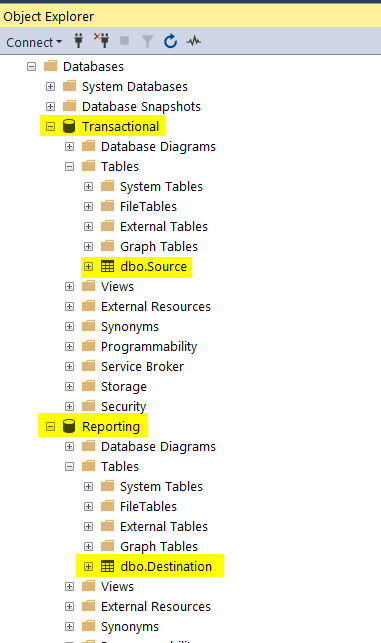
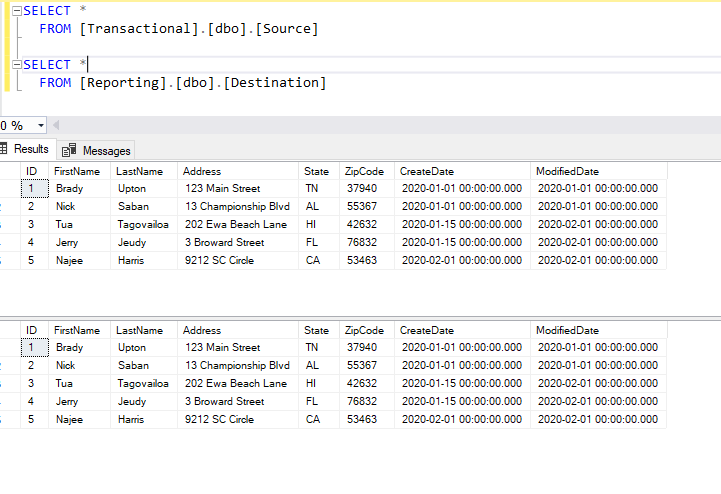
Here’s how my environment is setup. I have two databases appropriately named Transactional (for transactional data) and Reporting (for static report data). Two tables, Source and Destination.

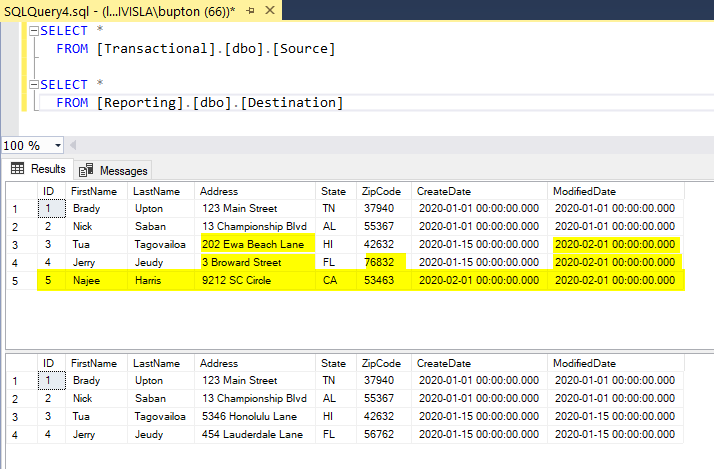
I also added some dummy data as you see below. I’ve highlighted what is different and will need to be changed in the destination table.

Let’s open SSIS and create a new SSIS project.
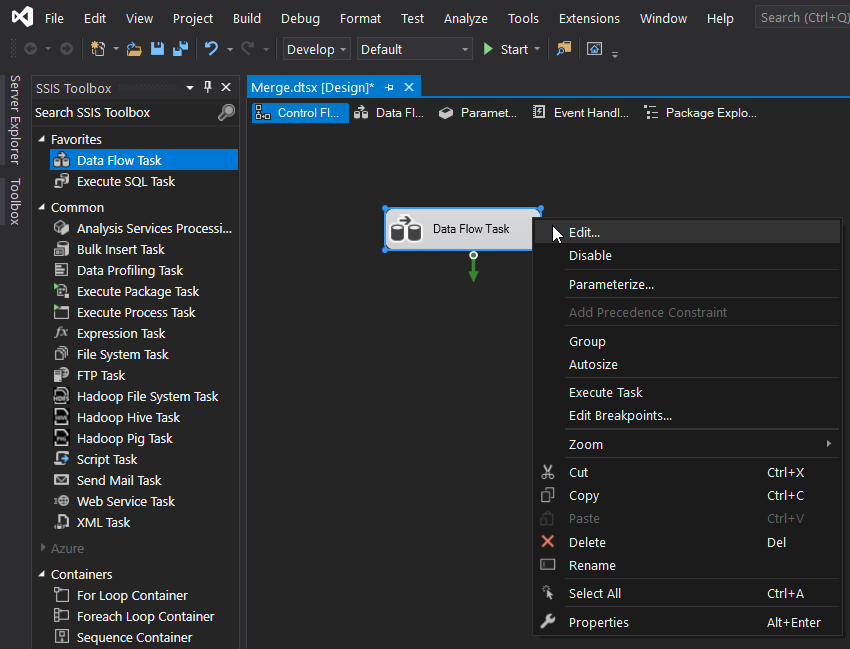
Drag and drop a Data Flow task into the design window, right click, Edit:

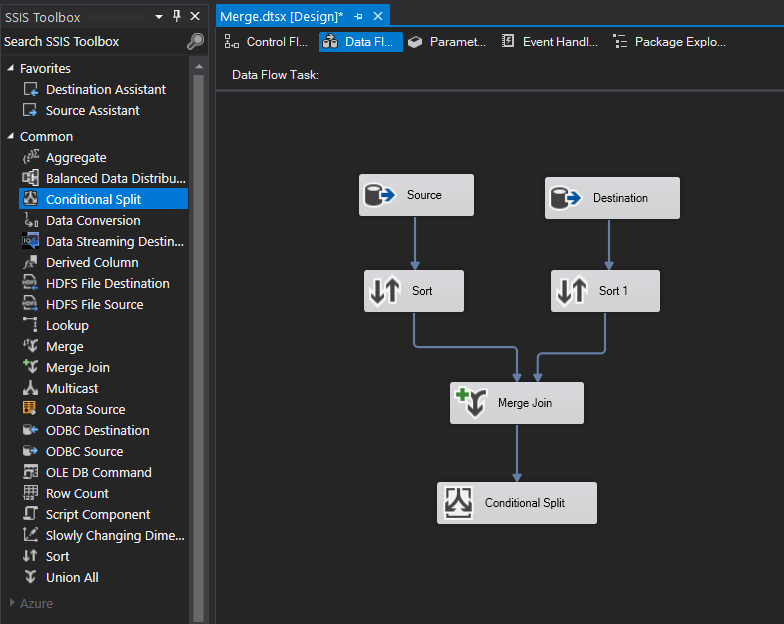
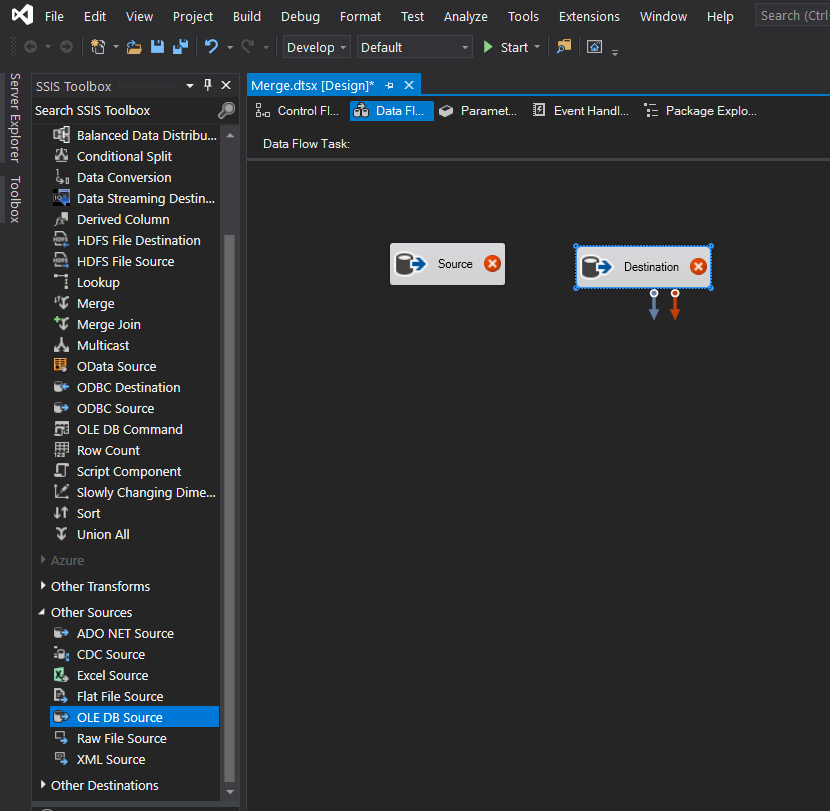
Next, drag and drop two OLE DB source components into the design window. I’m going to rename mine Source and Destination to match my table names.

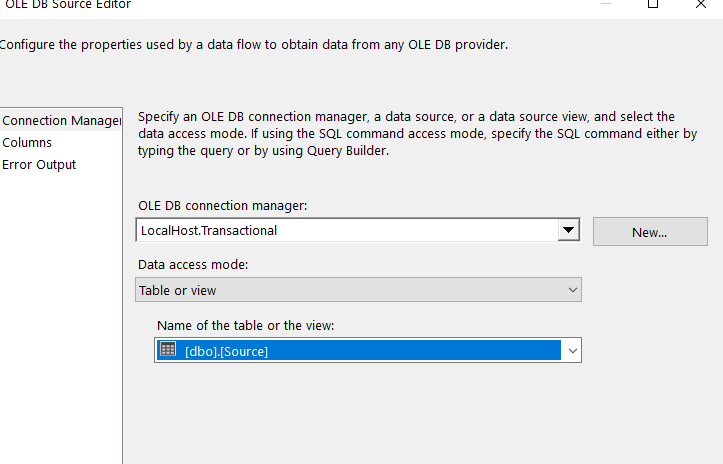
Configure the two OLE DB sources to match the source table and the destination table. Below is a screenshot of my source connection manager.

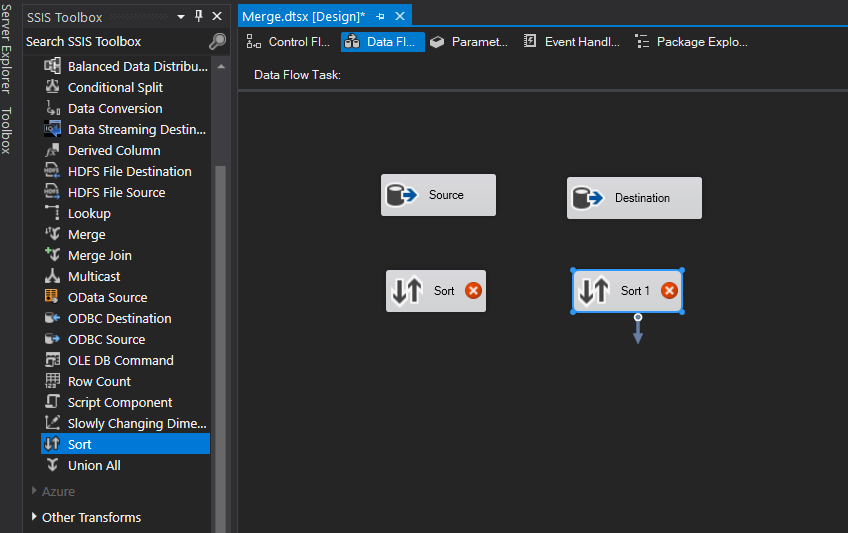
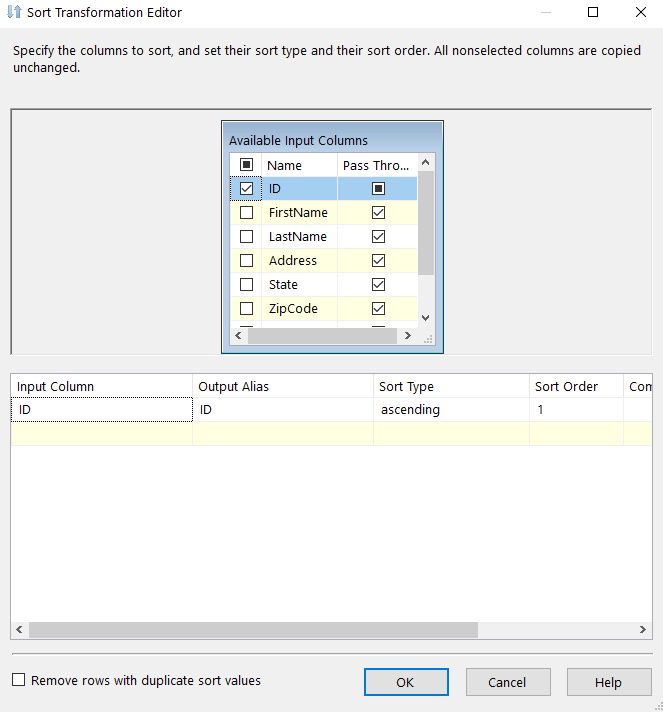
Once your connection managers are configured let’s drag and drop two Sort components below each OLE DB Source and connect them to each source. We will be using a merge join next and the merge join component needs to have data sorted in ASC or DESC order. I always choose to sort on the Primary Key for each table.

In my example, I’ll choose to sort on my primary key, ID.

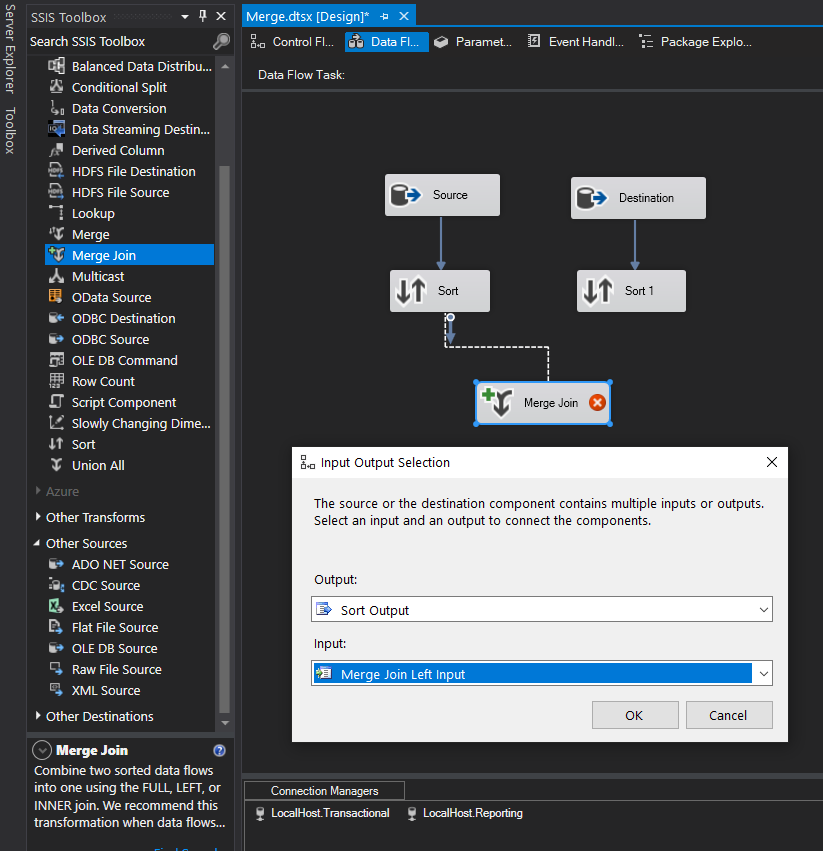
Next, drag the Merge Join transformation into the Design window and drag the data path from the Sort component to the Merge Join. When you attach the arrow to the transformation, the Input Output Selection dialog box appears, displaying two options: the Output drop-down list and the Input drop-down list. The Output drop-down list defaults to Source Output, which is what we want. From the Input drop-down list, select Merge Join Left Input, as shown below. We’ll use the other option, Merge Join Right Input, for the other connection.

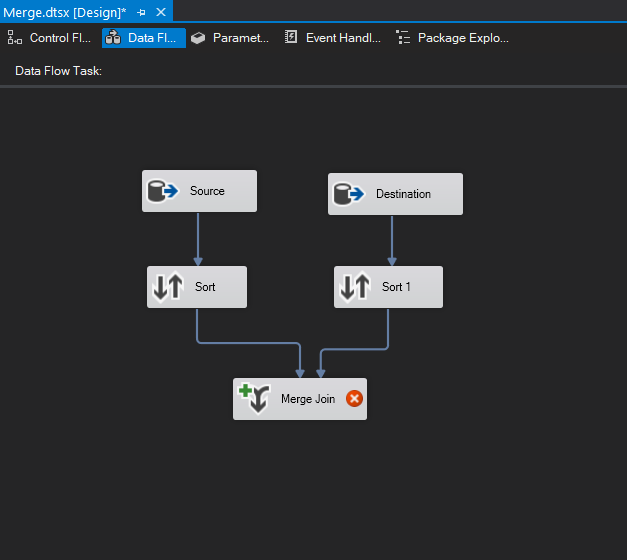
Next, connect the data path from the other Sort component to the Merge Join transformation. This time, the Input Output Selection dialog box does not appear. Instead, the Input drop-down list defaults to the only remaining option: Merge Join Right Input.

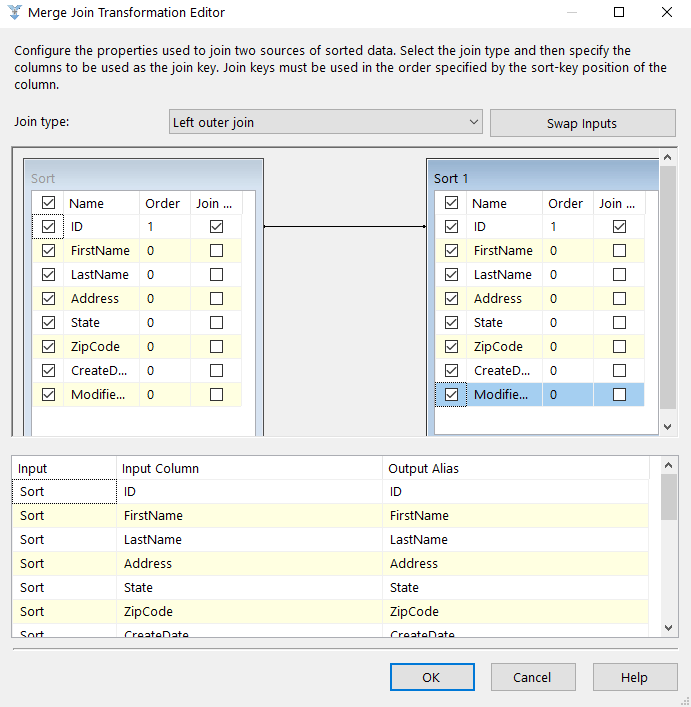
Now, let’s configure the Merge Join transformation.

The first setting in the Merge Join Transformation Editor is the Join type drop-down list. From this list, you can select one of the following three join types:

  • Left outer join: Includes all rows from the left table, but only matching rows from the right table. You can use the Swap Inputs option to switch data source, effectively creating a right outer join.
  • Full outer join: Includes all rows from both tables.
  • Inner join: Includes rows only when the data matches between the two tables.

For our example, we want to include all rows from left table but only rows from the right table if there’s a match, so we’ll use the Left outer join option.

You now need to select which columns you want to include in the data set that will be outputted by the Merge Join transformation. For this exercise, we’ll include all columns. To include a column in the final result set, simply select the check box next to the column name in either data source.

Almost finished, but first let’s add a Conditional Split transformation. This will allow us to insert new records or update previous records.

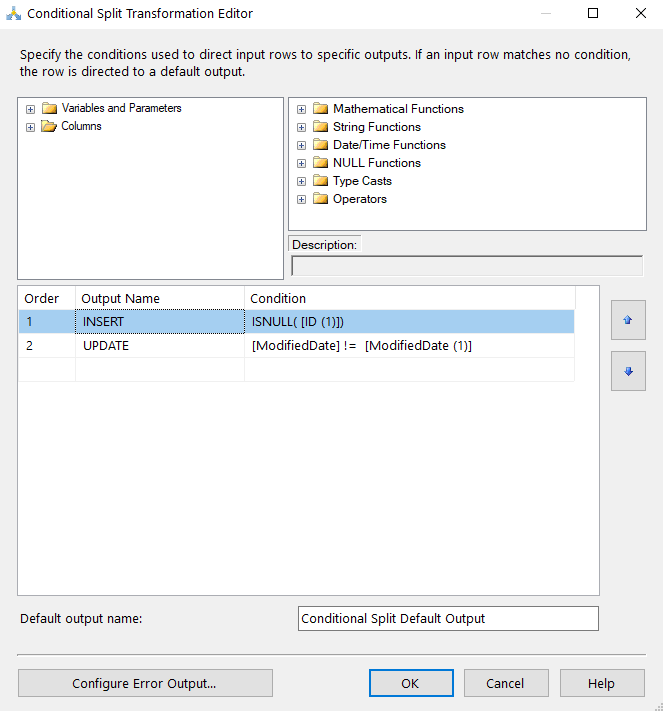
In the Conditional Split Editor, I created two outputs. If (Destination) ID is NULL then the record doesn’t exist so we’ll perform an INSERT. If the ModifiedDate is different between the two tables then we know something has been updated since the last execution and we need to update the record. See below.

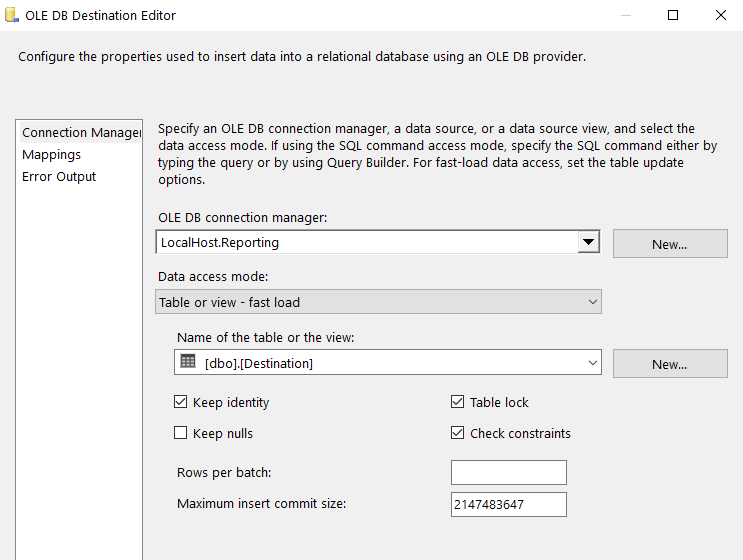
Since we can perform and INSERT or an UPDATE we’ll need two destinations. First, for the INSERT, we’ll simply be doing an INSERT into the table so we can drag the OLE DB Destination component into the window, choose “INSERT” in the Input Output selection window, and use the Reporting connection manager.

I’m going to check the “Keep Identity” box since the ID column is an identity column.

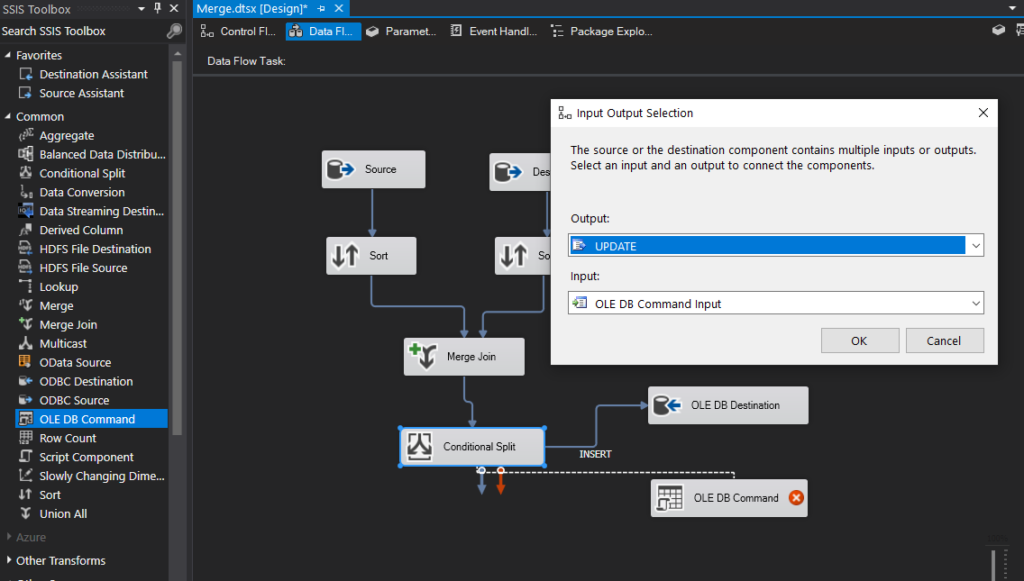
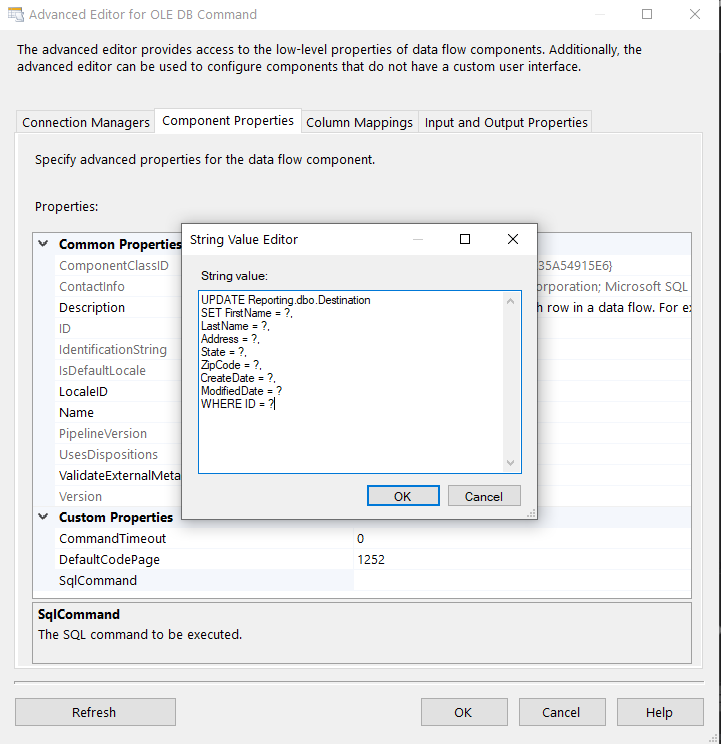
Next, for the UPDATE statement we’ll drag the OLE Command component into the window and configure it. Select “UPDATE” in the Input Output Selection window.

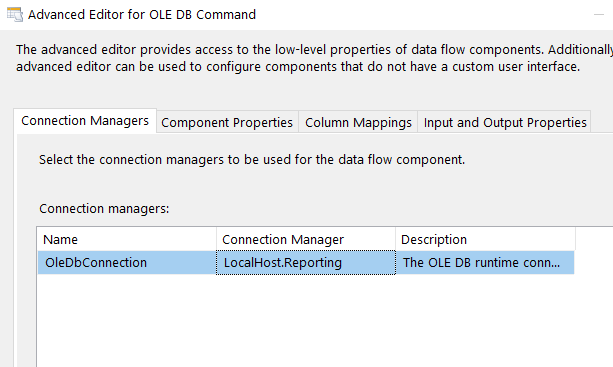
In the Connection Managers tab, assign the connection manager for Reporting.

In the Connection Managers tab, assign the connection manager for Reporting.

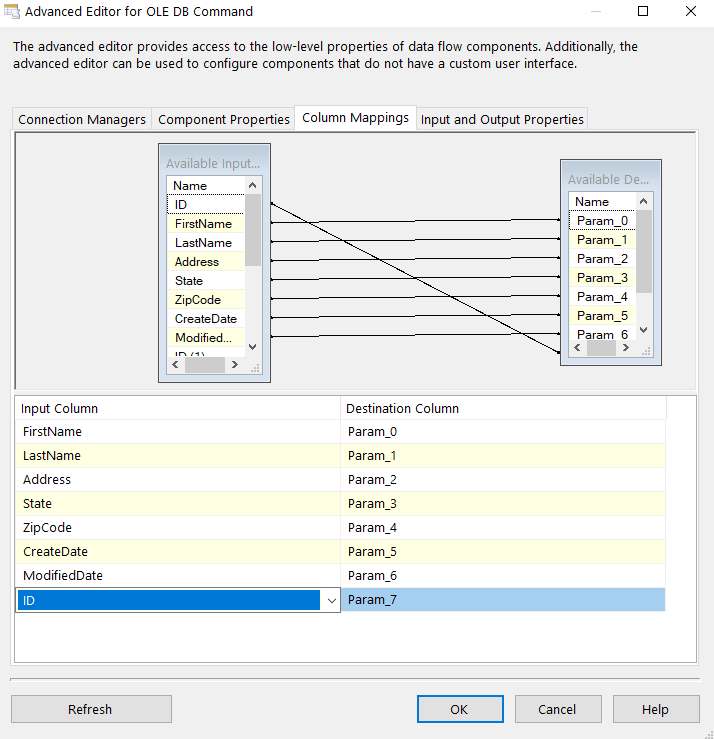
In the column mappings tab, assign parameters:

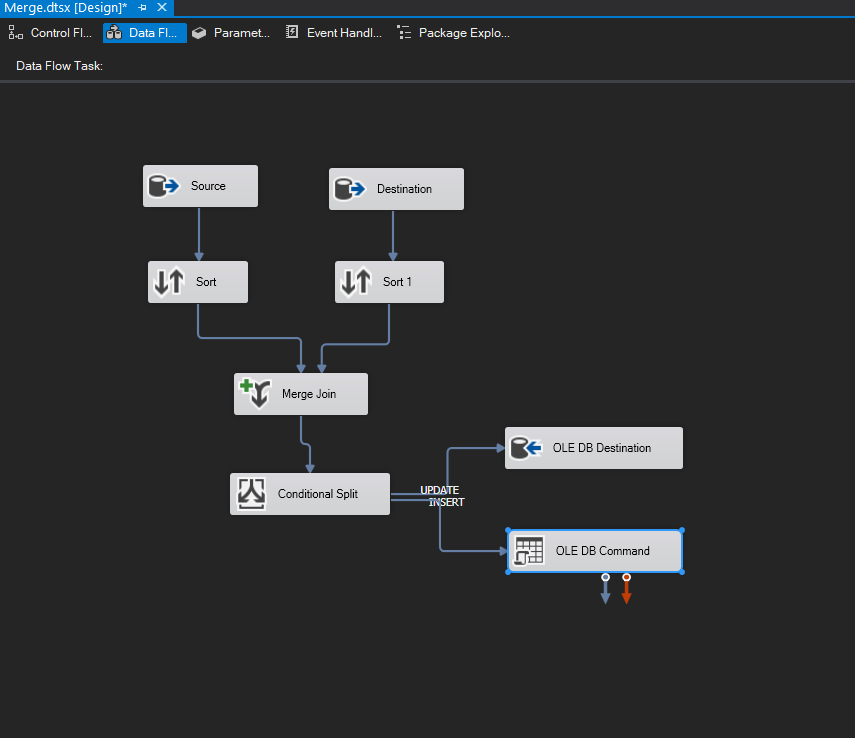
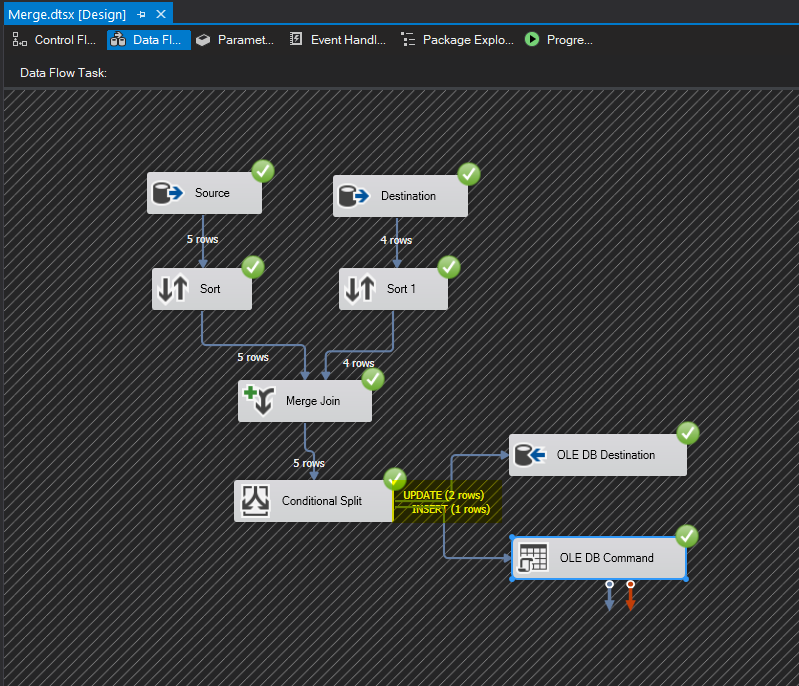
Final package should look like the following:

Save and execute. You can see that we updated two records and inserted one record:

Going back to our query you can see that everything matches up now:

Backup PostgreSQL to AWS s3 in Linux CentOS

This post walks you through how to backup a PostgreSQL database to an AWS s3 bucket.

There are a few installations we’ll need to make before allowing our on-prem Postgres server to communicate with AWS.

Install pip

  1. Use the curl command to download the installation script. The following command uses the -O (uppercase “O”) parameter to specify that the downloaded file is to be stored in the current folder using the same name it has on the remote host:

    curl -O https://bootstrap.pypa.io/get-pip.py
  2. Run the script with Python to download and install the latest version of pip and other required support packages:

    python36 get-pip.py --user

    When you include the --user switch, the script installs pip to the path ~/.local/bin.
  3. Ensure the folder that contains pip is part of your PATH variable.

    ls -a ~
  4. Add an export command at the end of your profile script that’s similar to the following example.

    source ~/.bash_profile
  5. Now you can test to verify that pip is installed correctly.

    pip3 --version

Install the AWS CLI with pip

  1. Use pip to install the AWS CLI.

    pip3 install awscli --upgrade --user
  2. Verify that the AWS CLI installed correctly.

    aws --version

Now that we have AWS CLI installed, we can configure our new client. You will need AWS Access Key ID, AWS Secret Access Key, Default Region Name and Default Output Format This information you can go to the IAM AWS Section.

aws configure

To view your s3 buckets use the following:

aws s3 ls

Now that AWS is configured and we can view our s3 buckets, let’s make a backup:

PGPASSWORD="password" ./pg_dump --no-owner -h localhost -U databasename > ~/databasename.sql

To view the backup file use the following:

cd /root
dir

Now that we have a backup, let’s create an AWS s3 bucket to store them in:

aws s3api create-bucket --bucket postgres-backups --region us-west-2 --create-bucket-configuration LocationConstraint=us-west-2

Back in AWS, you can see the new bucket:

Once the new bucket has been created, let’s push the backup we took earlier to this bucket.

aws s3 cp databasename.sql s3://postgres-backups/

Install SQL Server on Windows 10 using Docker

Starting with SQL Server 2017, Microsoft announced you can run SQL in Docker containers. This is great news for DBA’s because we tend to run multiple installations of SQL Server locally and with Docker we can spin up (or remove) a SQL instance fairly quickly.

I’m not going to go into what Docker is because there’s an entire website that goes into much more detail than I ever could. This post is going to focus on a simple SQL installation on Windows 10 using Docker. Let ‘s gooooooo!

First, let’s download and install the latest version of Docker. To find the latest version, open an internet browser and navigate to https://docs.docker.com/docker-for-windows/install/. From here, click “Download from Docker Hub”

You will need to create a docker ID and password if you don’t have one. Once you have this info let’s login.

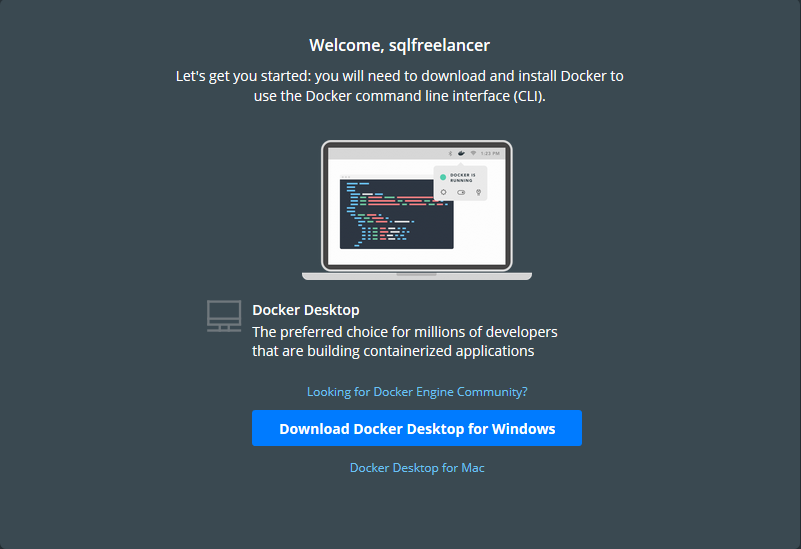
Next, let’s click “Get started with Docker Desktop” from the home page and “Download Docker Desktop for Windows”

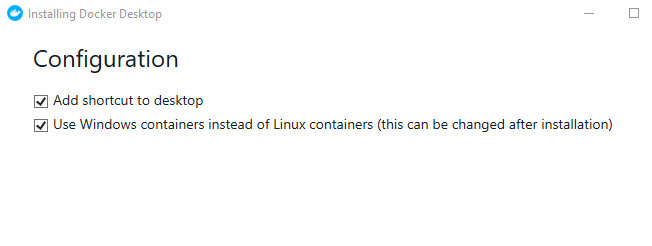
After the download is complete, go ahead and start the install. On the Configuration screen, I’m going to Use Windows containers instead of Linux. Click OK.

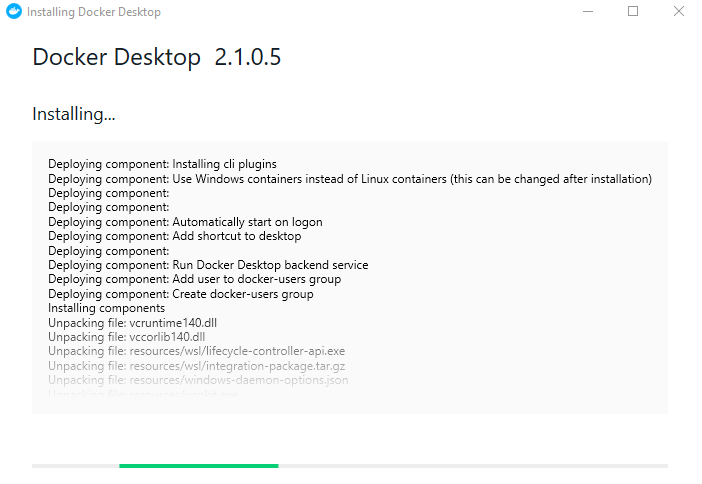
Docker Desktop is installing:

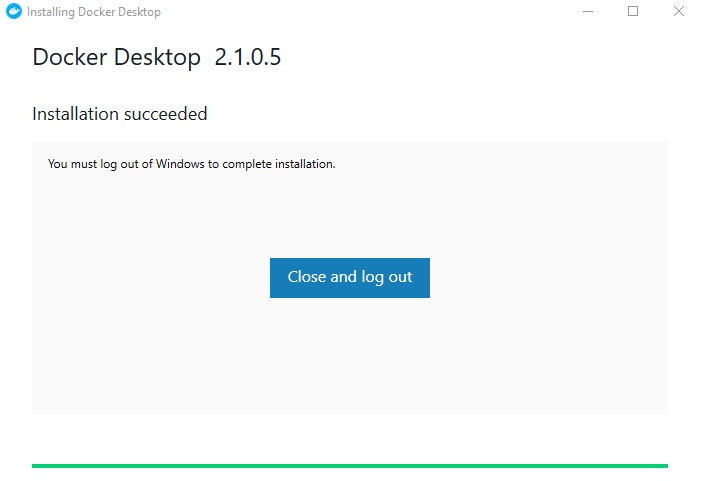
 After installation succeeds, you must log out so make sure to save everything!

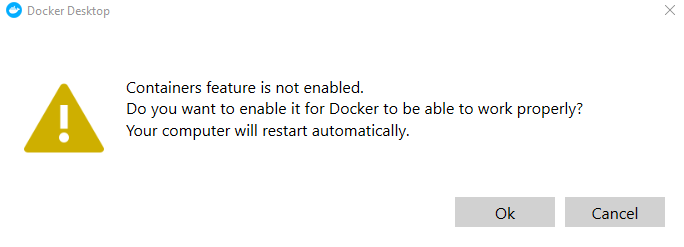
Upon logging back in, you will be greeted with this message, Hit OK and reboot.

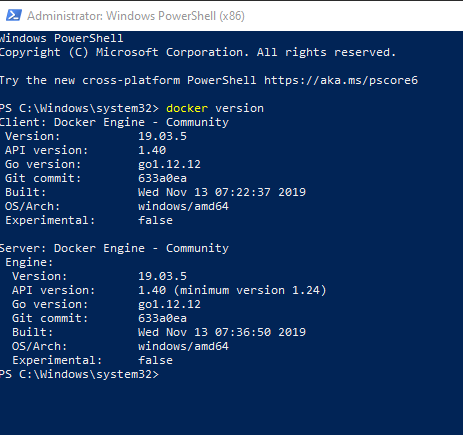
After reboot, let’s open Powershell (as administrator) and issue the following statement. This will show you that Docker is installed properly and it will give you the version we are running.

Docker Version

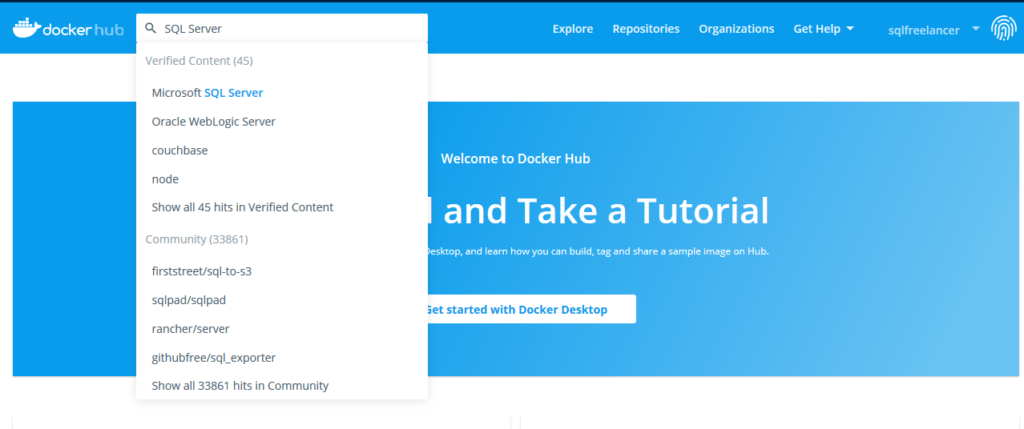
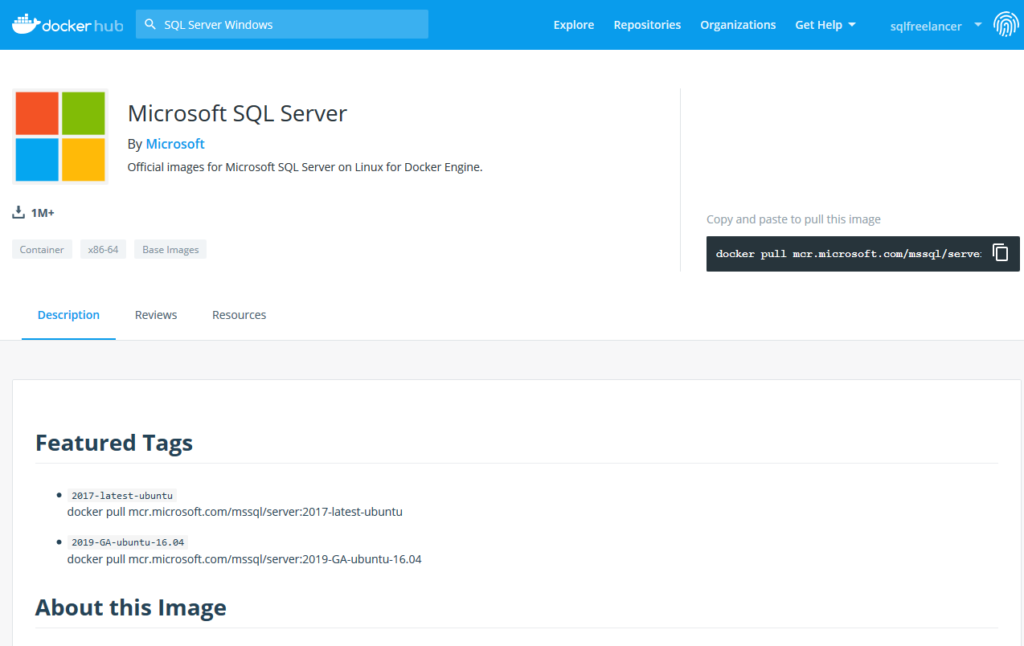
Next, let’s do a search for a SQL Server image. Back in Docker Hub, in the search box, let’s type SQL Server and click on Microsoft SQL Server:

This page will give you all sorts of valuable information.

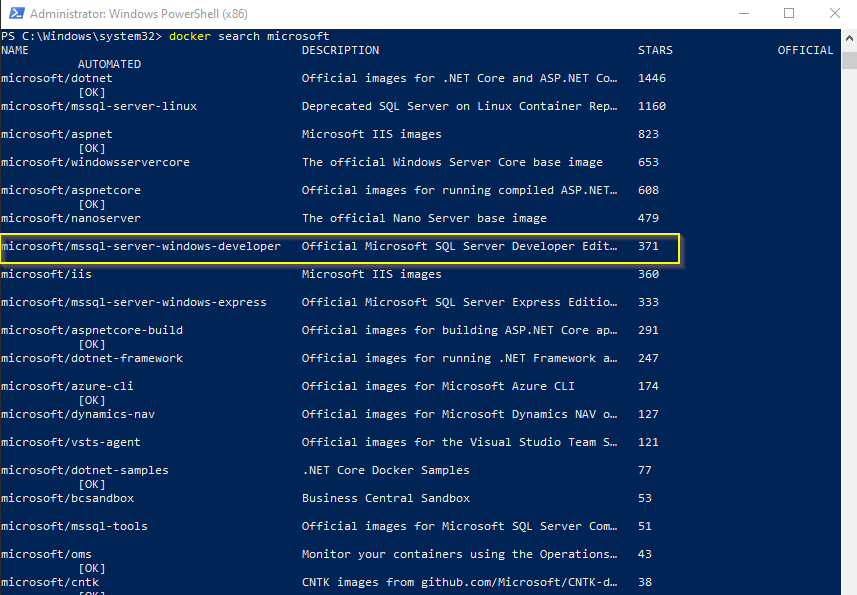
You can also use the following PowerShell statement to pull SQL Server images:

Docker search Microsoft

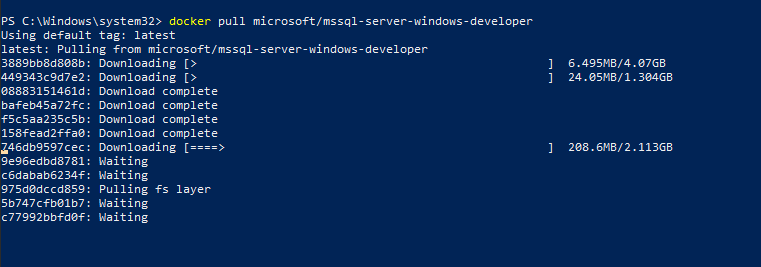
Again, from Powershell, let’s download the Microsoft SQL Server Developer Edition images. To do this use the following:

Docker pull microsoft/mssql-server-windows-developer

This will take a few minutes so grab some coffee…..or a beer.

Once the download is complete you can run the following statement to see the images downloaded:

Docker images

OK, we have Docker installed and our SQL Server image downloaded. Now the fun part….install SQL Server! In PowerShell, let’s run the following:

Docker run –name DockerSQL -d -p 14331:1433 -e sa_password= St0ngP@SSw0rd! -e ACCEPT_EULA=Y microsoft/mssql-server-windows-developer

  • –name – this is the name of the container you are creating
  • -d – Runs the container in the background otherwise the container will take over your cmd when it starts
  • – p port:port – Maps a TCP port on the host environment (first value) with a TCP port in the container (second value). In this example, SQL Server is listening on TCP 14331 in the container and this is exposed to the port, 1433, on the host. I’m using 14331 because I’ll create multiple containers and each container needs a different port number.
  • -e – Creates environment variables under the container execution runtime, for example, sa password and End User License Agreement (EULA)
  • sa_password – Create sa password for SQL instance (Hint, don’t use a $)
  • ACCEPT_EULA – Yes

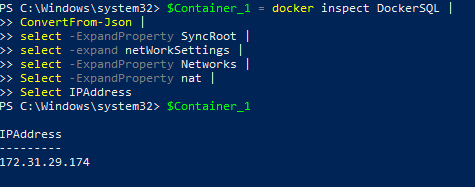
It will take a few minutes to finish the install, but it’s much shorter than a regular SQL install. Once finished, run the following to get the IP address of the container (make sure to use your container name after docker inspect):

$Container_1 = docker inspect DockerSQL |
ConvertFrom-Json |
select -ExpandProperty SyncRoot |
select -expand netWorkSettings |
select -ExpandProperty Networks |
Select -ExpandProperty nat |
Select IPAddress
$Container_1

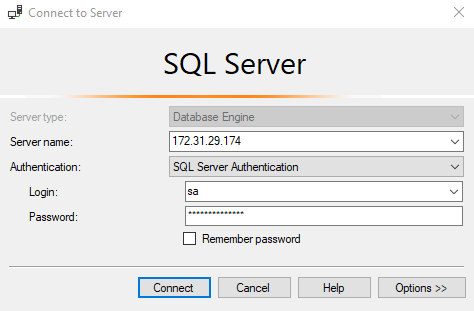
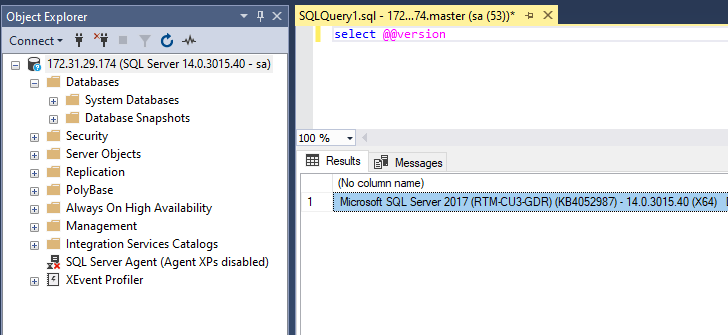
As you can see, the IP for my container is 172.31.29.174. If I open SQL Server Management Studio and connect to this IP using the sa account and password I created I can connect successfully:

If you have any issues connecting try using the following docker statement to view the logs:

Docker container logs –details DockerSQL

To remove the container, simply stop the container

Docker stop DockerSQL

And remove.

Docker rm DockerSQL

Introducing SIOS high availability for SQL Server 2008/R2 in Azure

Support for SQL Server 2008 and 2008 R2 ended on July 9, 2019. That means the end of regular security updates. However, if you move those SQL Server instances to Azure or Azure Stack, Microsoft will give you three years of extended security updates at no additional cost. If you’re currently running SQL Server 2008 or 2008 R2 and you are unable to update to a later version of SQL Server, you will want to take advantage of this offer rather than running the risk of facing a future security vulnerability. An unpatched instance of SQL Server could lead to data loss, downtime, or a devastating data breach.

If you have a SQL Server failover cluster instance (FCI) or use hypervisor-based high availability, or other clustering technology on-premises for high availability, you’ll probably need the same in Azure. If you need to migrate to Azure/Azure Stack at end of support, and you require high availability for SQL Server 2008/2008 R2, there’s only one solution recommended by Microsoft: SIOS DataKeeper. SIOS DataKeeper enables clustering in the cloud, including the creation of a SQL Server 2008/2008 R2 failover cluster instance, allowing you to achieve your high availability goals.

Click here to view the rest of this post.