Adding Storage to SQL Server 2008 Cluster

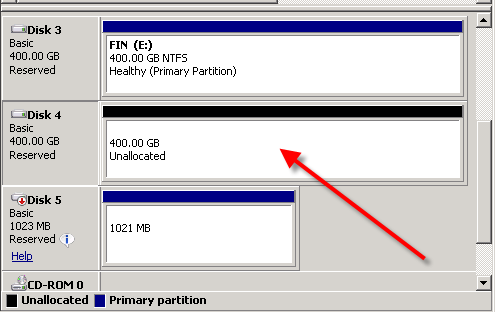
Adding a new storage device using Windows 2008 Failover Clustering has been simplified enormously since the Windows 2003 and older clustering technology. In this post, I’ll show you how to add an extra storage device to your configuration. First thing you will need to do is get your SAN administrator to present a new disk to the cluster. Once the new disk is presented, go to Disk Management, and you should see the new disk unallocated. If the disk displays “Offline” simply right click and choose Online.

SQL Freelancer SQL Server Cluster Storage
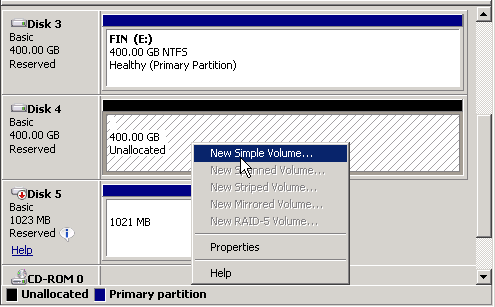
Next, right click on the disk and choose “New Simple Volume”. Clustering does not support any of the other volume options.

SQL Freelancer SQL Server Cluster Storage
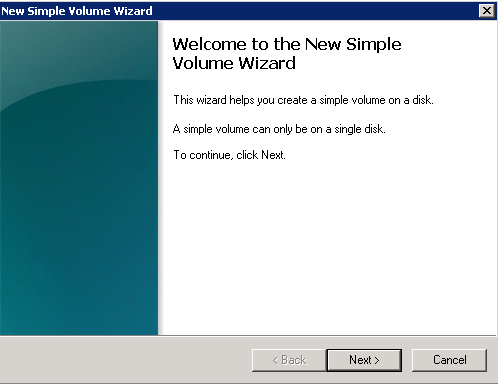
After clicking “New Simple Volume” a wizard will appear.

SimpleVolumeWizard

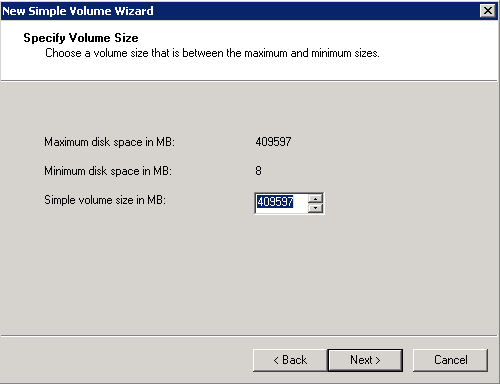
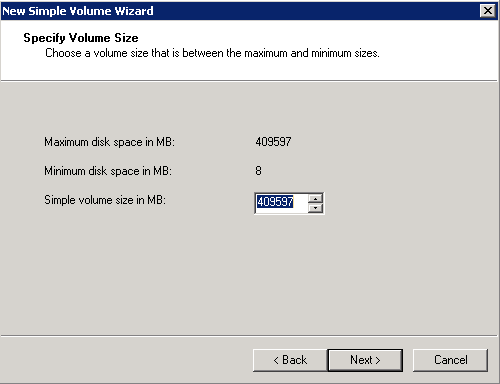
Click Next and you will see the following page. Choose your volume size and click Next.

VolumeSize

Choose a drive letter, create a mount point on an existing disk or do not assign a drive letter. In this example, I’ll give the disk a drive letter of F. Click Next.

SQL Freelancer SQL Server Cluster Storage
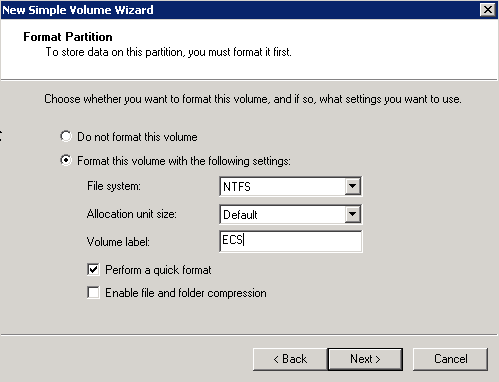
On this screen, you will need to format the volume using NTFS and you can rename the volume to better identify it later on. I will also perform a quick format. Click Next and Finish to format.

SQL Freelancer SQL Server Cluster Storage
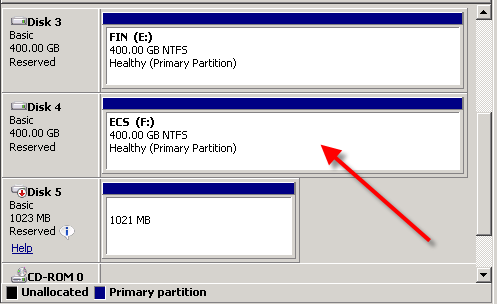
The disk should now be online and allocated.

SQL Freelancer SQL Server Cluster Storage
Click here to view the rest of this post.

Managing a Windows and SQL Server Cluster using the Failover Cluster Manager tool

Installing a cluster is just the beginning of a DBA’s administrative duties. In this post, I’ll show you a few management tasks that may help the novice. Most tasks will be carried out using Failover Cluster Management which is the management console built into Windows Server 2008. You can access the Failover Cluster Management in a couple of different ways:

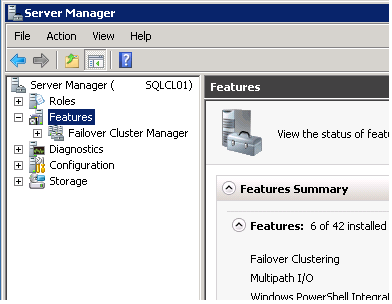
  • Go to Server Manager, Features, Failover Cluster Manager

SQL Freelancer SQL Server Cluster Failover Cluster Manager

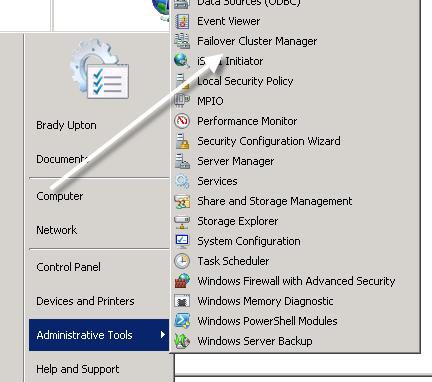
  • Go to Control Panel, Administrative Tools, Failover Cluster ManagerSQL Freelancer SQL Server Cluster Failover Cluster Manager

Once you open Failover Cluster Manager let’s see what can be done inside of this console.

View Status of Services and Applications

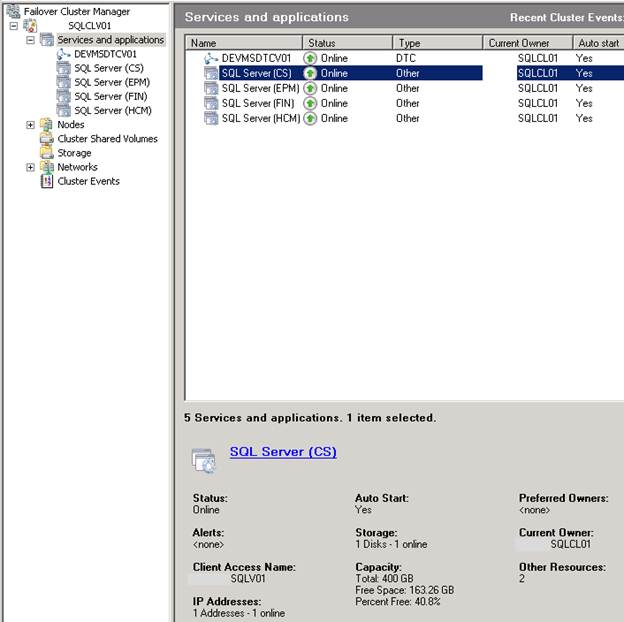
Inside of Failover Cluster Manager, if you click on Services and Applications you are presented with a wealth of information.

In this example, I have a multiple instance cluster that consists of four instances on a two node active/passive cluster. After clicking Services and applications, you can see in the right pane all the instances, status, type, current owner (or current node that they exist on) and if they are set to auto start. In the right pane, if you click on a specific instance you can see more information regarding this instance at the bottom.

SQL Freelancer SQL Server Cluster Failover Cluster Manager
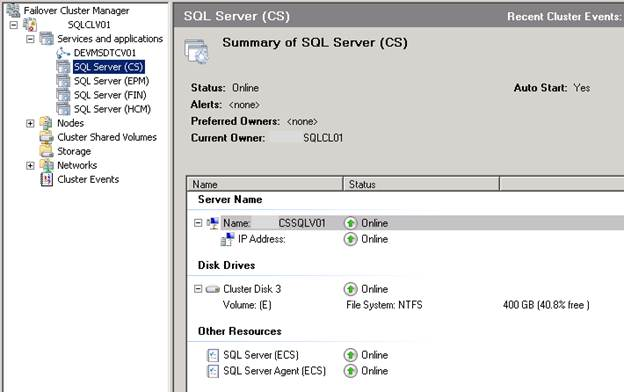
Likewise, if you drilldown from Services and applications and click on an instance name you will see even more information regarding this instance that includes server name, IP address, disk information, and the services that are clustered.

SQL Freelancer SQL Server Cluster Failover Cluster Manager
Click here to view the rest of this post.

SQL Server 2008 Cluster Installation

Here’s a quick and dirty look at how to install a two node Active/Passive SQL 2008 cluster on Windows Server 2008.

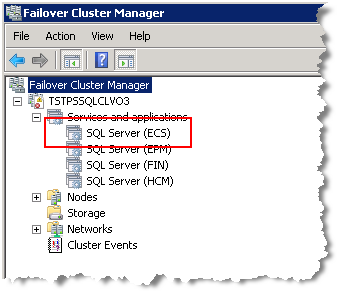
Environment: Two servers (nodes) running Windows 2008 R2 Enterprise Edition and SQL Server 2008 R2 Enterprise named TSTPSSQLCL03 and TSTPSSQLCL04. I’m creating a named instance named TSTECSSQLv01\ECS. The Systems Administrator has already set up the Cluster Name (TSTPSSQLCLv03), storage, and given me the following IP address to configure my named instance: 10.101.1.69.

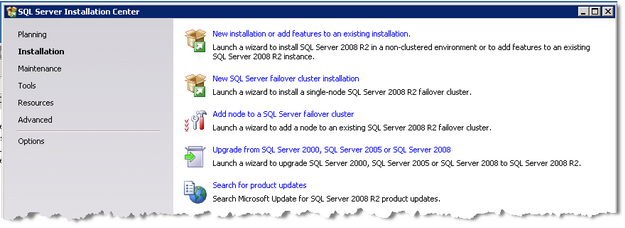
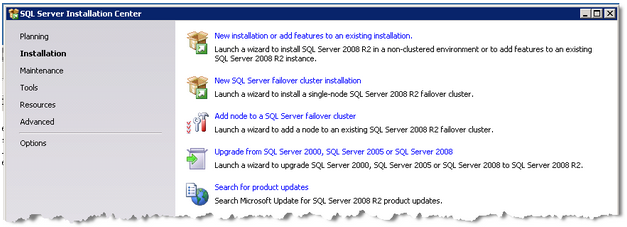
Step 1: On the first node (TSTPSSQLCL03) insert installation media and proceed to the SQL Server Installation Center, Installation, click on New SQL failover cluster installation.

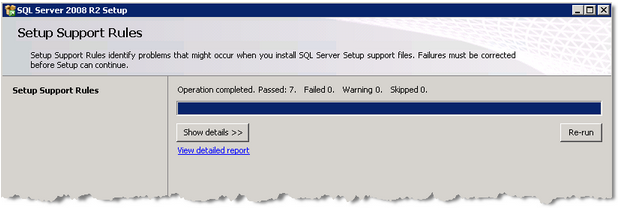
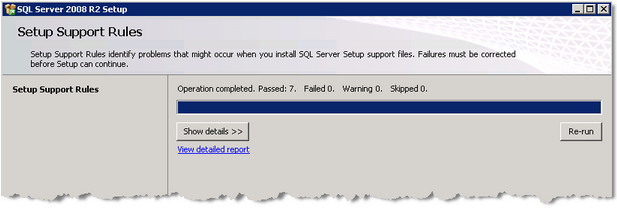
SQL Freelancer SQL Server Cluster InstallationStep 2: A Setup Support Rules check will run to identify problems that might occur when you install SQL Server Support Rules. Click OK.
SQL Freelancer SQL Server Cluster InstallationStep 3: Install Setup Support Rules.
SQL Freelancer SQL Server Cluster InstallationStep 4: Once Setup Support Files install successfully, click Next.
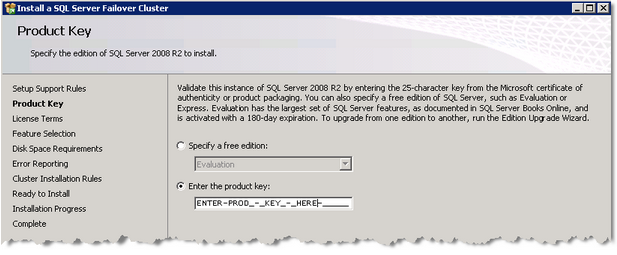
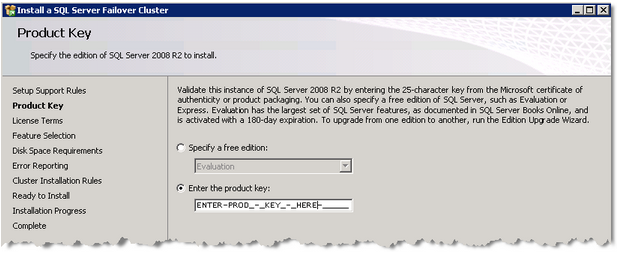
SQL Freelancer SQL Server Cluster InstallationStep 5: Enter Product Key and click Next.
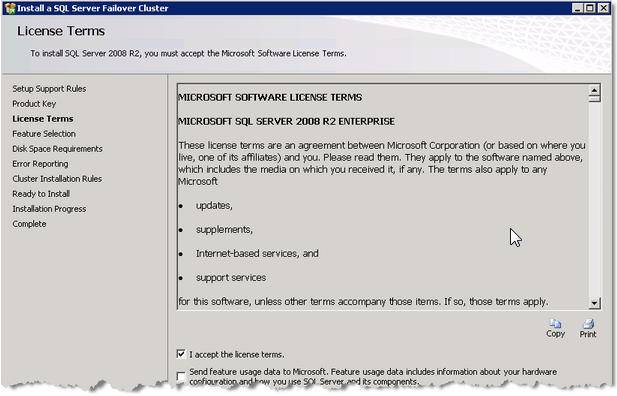
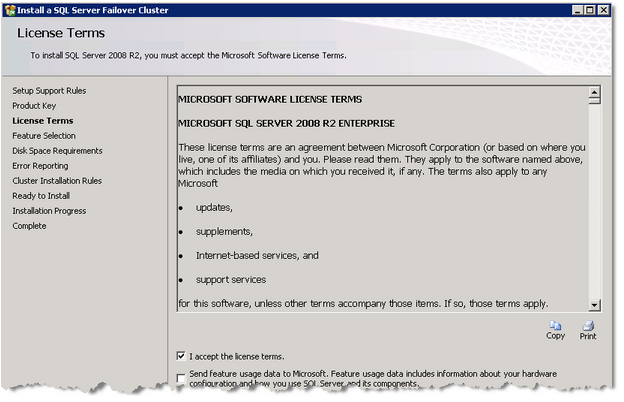
SQL Freelancer SQL Server Cluster InstallationStep 6: Accept the license terms and click Next.
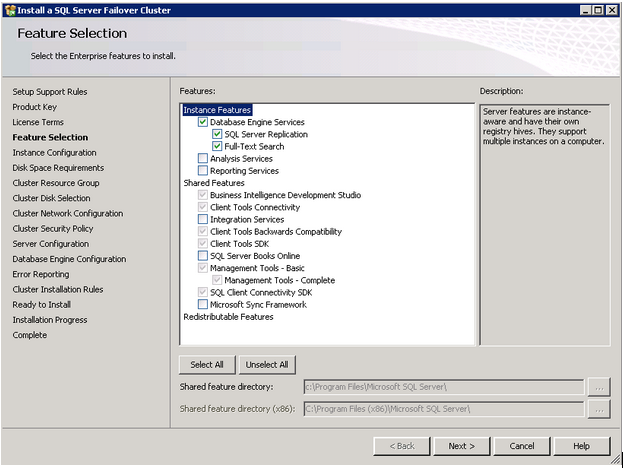
SQL Freelancer SQL Server Cluster InstallationStep 7: On the Features Selection page, select the features to cluster and click Next.
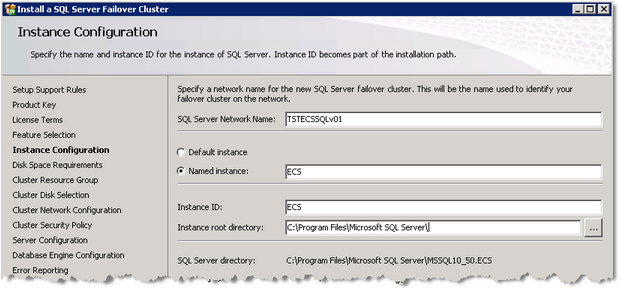
SQL Freelancer SQL Server Cluster InstallationStep 8: On the Instance Configuration page, specify a SQL Server Network Name and choose whether this installation is a default instance or named instance. You can also change the Instance root directory. Click Next.
SQL Freelancer SQL Server Cluster InstallationStep 9: View Disk Space Requirements and click Next.
SQL Freelancer SQL Server Cluster InstallationStep 10: Choose a Cluster Resource Group and click Next.
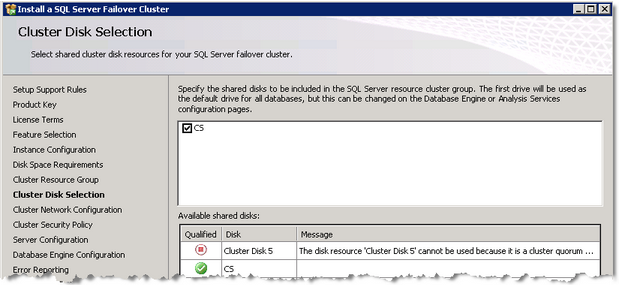
SQL Freelancer SQL Server Cluster InstallationStep 11: Choose a Cluster Disk Selection and click Next. (This should’ve been setup by the System Administrator).
SQL Freelancer SQL Server Cluster InstallationStep 12: On the Cluster Network Configuration page, it’s better to remove DHCP and specify a static IP address. (The System Administrator should be able to give you the IP address) Once specified, click Next.
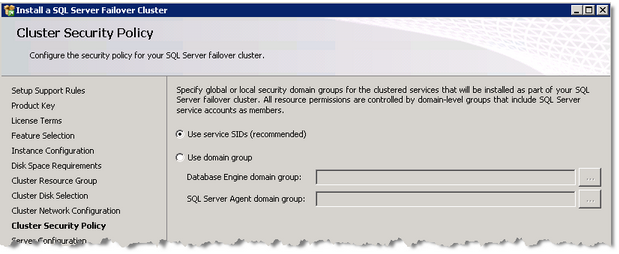
SQL Freelancer SQL Server Cluster InstallationStep 13: Choose a Cluster Security Policy and click Next.
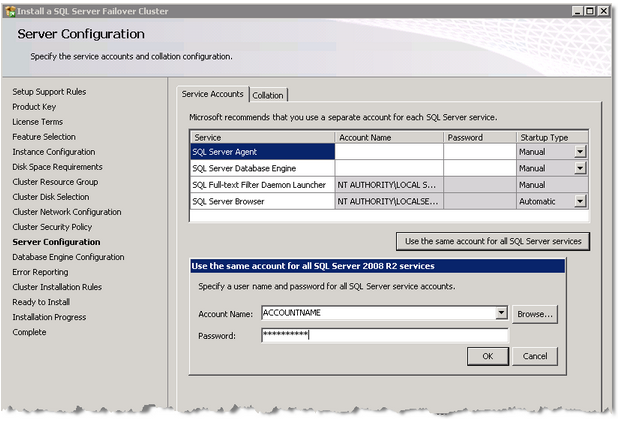
SQL Freelancer SQL Server Cluster InstallationStep 14: Enter service accounts and password for the DB Engine and SQL Agent. You can also use the “Use the same accounts for all SQL Services” button if you want to specify the same account for both services. Click Next.
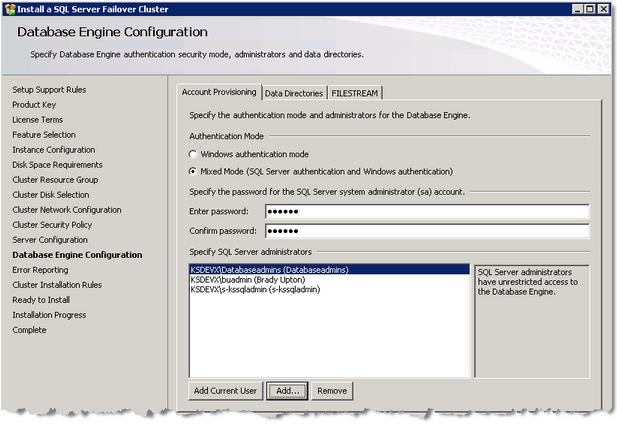
SQL Freelancer SQL Server Cluster InstallationStep 15: On the Database Engine Configuration page, select Mixed Mode and enter a secure ‘sa’ password. Under Specify SQL Server administrators, enter all users that will need sysadmin permissions. Click the Data Directories tab.
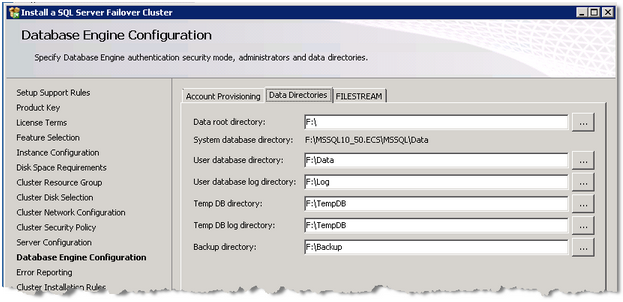
SQL Freelancer SQL Server Cluster InstallationStep 16: Under the Data Directories tab, change the directories to the following and click Next:
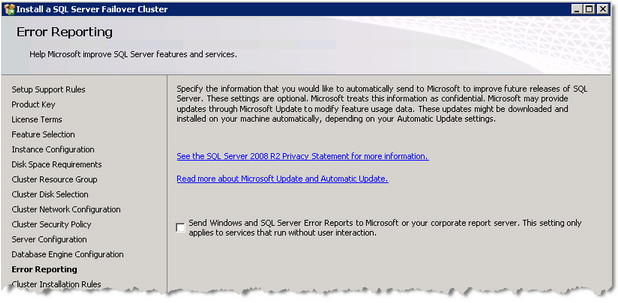
SQL Freelancer SQL Server Cluster InstallationStep 17: View Error Reporting Options and click Next.
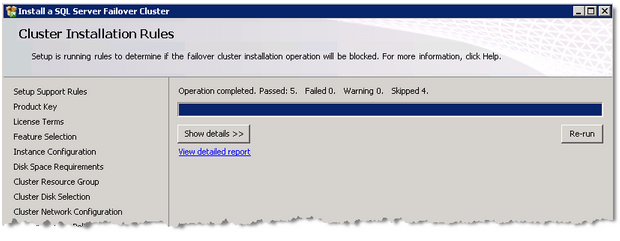
SQL Freelancer SQL Server Cluster InstallationStep 18: A Cluster Installation Rules check will run to determine if the failover cluster installation will be blocked. Once successful, click Next.
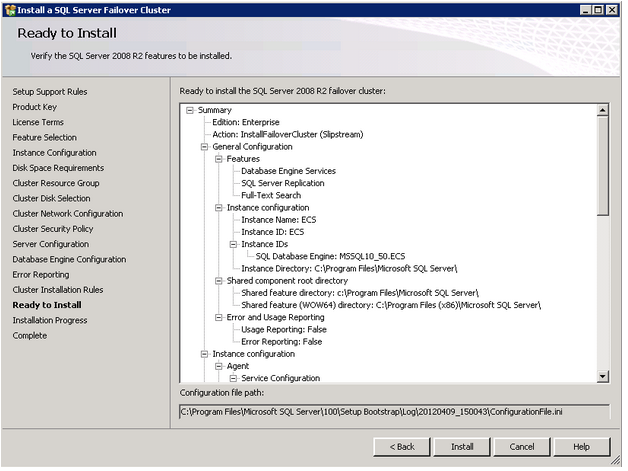
SQL Freelancer SQL Server Cluster InstallationStep 19: Look over the “Summary” page to make sure everything looks ok and click Install.
SQL Freelancer SQL Server Cluster InstallationStep 20: Once the install is complete, click Close. To verify an instance has been created, open Failover Cluster Manager (Administrative Tools) and drilldown under Cluster name.
SQL Freelancer SQL Server Cluster InstallationStep 21: Halfway there.  On the second node (TSTPSSQLCL04) insert installation media and proceed to the SQL Server Installation Center, Installation, click on Add node to a SQL Server failover cluster.
SQL Freelancer SQL Server Cluster InstallationStep 22: A Setup Support Rules check will run to identify problems that might occur when you install SQL Server Support Rules. Click OK.
SQL Freelancer SQL Server Cluster InstallationStep 23: Install Setup Support Rules.
SQL Freelancer SQL Server Cluster InstallationStep 24: Once Setup Support Files install successfully, click Next.
SQL Freelancer SQL Server Cluster InstallationStep 25: Enter Product Key and click Next.
SQL Freelancer SQL Server Cluster InstallationStep 26: Accept the license terms and click Next.
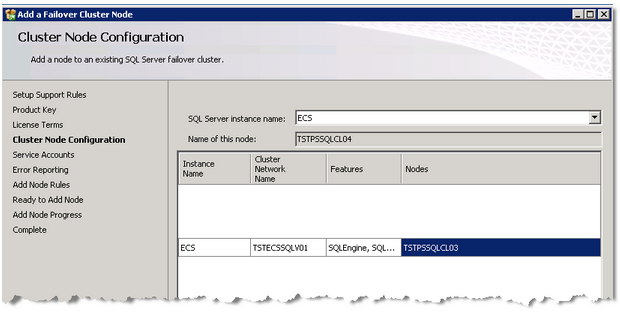
SQL Freelancer SQL Server Cluster InstallationStep 27: Select SQL Server Instance name to add a node to. Click Next.
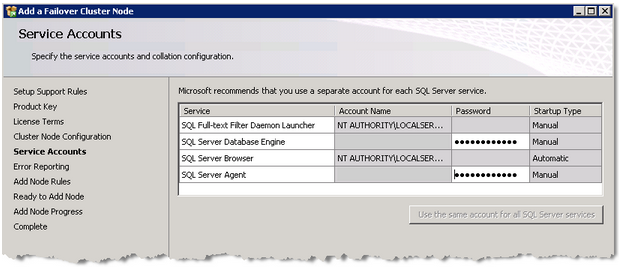
SQL Freelancer SQL Server Cluster InstallationStep 28: Specify Service Account passwords and click Next.
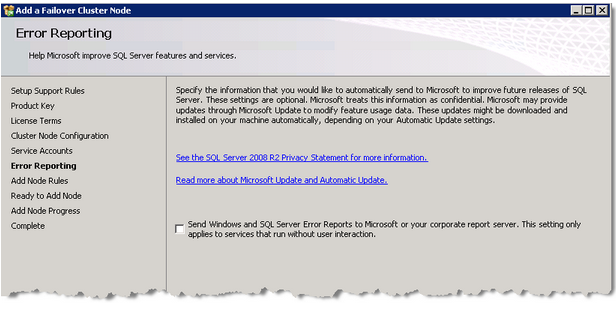
SQL Freelancer SQL Server Cluster InstallationStep 29: View Error Reporting Options and click Next.
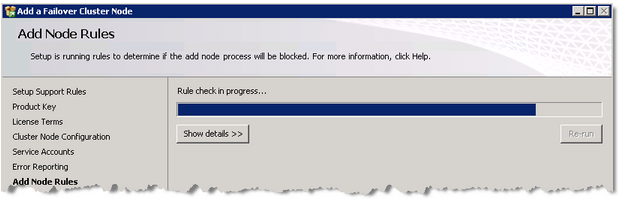
SQL Freelancer SQL Server Cluster InstallationStep 30: An Add Node Rules check will run to determine if the add node process will be blocked. Once successful, click Next.
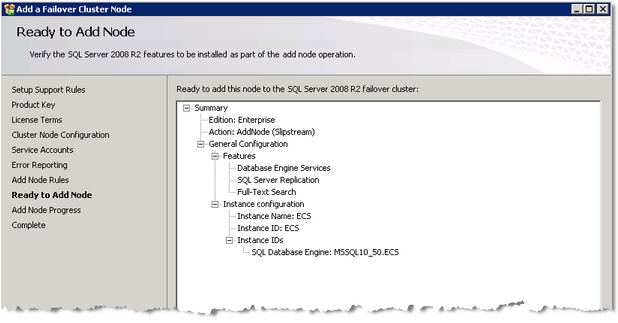
SQL Freelancer SQL Server Cluster InstallationStep 31: Look over the “Summary” page to make sure everything looks ok and click Install.
SQL Freelancer SQL Server Cluster InstallationStep 32: Once installation is complete, click Close. Repeat steps 21 – 31 for each node.


Data Driven Colored Text for Reporting Services Reports

In SSRS you can use data driven expressions to color code certain rows. This post will show you how to accomplish this.

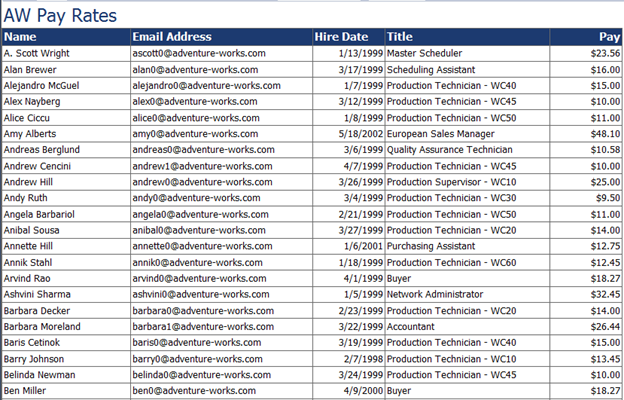
First thing is first. I’m assuming you already have a report created. In this example, I’m using the AdventureWorks database and I’m running a report on Name, Email, Hire Date, Title and Pay Rate:

SQL Freelancer SQL Server SSRS

Formatting Needs

I want to distinguish three different levels of pay. If the Employee makes $10.00 or less I would like to change the text Red. If the employee makes between $10.01 and $20.00 I would like to keep the text Black and if the employee makes more than $20.00 I would like to change the text Green.

Changing Text Color

First, go to the Design tab of Designer view and select all the fields in which the color of text needs to change. In this example, I’ll select all fields.

SQL Freelancer SQL Server SSRS
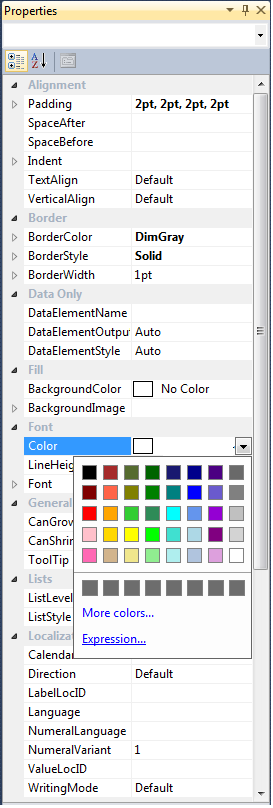
Next, I’ll go to the Properties Window. If you don’t see this window you can choose View, Properties or simply hit F4.

In the Properties Window click the arrow beside Color and choose Expression:

SQL Freelancer SQL Server SSRS

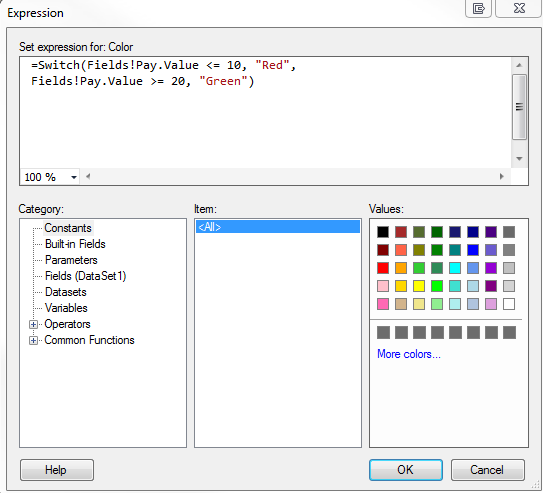
In the Expression box type your VB expression and click OK. In this example I’m using the following:

=SWITCH(Fields!Pay.Value <= 10, "Red", Fields!Pay.Value >= 20, "Green")

SQL Freelancer SQL Server SSRS
Click here to view the rest of this post.

Client Statistics

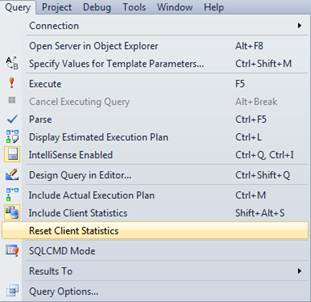
A feature often overlooked while tuning queries is Client Statistics located right on SSMS editor bar.

SQL Freelancer SQL Server Client Statistics
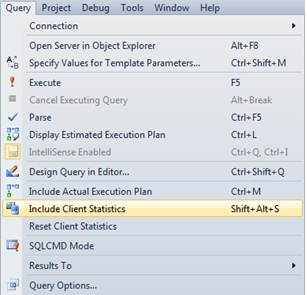
Other ways of opening Client Statistics include:

SHIFT + ALT + S and Menu Bar – Query -> Include Client Statistics

SQL Freelancer SQL Server Client Statistics

Client Statistics is useful when the user needs to gather information about execution times, processing times, the amount of data sent between client and server, etc. it’s very easy to use. Simply turn it on using one of the methods above and execute your query.

In this example I’m using the following query:

SELECT pc.FirstName
,pc.LastName
,pc.EmailAddress
,he.Title
,hh.Rate
FROM Person.Contact pc
JOIN HumanResources.Employee he ON pc.ContactID = he.ContactID
JOIN HumanResources.EmployeePayHistory hh ON he.EmployeeID = hh.EmployeeID
WHERE hh.Rate > 10
ORDER BY hh.Rate

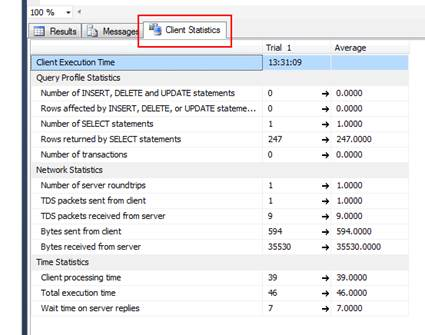
After executing the query you will notice a new tab labeled Client Statistics:

SQL Freelancer SQL Server Client Statistics

After looking at the statistics provided for Trial 1 you can see the processing time = 39ms, execution time = 46ms, etc.

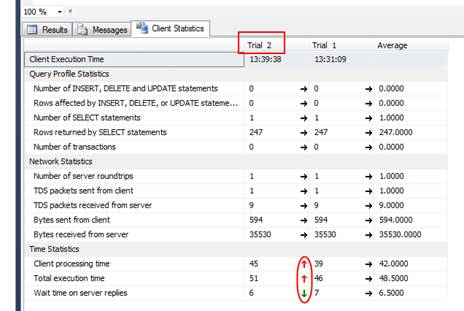
After the running the same query again I get the following results under Trial 2:

SQL Freelancer SQL Server Client Statistics
This time processing time went up to 45ms and execution time went up to 51ms. It also has an average column to compare overall results. The green and red arrows represent differences between trials. Green arrows indicate improved statistics and red arrows indicate degrading statistics.

A max of 10 trials can be run with the 11th trial dropping the 1st trial and so on. To reset statistics, on the menu bar, go to Query, Reset Client Statistics.

SQL Freelancer SQL Server Client StatisticsThis is great when tuning indexes because you can see different statistics as you add/delete indexes.

Querying Active Directory Data from SQL Server

In this post I’ll show you how to query Active Directory using linked servers and the OPENQUERY command.

Create Linked Server

First thing we’ll do is create our linked server, Active Directory Service Interface also known as ASDI, to Active Directory using the code below:

USE [master]
GO 
EXEC master.dbo.sp_addlinkedserver @server = N'ADSI', @srvproduct=N'Active Directory Service Interfaces', @provider=N'ADSDSOObject', @datasrc=N'adsdatasource'
EXEC master.dbo.sp_addlinkedsrvlogin @rmtsrvname=N'ADSI',@useself=N'False',@locallogin=NULL,@rmtuser=N'DOMAIN\USER',@rmtpassword='*********'
GO 
EXEC master.dbo.sp_serveroption @server=N'ADSI', @optname=N'collation compatible',  @optvalue=N'false'
GO 
EXEC master.dbo.sp_serveroption @server=N'ADSI', @optname=N'data access', @optvalue=N'true'
GO 
EXEC master.dbo.sp_serveroption @server=N'ADSI', @optname=N'dist', @optvalue=N'false'
GO 
EXEC master.dbo.sp_serveroption @server=N'ADSI', @optname=N'pub', @optvalue=N'false'
GO 
EXEC master.dbo.sp_serveroption @server=N'ADSI', @optname=N'rpc', @optvalue=N'false'
GO 
EXEC master.dbo.sp_serveroption @server=N'ADSI', @optname=N'rpc out', @optvalue=N'false'
GO 
EXEC master.dbo.sp_serveroption @server=N'ADSI', @optname=N'sub', @optvalue=N'false'
GO 
EXEC master.dbo.sp_serveroption @server=N'ADSI', @optname=N'connect timeout', @optvalue=N'0'
GO 
EXEC master.dbo.sp_serveroption @server=N'ADSI', @optname=N'collation name', @optvalue=null
GO 
EXEC master.dbo.sp_serveroption @server=N'ADSI', @optname=N'lazy schema validation',  @optvalue=N'false'
GO 
EXEC master.dbo.sp_serveroption @server=N'ADSI', @optname=N'query timeout', @optvalue=N'0'
GO 
EXEC master.dbo.sp_serveroption @server=N'ADSI', @optname=N'use remote collation',  @optvalue=N'true'
GO 
EXEC master.dbo.sp_serveroption @server=N'ADSI', @optname=N'remote proc transaction promotion', @optvalue=N'true'
GO

Make sure you change the @rmtuser and @rmtpassword variables to a login and password that has access to your Active Directory.


Querying Active Directory

Once the linked server is created we can now setup our query to return the information we need.

First, you’ll need to ask your Network/Systems Administrator for your LDAP info then we can continue to the query.

Here is how the LDAP connection is broken down:

  • For our example it looks like this: LDAP://DOMAIN.com/OU=Players,DC=DOMAIN,DC=com
  • LDAP://Domain.com – is the name of a domain controller
  • /OU=Players – this is the Organization Unit, in our case (Players)
  • ,DC – this is the Domain Name broken up by domain and extension name
  • So….LDAP://DomainControllerName.com/OU=OrganizationalUnit,DC=DOMAIN,DC=NAME

According to the problem, this user needs to return the companies email addresses and phone numbers. To do this we can use the code below:

(note – you will need to change your domain information for this to work)

SELECT * FROM OpenQuery ( 
  ADSI,  
  'SELECT displayName, telephoneNumber, mail, mobile, facsimileTelephoneNumber 
  FROM  ''LDAP://DOMAIN.com/OU=Players,DC=DOMAIN,DC=com'' 
  WHERE objectClass =  ''User'' 
  ') AS tblADSI
ORDORDER BY displayname

As you can see this query will return Active Directory’s Display Name, Telephone Number, Email Address, Mobile Number, and Fax Number. Also note, that when you query Active Directory it actually creates the SELECT statement backwards. I started the SELECT statement with SELECT displayname… but in the results pane it displayed displayName last as shown below.

SQL Freelancer SQL Server Query Active DirectoryIf you wanted to view more columns for each user we can use the below code to display fields such as: FirstName, Office, Department, Fax, Mobile, Email, Login, Telephone, Display Name, Title, Company, Pager, Street Address, and more.

SELECT * FROM OpenQuery
  ( 
  ADSI,  
  'SELECT streetaddress, pager, company, title, displayName, telephoneNumber, sAMAccountName, 
  mail, mobile, facsimileTelephoneNumber, department, physicalDeliveryOfficeName, givenname 
  FROM  ''LDAP://DOMAIN.com/OU=Players,DC=DOMAIN,DC=com''
  WHERE objectClass =  ''User'' 
  ') AS tblADSI
ORDER BY displayname

SQL Freelancer SQL Server Query Active Directory

You can also filter out columns using a WHERE clause. In this example I only want to return results where users have a fax number.

SELECT * FROM OpenQuery
  ( 
  ADSI,  
   'SELECT streetaddress, pager, company, title, displayName, telephoneNumber, sAMAccountName, mail,  
  mobile, facsimileTelephoneNumber, department, physicalDeliveryOfficeName, givenname
  FROM  ''LDAP://DOMAIN.com/OU=Players,DC=DOMAIN,DC=com''   
  WHERE objectClass =  ''User'' 
  ') AS tblADSI
WHERE facsimileTelephoneNumber IS NOT NULL
ORDER BY displayname

SQL Freelancer SQL Server Query Active Directory

Creating an SSRS Map report with data pinpoints

SQL Server Reporting Services has some cool features such as displaying maps and data points on the maps.  In this post I’ll show how to take a list of addresses and display them as pinpoints on a map in an SSRS report.

With SSRS 2008R2 you have the capability of adding maps to your reports using spatial data. In this tip I’ll show you how to accomplish this.

If you have a table with addresses, zip codes, etc. we’ll need to find the latitude and longitude of each address. You can accomplish this by using a geocoding website. There are many out there but I use http://www.gpsvisualizer.com/geocoder/ because it’s fast and easy to copy and paste multiple addresses into their input box, click “start geocoding” and within seconds it will output latitude and longitude information.

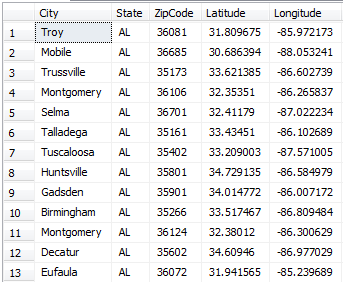
Once you get the latitude and longitude information you can import it into your database. See below for an example of my table of Alabama cities and zip codes with their appropriate coordinates.

SQL Freelancer SQL Server SSRS Maps

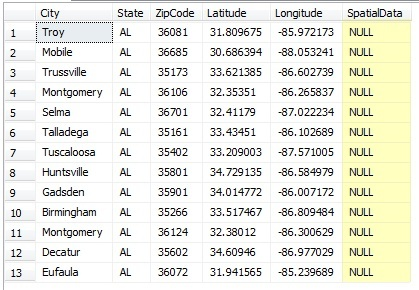
Once you have your coordinates we will need to create a new column with a geography data type that we will add our spatial data into. The following code will accomplish this.

ALTER TABLE ZipCodes ADD SpatialData geography

We should now have a table that looks like below:

SQL Freelancer SQL Server SSRS Maps

Inserting the data into the SpatialData column can be time consuming if you have a lot of records. The best way I have figured out how to do this is to use a basic UPDATE statement. Below is my script I have created for my table for this example.

UPDATE ZipCodes SET SpatialData = 'POINT(85.972173  31.809675)' WHERE ZipCode = 36081 
UPDATE ZipCodes SET SpatialData = 'POINT(88.053241  30.686394)' WHERE ZipCode = 36685
UPDATE ZipCodes SET SpatialData = 'POINT(86.602739  33.621385)' WHERE ZipCode = 35173
UPDATE ZipCodes SET SpatialData = 'POINT(86.265837  32.35351)' WHERE ZipCode = 36106 
UPDATE ZipCodes SET SpatialData = 'POINT(87.022234  32.41179)' WHERE ZipCode = 36701 
UPDATE ZipCodes SET SpatialData = 'POINT(86.102689  33.43451)' WHERE ZipCode = 35161 
UPDATE ZipCodes SET SpatialData = 'POINT(87.571005  33.209003)' WHERE ZipCode = 35402 
UPDATE ZipCodes SET SpatialData = 'POINT(86.584979  34.729135)' WHERE ZipCode = 35801 
UPDATE ZipCodes SET SpatialData = 'POINT(86.007172  34.014772)' WHERE ZipCode = 35901 
UPDATE ZipCodes SET SpatialData = 'POINT(86.809484  33.517467)' WHERE ZipCode = 35266 
UPDATE ZipCodes SET SpatialData = 'POINT(86.300629  32.38012)' WHERE ZipCode = 36124 
UPDATE ZipCodes SET SpatialData = 'POINT(86.977029  34.60946)' WHERE ZipCode = 35602 
UPDATE ZipCodes SET SpatialData = 'POINT(85.239689  31.941565)' WHERE ZipCode = 36072

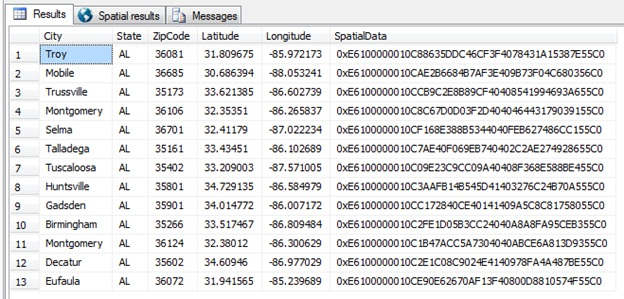
Once you update your table with the spatial data and run SELECT * FROM ZipCodes you should see the following output:

SQL Freelancer SQL Server SSRS Maps
Click here to view the rest of this post.

SQL Server AlwaysOn – Part 2 – Availability Groups Setup

In Part 1 we configured prerequisites for SQL Server 2012 new AlwaysOn and in Part 2 we’ll go over the fun stuff…configuring the High Availability Groups.

Create Sample Database and Create Backups

First thing we need to do is connect to the primary server using SSMS and create two databases and back them up to the network share we created. In this example I’ll create database RammerJammer and RollTide and then create database backups.

SQL Freelancer SQL Server AlwaysON

Specify Name

In SSMS go to Management, right click Availability Groups and click New Availability Group Wizard. Once the wizard appears click Next on the main screen and create a unique Availability Group name on the Specify Availability Group Name screen. I’ll name my group AG-Bama and then click Next.
Select Databases

On the next screen we will need to select our databases that we want added to our availability groups. This screen also has a status column that will let us know ahead of time if our databases meet the prerequisites. I’ll select both databases and click Next.SQL Freelancer SQL Server AlwaysON
Specify Replicas

On the next screen click Add Replica… and connect to the other server (Denali2) Replica Mode can be set to Automatic Failover, High Performance, or High Safety.

  • Automatic Failover: This replica will use synchronous-commit availability mode and support both automatic failover and manual failover.
  • High Performance: This replica will use asynchronous-commit availability mode and support only forced failover (with possible data loss).
  • High Safety: This replica will use synchronous-commit availability mode and support only manual failover.

Connection Mode in Secondary Role can be set to Disallow connections, Allow only read-intent connections, or Allow all connections.

  • Disallow connections: This availability replica will not allow any connections.
  • Allow only read-intent connections: This availability replica will only allow read-intent connections.
  • Allow all connections: This availability replica will allow all connections for read access, including connections running with older clients. For this example, I’ll choose Automatic Failover and Disallow connections to my secondary role and click Next.SQL Freelancer SQL Server AlwaysON

Click here to view the rest of this tip.


New SQL Server AlwaysOn Feature – Part 1 configuration

SQL Server has produced some excellent High Availability options, but I was looking for an option that would allow me to access my secondary database without it being read-only or in restoring mode. I need the ability to see transactions occur and query the secondary database.

Enter SQL Server 2012 AlwaysON High Availability Groups.

The new AlwaysOn feature combines the powers of clustering and mirroring into one High Availability option, but also allows you to interact with the secondary databases something that clustering and mirroring do not allow.  In addition, AlwaysOn Availability Groups allows you to configure failover for one database, a set of databases or the entire instance again something you could not do with database mirroring.  Another feature is that you can create multiple failover targets where in the past database mirroring only allowed one failover partner.

In this tip I’ll show you a basic look at how to setup SQL Server 2012 AlwaysON Availability Groups.  Note that this tip is separated into 2 parts: Part 1 will consist of installing and configuring the prerequisites for AlwaysOn and Part 2 will consist of setting up the Availability Groups and showing how they work.

Let’s get started…

Environment:  I have setup two separate VM’s running in VM Workstation with Windows 2008 R2 Enterprise Edition and SQL Server 2008 R2 Enterprise named Denali and Denali2.

First thing we need to do is make sure both servers have .NET Framework 3.0 Features and Failover Clustering installed. To do this, go to Server Manager, Features, Add Feature. Check .NET Framework 3.0 and Failover Clustering and Install as shown below.

SQL Freelancer SQL Server AlwaysON

Once .NET and Failover Clustering are installed we can configure the cluster. Go to Control Panel, Administrative Tools, Failover Cluster Manager and click Validate a Configuration.

SQL Freelancer SQL Server AlwaysONOn the “Validate A Configuration Wizard” page click Next, then enter the names of the SQL Servers you want to configure. In this example we are using Denali and Denali2.

SQL Freelancer SQL Server AlwaysONClick Next to run through some validation tests. If you receive any errors click View Report to view the errors.

SQL Freelancer SQL Server AlwaysONAs you can see from above I received errors on my validation, because I am only using one network card. This means I have a single point of failure. In a production environment you would want to fix this, but this is only a warning and does not stop us from configuring clustering. From the main screen click “Create a Cluster

SQL Freelancer SQL Server AlwaysONAfter clicking “Create a Cluster” and clicking Next on the main page you should see the “Access Point for Administering the Cluster”. Here is where you will type in the name of your cluster. This doesn’t need to be your server name. Use a name to distinguish this cluster from other clusters. In this example, I’ll use DenaliCluster.

Click here to view the rest of this post.

sp_who

There are numerous ways you can view blocking information but I’ll share the most popular in sp_who and sp_who2.

Like their name implies sp_who and sp_who2 give information about “who” is in your SQL Server as well as other useful information including processes and blocking info.

Below is an example of sp_who running against a SQL Server:

SQL Freelancer SQL Server sp_who

As you can see, sp_who will return SPID, status, loginname, blk, dbname, etc.

spid – The system process ID.
ecid – The execution context ID of a given thread associated with a specific SPID.
status – The process status.
loginame – The login name associated with the particular process.
hostname – The host or computer name for each process.
blk – The system process ID for the blocking process, if one exists. Otherwise, this column is zero.

When a transaction associated with a given SPID is blocked by an orphan distributed transaction, this column will return a ‘-2′ for the blocking orphan transaction.
dbname – The database used by the process.
cmd – The SQL Server command (Transact-SQL statement, SQL Server internal engine process, and so on) executing for the process.